how to
Learn how to do anything in the Feast, food, and recipe scope.
Mixed Vegetable and Bean Curry with Almond Wraps
Gluten Free ✅Vegan ✅Healthy ✅ *** Serves = 3-4 Time to cook = 30-40 mins Yes, I'm back with making some really nice dishes. I really also wanted to eat some wraps but I didn't want them to be too filling and so I decided to ditch the flour. Instead, these are made with almond flour which you can make at home in a food processor by using about 500g of almond and a teaspoon of salt. You just blitz them into a powder.
By Annie Kapur4 months ago in Feast
MANGO CHILL BREW
Can we make mango iced tea that is smooth, fruity, and perfect for warm days. Today we are making a refreshing mango iced tea that is smooth, fruity, and perfect for warm days. This drink combines brewed black tea with ripe mango, creating a balance between natural sweetness and gentle tea aroma. We will guide you step by step, with clear measurements and simple instructions, so we can easily follow along at home. The result is a chilled, fruity drink that feels light, refreshing, and satisfying. Ingredients With Exact Measurements To make this mango iced tea, we need the following ingredients: Tea Base: 500 ml water 2 black tea bags Fruit Mix: 1 ripe mango (about 250–300 g flesh), peeled and diced 1 apple (about 150 g), cut into small cubes 1 green citrus fruit, thinly sliced (optional for freshness) Flavoring: 30 g white sugar (adjust to taste) To Serve: Ice cubes, as needed Each ingredient plays an important role. Mango gives sweetness and body, black tea adds depth, and apple brings a light crisp texture. Step 1: Brew the Black Tea Base First, we pour 500 ml of water into a saucepan Step 1: Brew the Black Tea Base First, we pour 500 ml of water into a saucepan and heat it until it reaches a full boil. Once the water is boiling, we add 2 black tea bags. We gently move the tea bags up and down about 10 times to release flavor faster. Then we turn off the heat and let the tea steep for 10 minutes. This resting time helps develop a stronger aroma and smoother taste. After steeping, we remove the tea bags and pour the tea into a clean bowl. We let it cool down naturally to room temperature before using it. Step 2: Prepare the Mango Mixture Next, we prepare the fruit blend. We place the diced mango into a blender first. Then we pour in the cooled black tea. After that, we add 30 g of white sugar. We blend everything until the mixture becomes smooth and evenly combined. The texture should be slightly thick and silky, with a bright golden color. At this stage, we already get a fruity tea base that smells sweet and fresh. Step 3: Prepare the Fresh Fruit Pieces While the blended mixture rests, we prepare the extra fruit toppings. We cut 1 apple into small cubes to add a crisp texture. If we are using citrus, we slice it into thin pieces for a light refreshing taste. These fresh fruits will add contrast in texture and make the drink more lively when served. Step 4: Assemble the Drink Now we start building the final drink. We take a tall glass and fill it with ice cubes. Then we pour in the mango tea mixture until the glass is about 80% full. After that, we gently add apple cubes and citrus slices into the glass. This helps create layers of flavor and texture. As the ice slowly melts, the drink becomes cooler and slightly lighter in taste, making it very refreshing. Step 5: Final Mixing and Serving We gently stir the drink once to combine the flavors without breaking the fruit pieces too much. Now the mango iced tea is ready to enjoy. It should taste fruity, smooth, slightly sweet, and very refreshing. We can serve it immediately while it is cold to enjoy the best flavor. Tips for Better Flavor Balance We can adjust this recipe based on personal preference: For stronger mango flavor, use more mango flesh For lighter sweetness, reduce sugar to 20 g For a fresher taste, add a few drops of citrus juice For a richer texture, increase mango amount slightly Using ripe mango is important, as it gives a naturally sweeter and smoother taste without needing too much sugar. A Simple Drink We Can Enjoy Anytime Lykkers, this mango iced tea is a simple yet refreshing drink we can easily make at home. With just a few ingredients and clear steps, we create a tropical-style beverage that feels light and enjoyable. We hope this step-by-step guide helps you enjoy the process of making it. Try it at home, share it with friends or family, and enjoy every chilled sip together.
By Muhammad Talha5 months ago in Feast
HOME MADE PIZZA NIGHT
Simple dough , fresh toppings and fool proof baking steps . Simple dough , fresh toppings and fool proof baking steps The sound of dough hitting a floured counter has its own kind of promise. On weekends, when the oven warms up and the kitchen smells faintly of yeast and olive oil, making pizza at home feels less like cooking and more like building something from scratch. You control the crust, the sauce, the toppings—every detail shaped by your hands. If you've been relying on delivery, this guide will walk you through exactly what you need, how to do it, and what to avoid. Ingredients and Equipment 1. Basic dough ingredients :- You only need a few pantry staples: All-purpose flour – 3 cups (about 375 grams) Warm water – 1 cup (around 40°C, not hot) Active dry yeast – 2 1/4 teaspoons Olive oil – 2 tablespoons Salt – 1 teaspoon Sugar – 1 teaspoon The sugar feeds the yeast, helping it activate. The water should feel warm to the touch but not hot, or it may damage the yeast. 2. Simple sauce and toppings :- Canned crushed tomatoes – 1 cup Garlic – 1 clove, minced Olive oil – 1 tablespoon Salt and dried oregano – to taste Fresh mozzarella – 200 grams, sliced Vegetables such as mushrooms, bell peppers, onions, or spinach Keep toppings balanced. Too many will weigh down the crust and prevent even baking. 3. Tools :- Large mixing bowl Measuring cups and spoons Rolling pin (optional) Baking tray or pizza stone Parchment paper A pizza stone helps create a crisp base, but a regular baking tray works well if preheated. Step-by-Step Process 1. Prepare the dough :- In a bowl, combine warm water, sugar, and yeast. Let sit for 5–10 minutes until foamy. Add flour, salt, and olive oil. Mix until a rough dough forms. Turn the dough onto a clean surface and knead for 8–10 minutes. Press forward with the heel of your hand, fold back, rotate, and repeat. The dough should become smooth and elastic. 2. Let it rise:- Lightly oil a bowl. Place the dough inside and cover with a clean towel. Let it rise in a warm spot for 60–90 minutes, or until doubled in size. If your kitchen is cool, place the bowl in an oven that's turned off but has the light on. Warmth encourages proper fermentation. 3. Make the sauce:- Heat olive oil gently in a small saucepan. Add minced garlic and cook briefly until fragrant. Stir in crushed tomatoes, salt, and oregano. Simmer for about 10 minutes to thicken slightly. Allow it to cool before spreading on the dough. 4. Shape and assemble:- Preheat the oven to 230°C (450°F) for at least 20 minutes. Punch down the risen dough and divide if making smaller pizzas. Roll or stretch the dough into a circle about 1/4 inch thick. Transfer to parchment paper. Spread a thin layer of sauce, leaving a 1-inch border. Add mozzarella and chosen vegetables evenly. 5. Bake properly:- Slide the pizza onto the preheated tray or stone. Bake for 10–14 minutes. Watch for bubbling cheese and a golden crust edge. Rotate halfway through baking if your oven heats unevenly. Precautions for Better Results 1. Avoid excess flour:- Using too much flour during shaping can make the crust dry. Lightly dust the surface instead of coating it heavily. 2. Don't overload toppings:- A thick pile of vegetables releases moisture and prevents crispness. Aim for a balanced layer so heat circulates properly. 3. Preheat thoroughly:- A fully heated oven is essential. A lukewarm oven leads to pale crust and uneven cooking. 4. Use fresh ingredients:- Fresh mozzarella melts smoothly and creates a creamy texture. If it releases too much liquid, pat it dry before placing on the pizza. 5. Rest before slicing:- Let the pizza sit for 2–3 minutes after baking. This allows the cheese to set slightly, making cleaner slices. Making pizza at home isn't just about saving money or experimenting with toppings. It's about hearing the gentle sizzle as it bakes and pulling out a crust that crackles when cut. Once you've shaped your own dough and watched it rise under a simple kitchen towel, store-bought versions start to feel a little distant. The next quiet evening could easily become your own pizza night tradition.
By Muhammad Talha5 months ago in Feast
CAN You Do It?
There are times I stubbornly follow my own rules: like driving on unknown highways where the signs are few, satellite connection is uncertain, and the local businesses are closed and I just decide to go straight until the road ends sure that I will get somewhere eventually.
By Judey Kalchik 5 months ago in Feast
Refreshing Courgette Curry
Time: Up to one hour Serves: 2-4 people I'm serving this with a roasted pepper, some punchy coleslaw (you can probably still see the recipe for that on my Facebook) and a mixed bean salad. This is a healthy, vegan lunchtime recipe packed full of vegetables and rich in flavour. There's again, no onions and garlic involved because honestly it's too hot and I don't need my house to smell like that right now. But that doesn't mean we can't have a gorgeous scent and a tasty dish.
By Annie Kapur5 months ago in Feast
White Chocolate and Lemon Vegan Loaf Cake
I've been making more bean curry and cauliflower rice today and if you're interested in clean vegan cooking (I'm not a vegan, I just don't eat a lot of meat nowadays) then check out the recipe for this delicious dish below...
By Annie Kapur5 months ago in Feast
Spain's National Treasure
How to Catch a Husband with Paella You heard it here first, ladies. It is possible to land a man with paella. Even if you are a horrible cook, it is foolproof. The adage that you catch a man through his stomach is absolutely true. And there is an added surprise. He never has to eat it.
By Alexandra Grant5 months ago in Feast
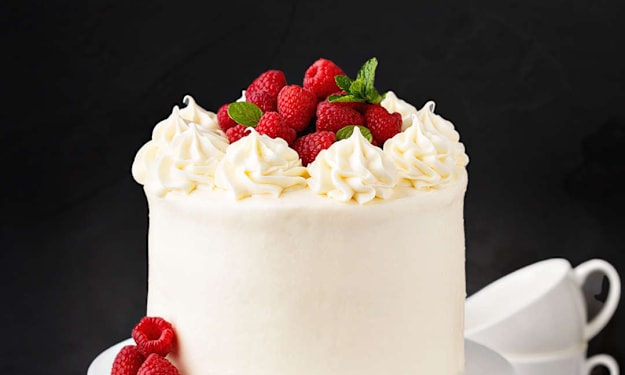
Vanilla Raspberry Cake
Vanilla Raspberry Cake Learn how to make delightful vanilla raspberry cake . The vanilla raspberry cake is a soft, layered dessert made with fluffy vanilla sponge, fresh raspberries, and a creamy frosting. It has a light texture, gentle sweetness, and a refreshing fruity flavor that makes it suitable for celebrations or simple homemade treats. We love this cake because it is easy to assemble, visually beautiful, and balanced in taste. The vanilla base brings softness, while raspberries add a natural fresh note that keeps every bite interesting. Ingredients We Need For The Vanilla Sponge Let’s prepare everything clearly before starting :- 3 large eggs 1.5 cups sugar (300g) 3 cups all-purpose flour (375g) 1 tablespoon baking powder 1/4 teaspoon salt 3/4 cup unsalted butter (170g, softened) 1 cup milk (240ml, divided) 2 teaspoons vanilla extract These ingredients help us create a soft sponge that is stable enough for layering. Step-By-Step Vanilla Sponge Preparation Preheat the oven to 350°F (175°C). Prepare two 8 or 9–inch round cake pans. Grease them lightly, line the bottom with baking paper, grease again, then dust with flour. In a large bowl, mix flour, sugar, baking powder, and salt evenly. Add softened butter and half of the milk (120ml). Mix on low speed first, then increase to medium until the texture becomes smooth and creamy. In another bowl, whisk eggs, vanilla extract, and the remaining milk until combined. Add the egg mixture into the batter in three portions. Each time, mix for about 20 seconds before adding more. Scrape the sides of the bowl to ensure even mixing. Divide the batter evenly into the prepared cake pans. Baking And Cooling The Cake Layers We bake the cakes for 25 to 35 minutes. To check if they are ready, insert a toothpick into the center. If it comes out clean, the cakes are fully baked. After baking, let the cakes rest in the pans for 10 minutes. Then carefully remove them and place them on a cooling rack. We wait until they are completely cool before adding frosting to avoid melting or sliding. Ingredients For Raspberry Cream Frosting 2 cups fresh raspberries 3 cups powdered sugar 1.5 cups unsalted butter (room temperature) 8 oz cream cheese (softened) 2–3 tablespoons lemon or lime juice 1/2 teaspoon salt This frosting is creamy, slightly tangy, and naturally fruity. Step-By-Step Raspberry Frosting Preparation Add 1 cup raspberries and citrus juice into a small saucepan. Heat on low for 6–7 minutes until raspberries soften. Mash the mixture and strain it through a fine sieve to remove seeds. Let the raspberry puree cool completely. In a mixing bowl, beat butter, powdered sugar, and salt until fluffy (about 2–3 minutes). Add cream cheese and continue mixing until smooth. Slowly add raspberry puree, one spoon at a time, while mixing. Continue beating until the frosting becomes light pink, smooth, and creamy. How We Assemble The Vanilla Raspberry Cake? Slice each cake layer horizontally to create thinner layers for better texture. Cut the remaining fresh raspberries in half for filling. Place the first layer of sponge on a serving plate. Spread a thin layer of frosting evenly on top. Add a layer of raspberries. Place the next sponge layer on top and repeat the process until all layers are stacked. Cover the entire cake with remaining frosting, smoothing the top and sides evenly. For decoration, place frosting into a piping bag and create simple swirls on top. Finish by placing fresh raspberries in the center for a clean and natural look. Final Thoughts On Our Baking Moment This vanilla raspberry cake is soft, creamy, and refreshing, with a perfect balance between sweetness and fruity freshness. Every layer brings a different texture, and every bite feels light but satisfying. When we follow each step carefully, we can create a homemade cake that feels special without being complicated. Lykkers, this is the kind of dessert that makes simple moments feel a little more joyful.
By Muhammad Talha5 months ago in Feast