


How to Bake Bread
By Ofoni Dennis

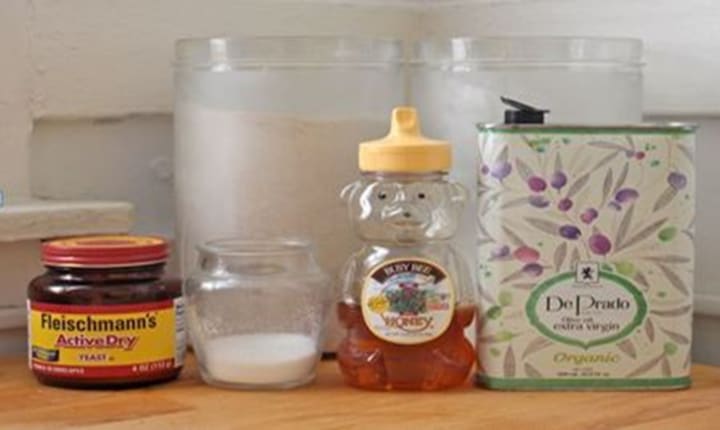
Step 1: Ingredients
• 1 cup of warm water
• 1 tablespoon of oil (whatever you'd like; I normally use vegetable oil)
• 1 tablespoon of honey or white sugar
• 1 teaspoon of salt
• 2 teaspoons of yeast
• 1 cup of whole wheat flour
• 1 cup of all-purpose flour
• Additional flour for kneading in/dusting or rice floor, (any floor of your choice)
• 2 tablespoons of yeast
• 1 cup of all-purpose flour
• additional flour for kneading in/dusting
You will, however, need to acquire some cooking spray, a sizable bowl for mixing, a loaf pan that can hold at least 1.5 pounds of food (or a larger capacity, depending on what you plan to make), as well as measuring cups and spoons.
Step 2: Feeding the Yeast

Either let the yeast soak in water or give it some food.
Before you do anything more, you are going to give it a chance to consume its food for around a half an hour. Keep in mind that you can let it sit for a longer period of time in order to achieve bread with a stronger yeasty flavour; however, you will also need to add additional flour to the yeast mixture at a later time.

A large bowl should have one cup of warm water poured into it, and then two teaspoons of yeast should be sprinkled in it. After that, add one tablespoon of oil, followed by one tablespoon of honey (Or even refined sugar!) Combine these ingredients and stir them together until the yeast and honey/sugar are dissolved. After that, add one cup of whole wheat flour and one teaspoon of salt, and thoroughly combine the two ingredients. After ensuring that all of the ingredients are adequately soaked, cover the bowl with a fresh cloth or some saran wrap and step away for around half an hour.
Step 3: Add the Regular Flour

At this stage, your yeast mixture will likely be quite huge, and there is a good probability that you may observe some beautiful bubbles.
After stirring, add one cup of all-purpose flour to the mixture. If you've only let the yeast 30 minutes to work its magic, the mixture should have formed a ball and pulled away from the sides, just like in the example above.
If you give the yeast a little bit more time to ferment the mixture, you could find that you need to add a little bit more flour. Continue adding ingredients and blending them together until the mixture comes away from the sides of the bowl and is no longer too wet. It will still be fairly moist and crumbly, but that is perfectly acceptable.
Step 4: Kneading

In the very final step, you will see that I did not add a significant quantity of all-purpose flour. That is because you are going to work it in with your hands later on! In the process of creating bread, it has been demonstrated via several trials that it is much more successful to knead in the additional flour rather than attempt to mix it in. If you do it in this manner, the bread dough will only take on as much flour as it can manage, which prevents you from accidentally mixing in too much and producing bread that is quite dense.
Dust a big work surface as well as your hands with flour. Remove a portion of the dough and place it on the working surface. In addition, dust the surface of the dough with a tiny bit of flour.

While you are kneading the dough, you will need to pause and add flour quite a few times. You should knead the dough for no more than eight minutes (use a timer!).

To knead the bread, begin by pressing away from you with the heels of your hands. Next, rotate the dough so that it is facing you by ninety degrees, fold it over, and press it once more with the heels of your hands.

Wait for the dough to absorb all of the flour that is on the work surface as well as on your hands. If the dough seems wet and sticky, add extra flour to your hands as well as the work surface. Proceed in this manner until the dough begins to develop truly elastic properties and becomes smooth. This will signify that it is almost finished! When the dough is finished, it won't become moist and sticky quickly after you run out of flour, and the exterior will be beautiful and smooth. This is how you'll know it's ready to be used. When you knead the dough, it will not become crumbly and it will not have many lines.
Step 5: First Rise

Put some flour in the bottom of the basin that the dough was originally mixed in, and spread it around. Put the ball of dough you just made into the bowl.
You'll also want to dust a little flour on the surface of the dough before you proceed.
Repeat the process of covering it with a clean towel or saran wrap, and then placing it somewhere warm. My habit is to place mine on the heated surface of the top of the refrigerator, the top of the stove or any other warm surface.

It is important to let the dough rise until it is at least twice as big as it was when you started. This should take between 30 and 45 minutes to complete. (It can take longer if it's cold).
Step 6: Punch It Down

Take the dough out of the bowl, and then punch it to remove any air pockets. Just keep punching.
If you were feeling horrible about something, perhaps it's because you don't even comprehend what you're doing, you will definitely feel better later; you are familiar with how things typically turn out.
Step 7: Second Rise + Preheating

Roll out the dough into a loaf-like shape on a floured surface. Your loaf pan should be able to accommodate it without any problems.
The interior of the loaf pan should be coated with cooking spray (or rubbed with a little amount of oil or butter), and then the dough should be placed within. Now you need to wait for this to rise until it is so high that it overflows the loaf pan.

During this time, I prefer to get the oven ready by preheating it to 350 degrees Fahrenheit. Your kitchen will become warmer as a result, which will hasten the process of the dough rising.
Step 8: Baking + Cooling
When the loaf has finished rising and the oven has reached the desired temperature, it is time to place the loaf inside.
Bake it for 30 to 40 minutes on a rack in the centre of the oven after you've placed it there. Now comes the part when you have to learn by doing and making mistakes!
I started out by baking some of my loaves for thirty minutes, but it turned out that this was not enough time. Even after they had cooled, the centre of them retained a good deal of their moisture. Therefore, I conclude that the best course of action is to bake them for a total of forty minutes. However, this will largely be determined by your oven! The more bread you bake, the more you'll understand how this works.
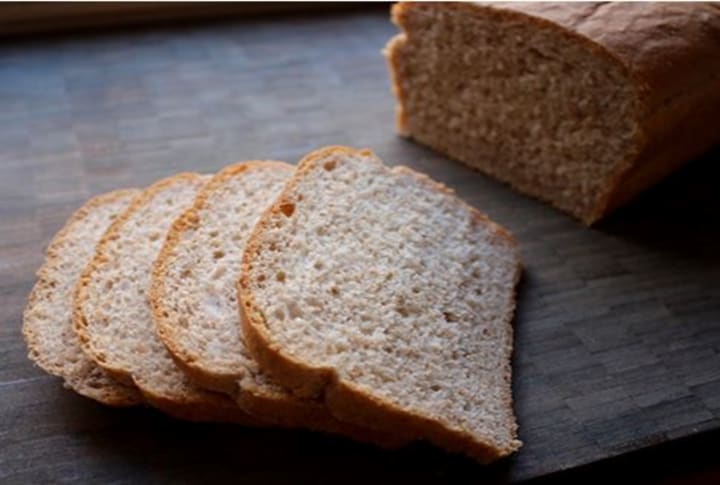
After removing the loaf from the oven, you will need to turn it out of the pan and place it on a baking rack so that it may cool down completely. Although you can have it when it is still warm, I believe that it maintains its form and flavour even better after being refrigerated for a few days.
Step 9: Storing Objects and Consuming Food
Once the bread has reached room temperature, you can wrap it in freezer paper and put it away in a cold location to keep it fresh.
This bread is perfect for making sandwiches. Toasted, with some butter and honey spread on top, it's also one of my very favorite ways to eat it.
Remember practice makes you a butter chef!
Enjoy
From Aurora’s Kitchen
About the Creator
Ofoni Dennis
I love to write content that is both interesting and captivating to a reader.
I make sure that every piece, whether it's a blog post, an article, social media material, is thoroughly researched, thoughtfully organized, for maximum impact.
Keep reading
More stories from Ofoni Dennis and writers in Feast and other communities.
4 coffee-producing countries
Coffee, the aromatic elixir that fuels mornings and fuels creative endeavors, has a fascinating journey from bean to cup. But have you ever wondered where your daily dose of energy originates? This exploration delves into the top five coffee-producing countries, each with its unique history, cultivation methods, and coffee characteristics.
By Moharif Yulianto3 days ago in Feast
The Power of AI: From Science Fiction to Everyday Reality
Artificial Intelligence (AI) has transitioned from the realm of science fiction to become an integral part of our everyday reality. Once a futuristic concept confined to the pages of novels and the screens of movies, AI now permeates various aspects of modern life, revolutionizing industries, shaping economies, and impacting society in profound ways. In this exploration, we delve into the journey of AI, tracing its evolution from fiction to reality and examining its transformative power across different domains.
By Paramjeet kaur7 days ago in Feast


Comments (1)
i like your post, its simple and easy to use