
Make Your Podcast Sound Professional—Without Spending a Fortune
How to take an average microphone to the next level


There are no more excuses for poor-sounding audio. The technology - and costs - have improved so much that inferior sound should be a thing of the past.
Whether you podcast, screen share, live stream, or create video/YouTube: audio is king. With video, I would argue it's even more important than image quality.
If I hear a podcast with poor sound: I'm out. Quality audio can have the biggest impact on how your content is perceived and consumed.
I've been podcasting for six years and have recorded hundreds of shows. Even if you're not an audiophile, there are some simple things you can do to improve the audio of your content.
A Decent Microphone
This is a giant topic on its own, so we'll try to keep things simple. Make note that I said "decent" microphone, and not the "most expensive" one.
You no longer have to spend a fortune to get quality. Ultimately, you need to find what works best for your situation.
The thing is, even average microphones have much better sound quality than even a few years back. There are many plug-and-play options that not only sound great but are very affordable.
If you record a podcast just once a week, you can keep things simple. If you host a live stream every day, you may want higher quality. To keep things as simple as possible, a USB microphone will provide you with great sound quality.
A USB mic also gives you more recording options as you can use laptops, tablets, and even your phone to record your audio.
Audio snobs may look down their noses at a USB mic. The pros will use XLR mics with mixers and high-end software, but you can get pretty close to that sound with a decent USB mic.
I started with a Blue Snowball, which is one of the standard go-to's for beginners. I then spent a few years recording in a professional studio with high-end XLR mics. Today, I use a simple Rode NTUSB Mini. It's an amazing mic, and even though I now record at home, I don't notice any real difference from the studio recordings.
Decide on your needs, budget, then find the best mic possible for your situation. Don't be afraid to go with a simple USB option. As mentioned, microphones are a giant topic, so start with some YouTube videos to get reviews and insights into which will work best for you.
The key takeaway is that simple is still fine, and the rest of this article will be about how to make that mic sound even better.
Speak on an Angle
Speaking at an angle can help take too much air, or the "plosives," out of your audio. Plosives are those 'b' and 'p' words that cause a pop of air into the mic and can mess up your sound quality.
The popping sounds can play havoc with audio levels and create a poor experience for the listener - especially if they listen on headphones. A pop filter is the easiest way around this. You can find them cheap online, or even go MacGyver-style and make one with a pair of pantyhose and a coat hanger.
With or without a pop filter, when you speak at a slight angle to the microphone, you take away most of that plosive sound. Speaking at a slight angle can also help make your audio more balanced and cleaner.
Distance From the Mic
The general rule of thumb is to stay 6–12 inches back from the mic. I like to be a bit closer. I tend to be around four inches away. The closer you get, the more low frequency you'll get. This creates a deeper, more bassy sound which works well for podcasting.
The farther back you are, the louder you may have to speak. But you don't want to extend your voice too much or you'll lose that warmness. The farther back you are, the more room sound the mic may pick up, too.
This will have to be something you experiment with to find the sound you're looking for. It will depend on the medium you work in. I've had some sound engineers tell me you should be four-fingers away from the mic.
I've found this to work pretty well for podcasts but try out some different mic placements to see what you like best.
Drink Water
This has been really helpful. When you get on a roll while your record, your mouth will dry out quicker than you realize. You don't want to stop your flow, but make it a point to get some sips of water. Hit pause, or just edit out the portions when you take a drink.
When your mouth gets dry, it can create a lot of mouth noises including smacking sounds, clicks, and saliva noises. You may not notice this when recording, but a good microphone picks up all those sounds.
Drink some water beforehand and keep a glass nearby to sip on while you record. It can also help to chew gum beforehand. Besides helping with dry mouth, chewing gum warms up the mouth, jaw, and tongue to help you enunciate and project your voice.
Stand Up When You Record
This is another tip I've found to make a big difference. When you stand up, you become more active and engaged. This can bring more energy to your voice. When you sit down, you can get too comfortable, and this may diminish your tone and expressiveness.
I feel more engaged when I stand up to record, and I think this translates into my shows. I think my natural voice isn't very expressive and my tone and cadence are on the duller end, so this has helped a lot.
Some reviewers have remarked that I sound more excited and engaged than other shows they listen to and I chalk that up to standing. And maybe the three Red-Bulls I shotgunned pre-show.
Simple Mixing to Make Your Audio Sound Great
Another giant topic, but let's keep things simple. I record with Garageband. It's free, and still a powerful recording software. When I was in the studio, I would record on a Mac, but since the pandemic, it forced me to record at home. I would just use an iPhone or tablet, and I've actually liked this better.
Whether you're on a phone, desktop, laptop, or tablet, the postproduction of your audio can make a massive difference. I'll focus on Garageband but this info can apply to other editing software.
With Garageband, the easiest thing you can do is set the audio recorder to the "narrator" setting. This will give your audio some more compression and give you that rich, full sound.
You can simply use the narrator setting and move on as it provides great-sounding audio. If you want to improve things even further, you can change the EQ settings.
For the noise gate (which helps eliminate dead air sound) I have it at around -20 dB.
On Garageband for iOS, there is a visual EQ control to adjust your settings. You'll find it by tapping the gear icon in the upper right corner and going to "track controls." You then go to "plug-ins and EQ" and open up "visual EQ."
Here's a screenshot of how I adjust the EQ for my shows:
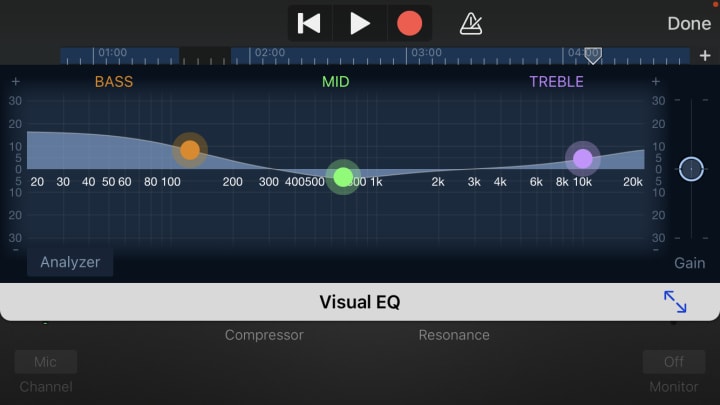
Again, I'm not an audio expert, but his type of balance works well for the sound I'm going for. The bass on the left is relatively high, but I keep the treble a little lower to keep things sounding full.
I've found that the mid-range works well at this setting. It gives some brightness and clarity to the sound but doesn't take away from the lower-frequency bass.
I still experiment with these levels such as lowering the bass and bringing the mid-range a bit higher. I'm not sure if listeners can even tell the difference, but I want things to sound as good as possible.
Key Takeaways
The microphone I use is pretty good. It cost around $120, which wasn't too bad. It sounded great right out of the box, but I've found that these tips - especially the EQ - make it sound at least as good as when I was in the studio.
With the advancements in mic technology, you'll be in good shape no matter what you get. An average mic can easily be taken to the next level with these tips.
No matter what you choose to record with, take your time to learn some good mic techniques, play around with mic positioning, and even try standing while you record.
Post-production is easier than ever, and there's not a lot you need to do. But if you want your audio to sound as professional as possible, take your time to experiment with EQ levels to dial in that exact sound you're going for.
About the Creator
James Logie
Personal trainer, nutrionist, traveler, blogger, podcaster, lover of the 80s.
Keep reading
More stories from James Logie and writers in Lifehack and other communities.
I Had to Delete the Weather App: and Here's Why
Do you obsessively check the weather like I do? I like to get a look at what the day and week have in store weather-wise. But after a while, I realized that using the Apple weather app was causing me a bit of anguish.
By James Logie3 years ago in Lifehack
What you don't know about hearing aids
The event unfolds in a spacious auditorium, bathed in soft, ambient lighting. Attendees trickle in, their anticipation palpable as they settle into their seats, eagerly awaiting the commencement of the presentation. At the front of the room, Vivian Lim, the esteemed speaker, and Michael Nystrom, the diligent reviewer, stand poised and ready to embark on a journey into the fascinating realm of hearing loss and assistive technologies.
By Ugochukwu victor5 days ago in Lifehack


Comments
There are no comments for this story
Be the first to respond and start the conversation.