
NOT the Ultimate Guide to Recurve Archery Equipment 1
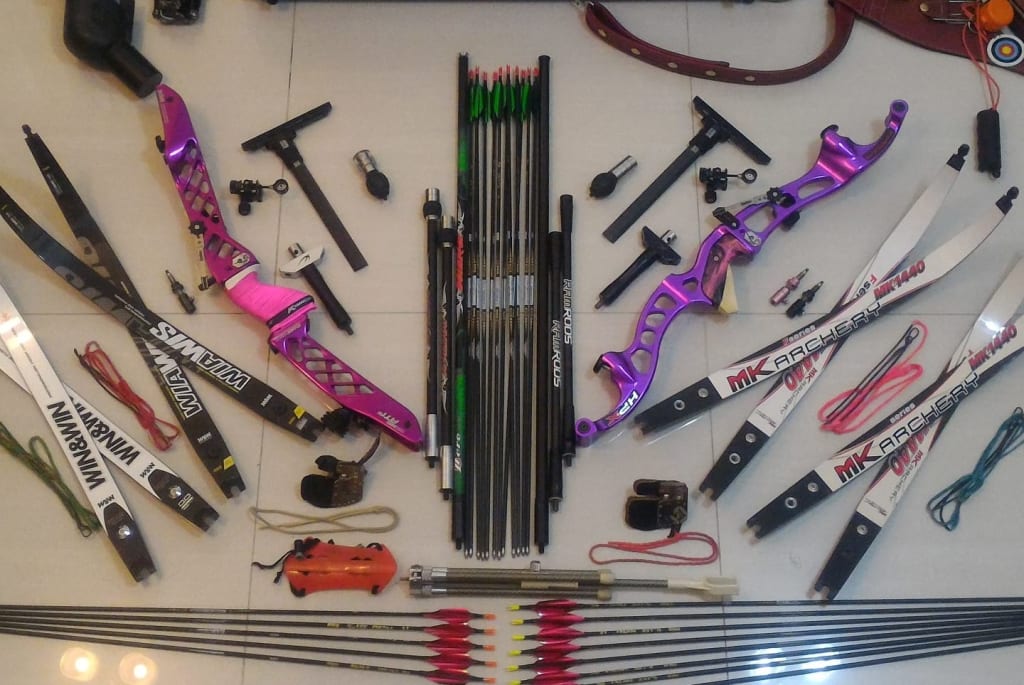
Armguard, Finger Tab, Chest Guard, Finger Sling, Bow Square / T-Gauge. This is NOT the ultimate guide to choosing your first bow. Instead, it is written to explain the details one must pay attention to when selecting their equipment. So yes, this is a piece of the puzzle that helps you in choosing suitable equipment. Mismatched or poorly set-up equipment may lead to bad habits, wrong moves to compensate for the problem with equipment, and worst increase the potential of injuries.

Before We Start
The articles I am planning to share are originally in Chinese written during the COVID. I have plenty of time to write them thanks to the long lock down period in Hong Kong from 2020 when most if not all coaching work was suspended. The articles cover basic concepts in archery, skill & technique, equipment, and a little on physical training etc. It is all based on target recurve archery.
Through my career in archery as both athlete and coach, I notice common misconceptions, outdated beliefs from old documents, and ignorance of important points etc. I hope these articles will raise some thoughts and help readers become a better archer or coach.
I intentionally not to include any specific training details. Archers shall seek for their coaches advice on their own training plan. Not only is shooting style personal, training shall be personalized according to individual needs and background. It is always a good idea to seek proper coaching advice. Another reason for me to not include any training details is that I believe It is the value of coaches to apply the knowledge, to help athletes set up training programs and to solve problems. It is not just a respect for the coach's expertise. It is in fact how coaches earn a living and is not something for free.
If you are good at something, never do it for free
Just a Quick Reminder
There are four core elements leading to an archer’s success: general & sport specific fitness, mental strength, skill & technique, and equipment. The importance of equipment has always been underrated. Some say bad archers blame the equipment. The fact is mismatched or poorly set-up equipment has a negative effect on archers' learning process. It may lead to bad habits, wrong moves to compensate for the problem with equipment, and worst increase the potential of injuries. Selecting the appropriate equipment and setting it up nicely is the first thing to do for a new archer to learn the sport properly, injury free.
Making Informed Decision
This is not intended to be the ultimate equipment selection guide. In order to make informed decision on what to buy, one must need to know the following three things:
First, basic knowledge in equipment. If you are confused with what a 66in or 68in bow is, why both 23in handle and 25in handle can both make up a 68in bow, or what arrow spine is etc., it is necessary to get some textbook knowledge first. There are plenty of resources available online or as hard copies. I am not trying to repeat that information here. Instead, I hope the articles add some tips and information based on coaches and user experience which are not mentioned or covered by the textbook resources.
Second, specifications of equipment, so to judge if the piece of equipment is suitable. Online shops or brands' websites may be good sources for such information but I also suggest archers pay a visit to a pro shop too. It is not uncommon to have mistakes in official websites or catalogs, especially those brands not from English native speaking countries. I am hoping to provide some insights on how to interpret the data specifications. Sometimes specification data are of higher importance, while some data can be deceiving or of no importance at all.
Third, discuss with his coach, especially before you make the very first set of equipment purchases. One may know more brands and new models than his coach does by doing extensive online research. However, this doesn’t change the fact that the coach is generally more experienced and is the only person who knows the archer the best, who can provide advice based on personal shooting style and background. It is likely the coach will be the one setting up or tuning the equipment as well. Good to get something the coach is familiar with and experienced in handling.
Oh one last point before we start. I bet you already know it…
***poor English alert***
Armguard
Armguard could be the very first piece of equipment an archer needs to pay for. The price ranges from a few to 20 dollars. The performance of an armguard is unrelated to its price.
Shape. The basic function of an armguard is to prevent bowstring hitting the arm. Some armguards don't fit nicely on the arm, leaving a gap between the armguard and the arm. Expensive does not mean to be better in shape. Instead, cheap models are usually good in terms of shape.
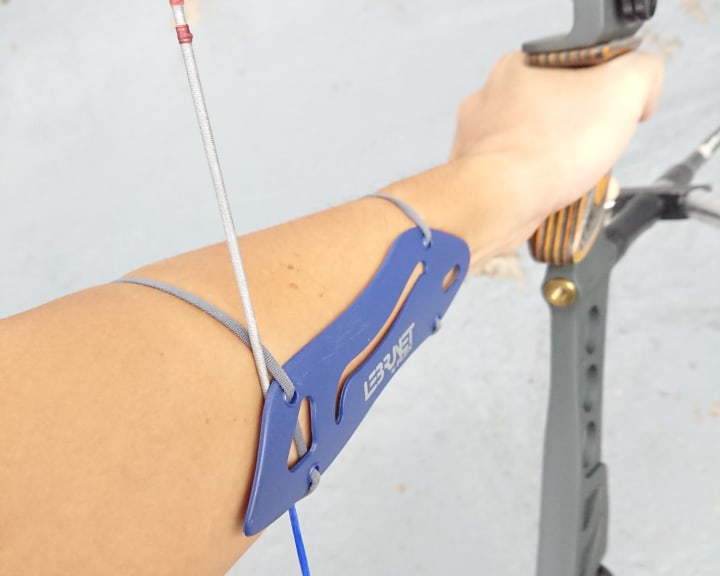
Thickness. Having the bowstring hit the bowarm can be the result of poor shooting form but not being the only reason. Vibration of string after release can lead to the bowstring touching the arm too. That is why top level archers still need to wear an armguard. This is why the thickness of the armguard needs to be considered. The thicker the armguard is, the more likely the string will touch the armguard after fire. The contact will wear out the serving or the string itself pretty quickly. So a thinner armguard might be preferred. However bear in mind if it is going to extreme it may not be good. One model of Korean F brand armguard is so thin that some archers complain that the arm is painful even if it is just the touch of the bowstring vibration after release.
Durability. There are two weak points in an armguard which break most frequently: the part holding and for adjusting the elastic strap and the proximal end of where the armguard is connected to the elastic strap. For the first position, it is better to have fasteners holding elastic straps together instead of having fancy swivel buckles / safety buckles. The problem with swivel buckles / safety buckles is they get loose easily and wear out quickly under the sun. Hook and loop is not a good option either as they usually don't last very long.
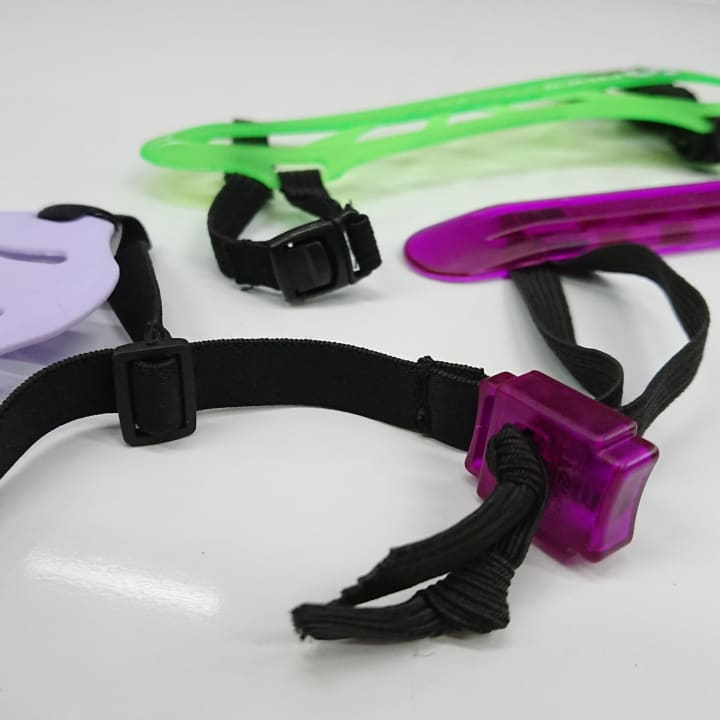
The other good thing about using fasteners is that it serves the purpose to adjust the strap as well. For those using swivel buckles / safety buckles to hold the strap round the arm, another adjustable buckle is needed for adjusting the tightness of straps. Sadly these adjustable buckles usually do not fix the length firmly and the armguard will get loose after a few shots.
Finger Tab
The function of the finger tab is not exactly to protect archers’ fingers nor to reduce the pain upon release, though it could be the belief of entry level archers. The key function of the finger tab is to reduce friction between fingers and bowstring, allowing smooth release of bowstring. So its real purpose is actually to help our arrows fly better and to score better.
Beginners may find it more difficult to hold the string firmly or keep the hook shape of string fingers with a finger tab. As a result, the archer may intentionally hold the string harder and tense up the muscles, eventually leading to a poor release and inaccuracy. I find it better for beginners to master the basic string finger technique before starting using a finger tab.
Frequently there are over enthusiastic beginners who attempt to buy their own equipment too soon, some may even buy equipment before they start their beginners course. It is very likely to be a waste of money and always a total disaster for coaches. Without relevant knowledge, appearance and color will be the major factors determining their choice. Some beginners might even buy a shooting glove, which is totally irrelevant to target recurve shooting.
Material. One may encounter finger tabs in plastic during beginners courses. These finger tabs are easy to clean, possibly convertible for left hand and right hand use. However, they are not cheap and are not performing well when you increase your bow weight. So it is only good for running courses but not as a personal gear.
The difference between more affordable finger tabs and less affordable ones are usually the leather part. Cheaper ones usually use synthetic leather while more expensive ones use cordovan. Some finger tab models consist of a middle layer between the back leather and the face. The middle layer could be made of plastic. Super expensive finger tabs differ from the expensive ones at their metal parts. Super expensive models usually come with more accessories and are with more options for adjustments. Some super expensive models are made of brass, while common ones are made of aluminum alloy. Brass makes the finger tabs heavy and some archers prefer the weight to get them a solid stable feel at full draw anchor position.
Size. By talking about the size usually two dimensions are in concern, one is the length which is the finger length and the other is the width of three string fingers index, middle & ring, or consider it the palm size. I am paying more attention to the latter which is of higher importance.
Finger tabs rarely have leather / cordovan too short for the fingers, instead it usually comes with longer face and back leather for archers to trim and customize. If the face and back leather are small, it can easily be replaced on your own. It is possible to get a piece of leather to make like 8 to 10 pieces of finger tab faces for as low as say 15USD. (I can easily find cheap good quality leather in Hong Kong. However I am not so sure in other places) It is indeed enough for leisure archers to use lifelong.
However it will be a different story if you insist on using cordovan. It would be costing you at least 10 times the price of other leathers. Once there was a lack of cordovan which resulted in months of shortage in finger tabs production.
Unlike the side of the finger length, the side of the wide of fingers can hardly be corrected or modified if the finger tab comes unfit. If the metal part is too big, wider than the hooking fingers, it will prevent fingers from forming a solid connection with the jaw bone at full draw position. It may also prevent the little finger from remaining at its relaxed natural curling up position. If the metal plate is touching the chin at full draw position, scratching every time upon release will eventually lead to bleeding.
A third dimension which is easily being ignored is the thickness of the finger tab. Difference size finger tabs usually come with the same thickness metal plate main part. It is a less significant issue if the archer's fingers are long. However if the fingers are not long, the combination of thickness of the metal plate and the face / back leather will be a big concern. Many archers will find it difficult to bend their fingers and keep the hook shape in order to hold the string. It is not uncommon archers fail to form a solid connection with the string, or are forced to switch to shallow hooks because the finger tab is too thick.
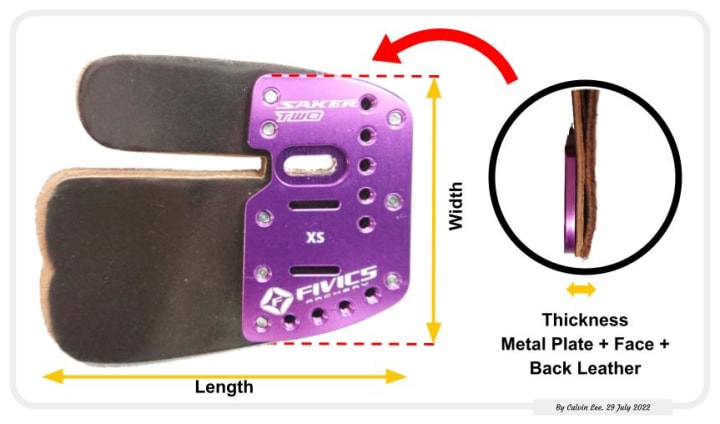
Thickness of Leather / Cordovan. Thickness of face and back leather are not guaranteed identical even for the same model of finger tab. Some factories and brands never attempt to identify and solve this problem, or they do not even consider it a problem. At one of the only two points of contact with the bow, the thickness of the finger tab is affecting arrow tuning severely. Competitive archers must have a few finger tabs as spare, any difference in face or back leather thickness is unacceptable. That is one of the reasons why as an athlete I tend not to use factory face and back leather. I change them once I get my tab open box.
As mentioned above, finger tabs being too thick is a concern as it limits archers from doing a desirable string finger hook. This must be put into consideration if intended to use a finger tab with three layers of leather / cordovan.
Stretching. Another reason why I never like to use factory cordovan. For over 10 years the first thing I do with a new finger tab is change the cordovan. Factory cordovan looks shiny, smooth and nice. However, it is not always in the correct direction. It might be because the cost is so high that factories would like to utilize the whole piece of cordovan. One might know cordovan does stretch, though not as much as other leathers. But it is less known that stretching doesn't appear uniform in all directions. The natural stretching direction must be taken into consideration when making the finger tab face. If the stretching side runs along the finger, which is wrong, the face will over-stretch easily. The face will become thin and deform into unwanted shape quickly. Sadly to say finger tabs always come with random face directions. The natural stretching direction is not always put into consideration while the finger tabs are being produced.
Custom. No matter if one is using factory face / back leather or custom ones, trimming them according to individual needs is something that must be done. The face / back leather comes large, expecting the archer to trim them to fit their own hand. There are three common areas that need to be trimmed.
First is around the ring finger. There is usually much room left in front and below the ring finger, leaving the face / back leather there will affect release and eventually lead to poor arrow flight.
Second is above the index finger where the string hand comes into contact with the anchor point. If the face / back leather are long and touch the chin, repeating contact upon release will rub the skin to bleed.
Third is the gap between index and middle finger. The gap is usually narrow and could result in pinching the nock. It is not the finger itself but the face / back leather pinching the nock so it is less easy for archers to be aware of this issue by oneself. Pinching affects arrow flight and what’s worse can be to cause an arrow jumping up onto the plunger or falling from the rest.
Trimming needs some experience and skill. Observation at full draw position is required to make correct judgment. It is better done by coaches and must not be done by inexperienced archers, unless you are prepared to pay for an extra set of face and back leather.
Accessories. Finger tabs get more and more fancy and complicated. Classic models come with a finger spacer and anchor plate. Newer models come with a whole lot of accessory parts e.g. thumb rest, little finger rest, & palm extender etc. Not only do they come with parts, they are very adjustable to fit individual needs. The finger tab set up is very personal according to the archers requirement and feel, which is highly dependent on the skill and technique used. Despite individual differences, one shall agree that the general rule is to keep the string hand wrist and palm relaxed. If we agree on this point, I am suggesting the novice NOT add any of those fancy accessories to your finger tab, not before one practiced the proper string finger technique. Anchor plate may be exceptional but that is it. Any extra accessories provide extra points for applying force to the finger tab, potentially tends up your fingers, palm, or wrist which is undesirable. A solid and firm sensation in holding the string might be the result of applying extra or unwanted force on the finger tab, which is the opposite of relaxation we are seeking.
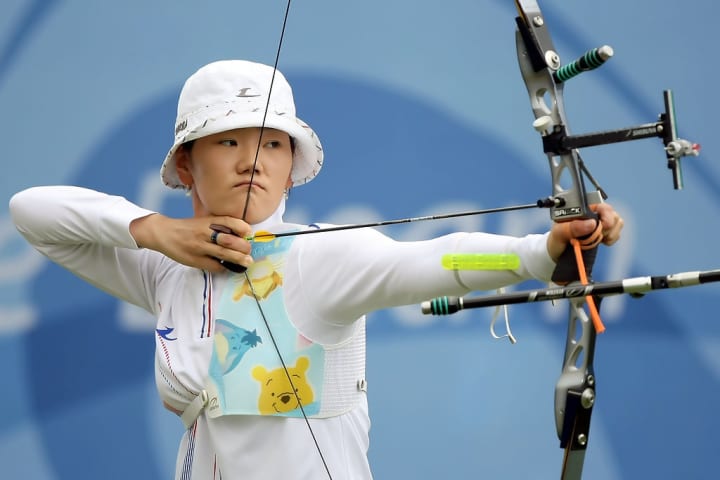
Chest Guard
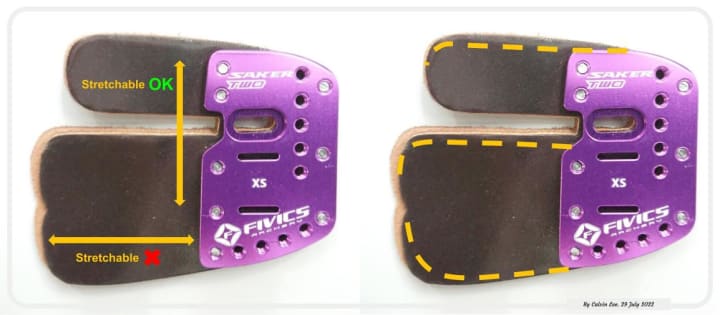
It is misleading in Chinese translation of chest guard “護胸” which implies protection. Similar to the finger tab, instead of being a protective gear, the primary function of the equipment is performance related. It allows the string to project the arrow smoothly and with consistency from shots to shots free from clothings affect, or to minimize it. Chest guard has to be tight fit. It is preferable if one can try it before buying. The most common problem one might experience is unfit somewhere between the armpit and the chest. The folding up part around that area will touch the string and prevent smooth release.
It is possible to solve the problem by adjusting the hook and loop tape or by minor modification of the chest guard. Just go ahead and try adjusting it to see if it will make the chest guard fit your body shape better. Sewing may be necessary in order to fix the chestguard as hook and loop might not be available to hold it in the desirable shape.
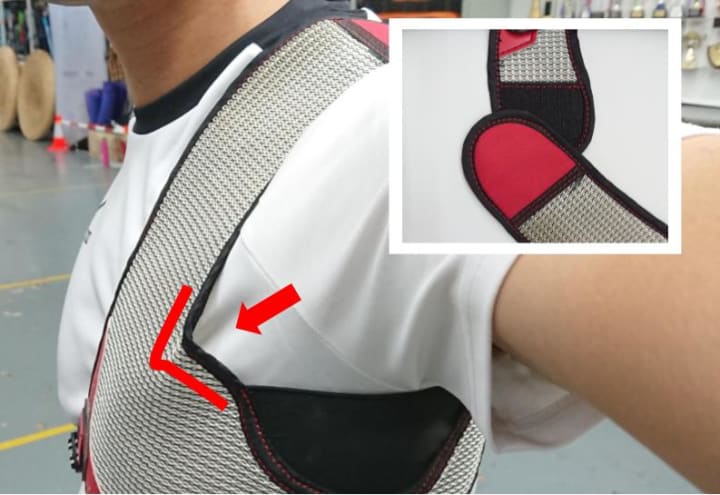
You might notice some archers have a plastic file-like cover on their chest guard. This is more than just decoration but has a bonus on performance. It reduces friction between the string and chestguard to allow smooth shots. I attempted to make such a cover with a plastic file but found it not working nicely. From the limited documentation available it is found that vinyl is suggested to be used for such purpose. There was once a Korean fashion brand making vinyl covers for chest guards. You can actually see it is widely used by Korean archers. They even provide the vinyl covers as a gift to competition participants on some occasions. Search: Bagazimuri chest guard
Finger Sling
It is quite a common practice for coaches to ask novice archers to prepare a shoelace to make their own finger sling. It provides novices with some homework to do and personalization add-on element to boring stereotype club bows. One should pay attention to the extra length of shoelace after tying up a knot. Shoelace is usually too long and must be cut after adjusting to the correct length. The overhanging shoelace might be left hanging on the sight or the arrow during the shot, leading to potential danger.
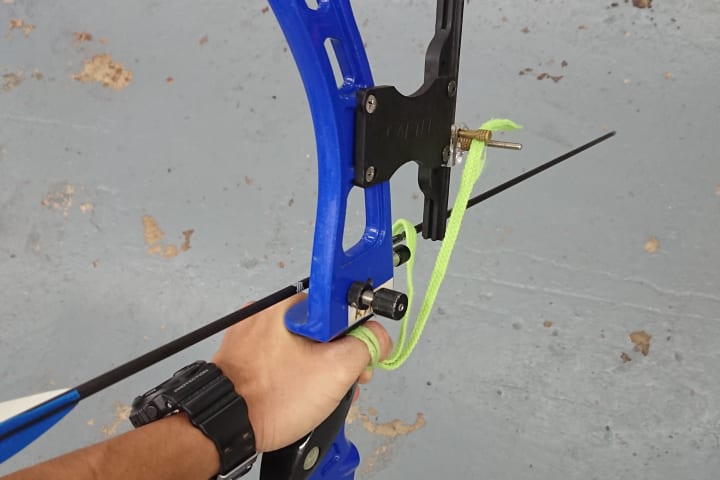
One should pay attention to the material, shape and thickness when choosing their shoelace too. It is not uncommon to see archers with good grip technique to have their bow jumps and fall upon release because the finger sling failed to catch the bow. Shoelace in round shape or being too thick would be more slippery on fingers and has a higher risk of such accidents to happen. Another finger sling related accident, which is less commonly seen, is having the shoelace cut upon release, thanks to the sharp edge of poor design or poorly made handles. Strong and durable material is a wise choice for finger sling after all.
There are not many suggestions or guidelines for finger sling. One rare piece of well written reference about finger sling is from the book Total Archery by coach Kisik Lee. The book does not miss out minor parts such as the finger sling. Instead it defines a very clear requirement on how to apply and adjust the finger sling.
In the above subtitle I try to mention finger sling only but not the bow sling, which is supposed to serve the same function. I avoid bow sling because I believe it is not suitable for equipment nowadays. Bow sling was once a good piece of equipment. Archers' choice of bow sling or finger sling were possibly 50 50 back in 10 or 20 years ago. The design of the bow evolves throughout the years e.g. the balance of the bow (center of gravity), the bow grip (which leads to a change in grip and “pushing” technique), distance between grip pressure point and arrow, and limb getting faster and faster etc. These make older model bows distinguish from newer ones in the reaction upon release and feedback given to the archer. For example the grip pressure point is lower in older models, the center of gravity of the bows are usually set more to the front, and the duration for release is longer. It is quite difficult to explain the differences by words well. But the differences are significant for average level archers to feel. Just borrow an older model bow and try.
During the shot cycle, the bow jumps forward upon release. As the bow reaches the finger sling, it brings the finger sling forward hence pulling the two fingers connecting to it. Reflex action of the bow arm is to resist the pulling force by bending the fingers and extending the wrist. At the same time the forward jumping force goes weak and the bow starts dropping. The archer either has the bow arm wrist further tense up or has the bow arm elevated intentionally to resist the drop. Without doing anything bowarm will be pulled down by the bow. Total Archery suggests a solution: voluntarily flexing the wrist (dropping) at the moment the bow touches the finger sling and the finger sling pulls the fingers. By doing so, it re-directs the forward jumping force of the bow to the downward swing. This keeps the bowarm solid and at the same level till the end of follow through. This also gives uniform direction to the bow for consistency.
Using a bow sling instead of a finger sling makes it impossible to use such technique, as there is no pulling on the fingers. The length of finger sling has to be very precise in order to execute the downward swing. With the sling too long the forward jumping force becomes too weak to maintain the bow direction. With the sling too short there is no time or room for the archer to flex their wrist upon release. It is good to check if the length of the finger sling is adjustable if you consider buying a ready made one.
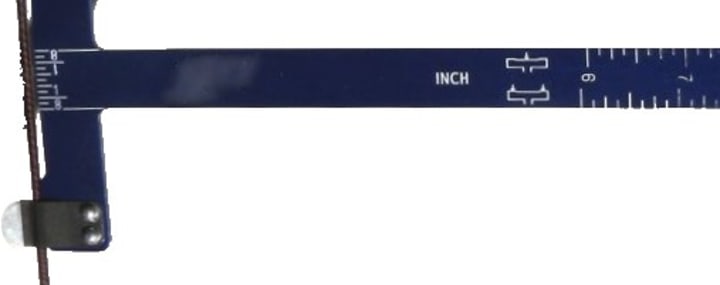
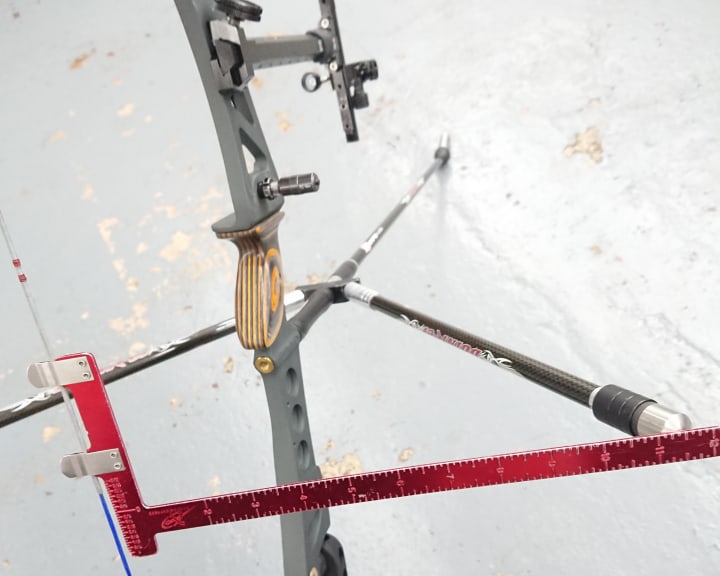
Bow Square / T-Gauge
A serious archer must have his own bow square / T-gauge. Using it to check every time one sets up his bow indicates the correct attitude towards success. Many archers do not build up the habit of checking the bow's brace height. It may be laziness or thinking that is of little importance. This is ignorance of the importance of consistency, which is in fact contributing to everything to this sport. My experience is when the brace height is off by ⅛ inch, I can feel it during the shots without measuring it. I believe this is the same case for most if not all experienced archers. Even if you cannot feel it, you can easily see it reflected on the 70m target with a loose grouping or the need of a different sight mark than usual.
By giving the above example I would like to emphasize the importance of keeping brace height uniform and the significance it makes on performance. Taking it seriously is not only important to good archers, but paying attention to details opens the window for one to become successful. It is every archer's responsibility to do a routine check on the bow.
There is a persistent problem with selecting bow squares. It is a real pain for coaches for years. Obviously we are not concerned about the color or style of the bow square. What is in concern is the correct way to use the bow squares and the measurements they give. Some models provide two scales on the bow square for two different methods to take reading. The first method is to clip the bow square on the string and take reading. The other method is to slide the bow square to the grip and measure its shortest distance to the string. Without paying attention to the method provided by the bow square or using the wrong scale on it will result in a wrong reading. We actually found one bow square (a big brand model!) giving wrong numbers by using either way of measurement. We have no clues why this happened or we are using incorrect ways to read the scale.
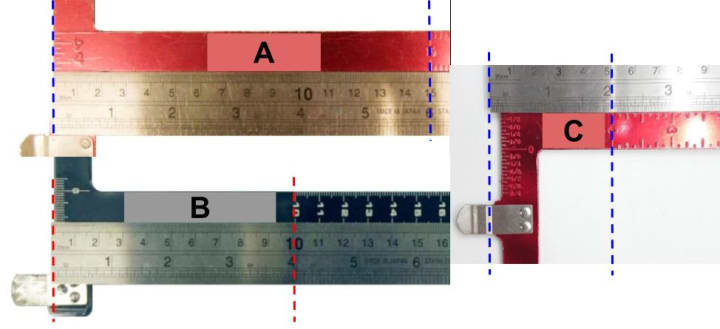
On top of measuring the brace height, the functions of bow square are measuring the tiller difference and nocking point. Some archers may use it to check if the two side bars are balanced. What's common in these functions is that the actual reading is of less importance, what is important is the consistency every time you set up the bow. To make it simple, using only your own bow square can skip all the mess mentioned above. Using the same method to tame measurement is also important. Say for some handles the button hole is not located directly above the grip throat, hence it will give different reading by measuring the brace height with different methods.
There are two styles of bow square, the T shape one and the L shape one. As coach, I prefer the L shape one as it fulfills all the functions of a T-gauge yet works well on compounds. The “L” shape allows it not to be blocked by D-loop, nocking point and kisser etc on a compound bowstring. The problem with L-square is the shape. It occupies more space for storage. Another point to be aware of is that L-square usually comes with inches only, while T-gauge usually comes with both imperial and metric scale.
About the Creator
Calvin Lee
2020 Tokyo Paralympics Hong Kong Team Coach
2012 London Olympics Olympian
25+ years experience in target archery, both recurve and compound
15+ years in coaching. From entry level to elite training. 500+ beginners per annum at peak.
Keep reading
More stories from Calvin Lee and writers in Unbalanced and other communities.
Archery Shot Cycle / Routine
STEPS OR NO STEPS. Traditionally we love to break down the shot cycle / routine into steps. It helps the coaching process by making presentations easier and possibly more systematic. However, some argue that breaking down the routine into steps ignores the fact that it is one motion and makes it lack smoothness.
By Calvin Leeabout a year ago in Unbalanced
John Jay Goes to 7-2 with Win Over Byram Hills
On Friday April 19 John Jay traveled to Byram Hills and started early by getting their first three batters on. Unable to score, Coach Ted Lawrence didn’t get ahead of himself. “It was still early,” he reasoned, but foresight would end up playing a big part in the final outcome.
By Rich Monetti6 days ago in Unbalanced
Red Shelves
Death is a black hole. Think about it. A black hole is the corpse of a star, something once warm and bright, now come to the end of its life cycle. But some will argue that the cycle of life does not end with death. That death is merely another path we must walk once our bodies expire and our souls ascend. In that moment, when the fuel in the star’s chemical tank hits empty and the shiny matte coat explodes into supernova, the mass left behind – the corpse – becomes a black hole. We understand that, around such a vast cadaver, dimensions work a little differently in death to the way we’re used to in life. For example, light cannot escape the pull of a black hole when it hits the point of no return. That’s where it gets its colour. Space itself is contorted by a black hole. That’s where it gets its funny shape. Even time. Time slows right down the closer you get to it. The closer you get to a black hole. The closer you get to death.
By Matthew Curtis3 days ago in Humans


Comments
There are no comments for this story
Be the first to respond and start the conversation.