
No-Bake Cheesecake: A Perfect Dessert for any Party
The article describes a recipe for a no-bake cheesecake that is easy to make and does not require an oven. The recipe calls for 2 tablespoons of butter, 1 package of cream cheese, 2/3 cup of sugar or Splenda, and 1 teaspoon of vanilla extract. The author suggests using raspberry or strawberry jam for flavor, but any flavor can be used. The author also mentions that ready-made cheesecake mix can be used to save time and that a good mixer is essential for making a successful cheesecake.


One of the easiest party desserts ever is a no-bake cheesecake, and once you know how to make it, you'll be the star of the party! This recipe is super easy, it only takes about 15 minutes to make, and tastes delicious. Plus, you don't need an oven - just a mixer and a couple of bowls (and a little elbow grease if you don't have an electric mixer).
One of the easiest party desserts ever is a no-bake cheesecake, and once you know how to make it, you'll be the star of the party!
If you're looking for the perfect dessert for your next party, then no-bake cheesecake is the answer. It's easy to make and looks great. Plus, it's not like any of your guests would know that it didn't take hours to prepare!
Here's what you'll need to make a basic no-bake cheesecake:
- 2 tablespoons butter, softened
- 1 package (8 ounces) cream cheese at room temperature
- 2/3 cup sugar or Splenda No Calorie Sweetener Packets
- 1 teaspoon vanilla extract You can use any flavor jam you prefer but I think raspberry or strawberry are best.
You can use any flavor jam you like, but I prefer raspberry or strawberry.
You can use any flavor jam you like, but I prefer raspberry or strawberry.
If you are in a hurry, you can use ready-made cheesecake mix instead of making your own. You will simply follow the instructions on the box and then pour it into your pie crust. This is also a great way to save time when entertaining guests at home or when there are lots of other things to do before guests arrive!
The key to any cheesecake is a good mixer.
Cheesecakes are notoriously finicky. The wrong recipe, ingredients or mixing technique can turn a perfect dessert into a soupy mess. But there is hope! With the right tools, your cheesecake will be picture-perfect and sliceable in no time.
Here are some options:
- A stand mixer: This is probably the most common way to mix up a batch of creamy goodness, but it's not the only way. Investing in an inexpensive hand mixer can help save you from getting arm fatigue when mixing heavy cream and egg yolks for hours on end (and don't forget about those whipped topping accessories). An immersion blender has also been known to do wonders when whipping up mousse or mayonnaise…but just be careful not to overdo it with them as well!
- A whisk: For those who prefer something old school but still effective like myself - there's nothing quite like good ol' fashioned manual labor when making desserts from scratch! Just make sure that whatever utensils/tools you choose are sanitized properly before use (I'm looking at YOU dirty sous vide machine!).

Make sure that your cream cheese is at room temperature before you start mixing.
For best results, make sure that your cream cheese is at room temperature before you start mixing. This will allow the ingredients to combine more easily and quickly, which helps prevent lumps from forming in your cheesecake. If you find that your cream cheese has hardened or congealed, pop it in a microwave-safe dish and heat it on high power until soft (about 30 seconds).
If you're using a hand mixer or whisk to stir up these ingredients, be sure not to overmix them - this can cause too much air into the batter and give it an unpleasant texture. Instead, mix just until all of the ingredients are incorporated together without any clumps or bumps remaining visible on top of them after being mixed together once thoroughly with each pass through the bowl (or whatever utensil you're using).
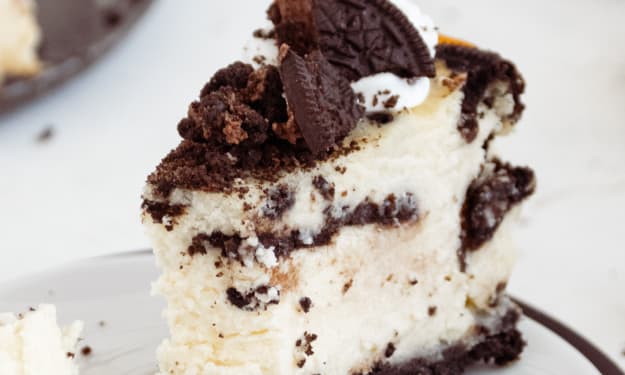
You can always use graham crackers instead of Oreos for the crust, but I really like the Oreo crust. It tastes better, and it's a lot easier!
You can always use graham crackers instead of Oreos for the crust, but I really like the Oreo crust. It tastes better, and it's a lot easier!
It has a more intense flavor than regular graham crackers and it's softer, so it makes crumbling the cookie crumbs less messy (and your hands don't get covered in crumbs). The softer texture also allows you to mix them into the cream cheese without having to smush them too much - they will blend easily on their own.
Putting whipped cream on top is optional, but it adds a nice touch. It tastes great, too!
Whipped cream is a great topping for any dessert, but it also makes an excellent addition to cheesecake. To make whipped cream, you can either use an electric mixer or a whisk. If you're using an electric mixer, place a metal bowl in the freezer for about 30 minutes before you start making your whipped cream so that it will be chilled during the mixing process. Add one cup heavy cream and 1 tablespoon sugar to your chilled bowl; beat until soft peaks form - this should take about 2 minutes with an electric mixer and 3–5 minutes if using a whisk. You can also add other ingredients like vanilla extract or even fruit puree to make flavored whipped cream!
To make the cheesecake gluten free, just make sure to buy gluten free graham crackers or use gluten free Oreos for your crust.
This recipe is also great for those who have food allergies or intolerances. If you don't have an electric mixer, you can use a hand mixer or even an immersion (stick) blender, but mixing by hand will take some muscle and time. For the crust, feel free to use gluten free graham crackers if needed!
The best way to get your no-bake cheesecake out of the pan without making a mess is to line it with parchment paper and then lift it right out.
- Line the bottom and sides of a 9-inch springform pan with parchment paper.
- Pour all ingredients into a large bowl and whisk until smooth, or use an immersion blender to blend until smooth.
- Pour the cheesecake batter into your lined pan, then place it in the freezer for at least 4 hours, or overnight if possible (this ensures that you'll have a solid cheesecake).
- Before serving, remove from freezer to let soften slightly - about 15 minutes should do it - then use a spatula to lift out of the pan and cut into slices using a large knife or cake lifter
If you don't have an electric mixer, you can use a hand mixer or even an immersion (stick) blender, but mixing by hand will take some muscle and time. Be careful not to overmix!
If you are using a handheld electric mixer, use a low speed so the cream cheese doesn't separate.
If you don't have an electric mixer, do not use one of those little hand mixers that look like egg beaters! They just don't have enough muscle to beat the ingredients together properly and evenly. So if possible borrow one from your neighbor for this recipe or buy one on Amazon for less than $20. You can also try using an immersion blender as long as it's strong enough (some models aren't). Just be sure to follow all directions carefully when using it in place of other appliances because they are designed differently than regular blenders - especially when handling hot liquids like melted chocolate chips which could splash out onto your hands if mishandled at high speeds when blending them into the batter base above!
Side Note:
The takeaway from this recipe is to use an electric mixer. You could use a hand mixer, but it would take you much longer and you might get tired. If you have an immersion (stick) blender, that would work too - just be prepared for some muscle! Whisking by hand isn't recommended because it takes so long and is pretty difficult on your wrists and forearms.
Conclusion
Don't forget to use your favorite jam in this recipe - I love raspberry or strawberry. You can also use any kind of cookie you'd like for the crust - it's totally up to you!

About the Creator
Courtanae Heslop
Courtanae Heslop is a multi-genre writer and business owner.
Keep reading
More stories from Courtanae Heslop and writers in Feast and other communities.
A Culinary Pilgrimage: Discovering Michelin-Starred Tom Yum Kung in Bangkok
Bangkok is a city where the old and new come together beautifully. It's known for its lively streets, stunning temples, and, most importantly, its amazing food. As someone who loves trying new flavors, I went on a trip to Bangkok with one main goal: to taste the famous Tom Yum Kung at a Michelin-starred restaurant.
By Ratthapoom Thomola day ago in Feast


Comments
There are no comments for this story
Be the first to respond and start the conversation.