
To edit, or not to edit?
Do we need to edit our photos?


Hello all! Welcome back, Happy New Year! I figured we'd get back into some photography related blogs! Let's talk a little bit about editing. What is it? What does it do? Is all editing the same? How do we edit an image? Is editing necessary?
I'd like to start with the first topic, what is it? What does it mean to edit an image? It's an incredibly broad topic, but ultimately it means we are changing something on our photo through either physical or digital means. In the days of film photography images were "edited" in dark rooms via dodging and burning (brightening or darkening certain areas of the film) by using laborious and materially intensive procedures. With how common digital cameras, personal computers and phones are, we can now do all of this even while on our morning commute riding the train. The process has become so streamlined and simplified, that should you need to, with a little guidance or understanding, you can get more out of your images.
The process of editing an image alters the photo in someway shape or form after it has been taken by the camera. So after we've clicked our shutter release, the photo has been taken, any changes henceforth could be considered an edit, even if it's performed with in-camera settings as some camera's now offer (say greyscale, perspective distortion, sepia toning etc). It can be as intensive as reconstructing a photograph from multiple sources to create a "composite image" via Photoshop, or as simple as putting an instagram filter over your image just before you upload it.
You will find many people will have very different interpretations of what constitutes "editing" an image. But ultimately, if you change it in some way from the original shot, it technically has been edited. I believe personally it can be broken into 3 broad categories:
- Life-like
- Creative/artistic
- Composite
Life-like edits
A life-like edit in my opinion is when we edit our photo to more accurately represent the actual scene that we were able to perceive with our eyes. Digital camera technology has come a long way, but it is still far inferior to what our eyes can actually perceive. Our camera's don't display the same colours as our eyes can see, shadows in an image may be a lot darker than what was actually perceived due to the settings we used to get the shot. With this in mind, I consider edits that make something look as it was perceived as a life-like edit, to make it more similar to what we saw, by altering small things such as lighting (highlights/shadows/exposure), colour (saturation/vibrance), crop (composition). If I find myself altering an image more than these it falls into the next category.
Creative/Artistic edits
A creative/artistic edit is what I consider to be more than slight lighting/colour corrections. If we have a vision for how we would like our image to look, and we've changed colour balances, added colour or taken away colour that was or wasn't previously there, probably added a more significant manipulation of existing (or even non-existing) light, we're now at a point where I would say this is a creative or artistic edit. It could also be something as simple as applying a slight fade to the image and adding some grain to give it a film look, or it could also be that we've removed something from the image, say there's a lamp post that seems out of place, or some power lines, maybe some rubbish, or some people that don't fit with the image. If we've changed it someway from what our eyes saw, to something different from what would have been a "life-like" edit, we've put our creative or artistic touch on it. It's a scene that no longer looks quite how it did when we took that image, to make it look like something we've wanted to create, to convey a certain mood or message. I would say majority of my images fall into this category. This category of editing I tend to enjoy the most, it gives me the creative liberty to create something I find visually pleasing, without being too labour/time/skill intensive.
Composite edits
Composite edits, personally I don't considering a photograph anymore. That is not to say that they are worth less, or that I dislike them. Many of the composite images I see I really enjoy and appreciate, it takes a lot of skill to create a composite image that doesn't look like a composite. But what is a composite, and why don't I think it's fair to consider it photography? A composite image is where we take components of multiple sources and combine them to make a final image. While the majority of this image may be photographs, I consider this category to be digital art at this point. We're taking multiple items (whether that be multiple photos, or vectors, stickers, freehand, etc) that does (or doesn't exist), and creating a visual that doesn't exist, or is completely different from how it started. Great examples of this style of art can be seen by searching: "Demas" on instagram, "Laanchan" on instagram, "Calop_" on instagram. So while it is likely comprised of multiple photos, it's no longer "just" a photo where as the editing styles we discussed just prior still retain some element of "reality". Composite images though are the greatest way for us to express our creativity, the creative process is practically limitless when making a composite image and is only limited by your skill and the amount of time you have.

So how do we actually edit an image?
There are now near infinite ways for us to edit images, some all via automated processes or filters, some offering us more liberty in how we want to edit. I don't use many apps for editing other than Lightroom CC and Photoshop, but a quick google should find you a significant list of apps for various purposes. Here's some quick tips to get you started with Lightroom CC (and similar programs), and we'll get to a more comprehensive tips list in the near future.
1: Play with the sliders
Lightroom CC offers a really simplistic and intuitive way to edit your images, everything is done via sliders, play with these sliders, see what they do, they update images in real time as you move a slider. For example if adjusting the "shadows" take it all the way to -100 to +100, get familiar with each of the settings.

2: Know your hot keys
Certain hotkeys will have certain affects in lightroom that can help with your editing process. The backslash key "\" will allow you to toggle between the original image and your edits. The "j" key will show you clipped highlights on the images in red (meaning your highlights are blown out and lost detail which might be recoverable by changing some settings) and it will show crushed shadows on the image in blue (meaning the shadows are black and have no detail in them which might be recoverable by changing some settings). The "f" key will display the image as a fullscreen (handy for viewing the image without the distraction of everything else around it). Control/command "c" will copy your current edit settings, control/command "v" will allow you to paste the same settings on a new image. There are many more hotkeys, but these are the keys I use most frequently and have the most effect on my workflow.
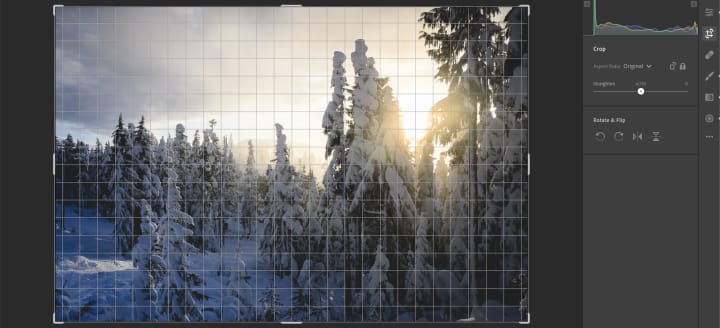
3: Straighten your images
Unless intentional, images should have straight horizons, or lines of buildings. You can straighten your image in post by entering the crop menu of Lightroom CC. This can be done via the "Auto" function or via the slider, for more precision, try lining the horizon up with the small overlay grid that appears during the process. This can also be done via the geometry tool, however this is a paid feature on Lightroom CC and requires an active subscription.
4: Aspect Ratios
Lightroom offers common aspect rations to remove the guess work from how big your image needs to be if you know it's purpose. Portrait orientation images for instagram should be cropped at 4x5 or at 1x1. iPhone wallpapers are cropped at 16x9, Samsung's at 16x10 (from memory).
5: White Balance and Colour
White balance is very intuitively altered by a variety of methods through Lightroom CC. There is an option to use: a slider bar, a balance dropper (which will change the white balance depending on a section of the image you choose, a good trick with this is to use the dropper on the whites of your subjects eyes if they're in an image). There's also some preset white balance modes for different lighting situations, such as auto, daylight, shade, cloudy and more options. Playing around with the "Temp" (blue/yellow:cold/warm) and "Tint" (green/purple) sliders will give you the most accurate result to what you want to achieve with practice though. Sometimes when changing the temperature (white balance) of an image it may become too green or too purple, this can be rectified with the tint slider. Colour can be manipulated via Saturation and Vibrance sliders, or you can target specific colours to affect only certain tones in an image. The selective colour tab also allows for a "dropper" function in which you can edit hue, saturation and luminance on a specific section of an image if you're unable to pin point what colours are combined.

6: Take a break
After having a bit of an edit, take a break. Look at the photos you've edited the next day. This time away often allows us to see where we may have overdone it, or underdone it on certain sections or entire images. It helps alleviate tunnel vision and also helps highlight issues we may not have seen earlier (like maybe our image isn't actually straight, but yesterday it seemed straight). Coming back later with a fresh set of eyes is incredibly beneficial to producing work you're happy with.
7: Have fun
Get creative, have fun with editing, it's one of my favourite parts of photography. Set yourself photography challenges, take different types of photos with different settings to see what you can do with editing, see what you can get away with, purposely take under exposed or over exposed photos to see what you can recover via editing. Change your colours, play with radial/gradient filters.
8: Please, please, please, stay away from preset packs
While new to editing, stay away from preset packs if you would like to grow. Using presets will stunt your creative growth in the long term. It will give you immediate results, but you're better off learning/struggling through the first few months of editing, making some of your own presets and finding your own style. In a medium where we can be so expressive and individualistic, don't adopt someone else's style through presets for a means of simplicity.
Is any of this really necessary?
I'm a big believer of applying the right category of edit to the right photo, once you're efficient enough in the editing process, smashing out a bunch of "life-like" edits across a whole album of photos you took for your aunts birthday the other week will take you next to no time, and it'll improve the look and the quality of the image. You don't need to photoshop your aunt and the entire family on top of Mount Everest (composite), and you probably don't need to be all that creative in applying colour shifts or creating lens flares and light baths (creative/artistic). Choosing the right style of editing will help get a little more pop from an image, but you want the right amount of pop. There's nothing wrong with taking a photo, getting it onto your computer and appreciating it as it is. But as we mentioned before, our eyes see light differently to our cameras, our cameras also don't replicate colour as well as we see, white balances are sometimes off. Having the skills to fix these minor issues should you want to, will take your photography to the next level by having a more wholistic and well-rounded skill set.
Once again, thanks for stopping by! - J
As always, if you've enjoyed this blog, or if you've found some benefit from this, feel free to share it around, drop a comment on the facebook post with this blog on my page, or if you're really feeling generous Vocal allows readers to leave tips. If you enjoyed this enough to buy me a coffee I wouldn't say no to a coffee donation 😍
If I've missed something or completely missed the mark, please feel free to let me know also, I do take constructive criticism onboard for future blogs!
About the Creator
Keep reading
More stories from Justin Clark and writers in Photography and other communities.
The Exposure Triangle—A Guide to Getting off Auto
Welcome back everyone! For the past few weeks we've gone over the components of the exposure triangle; shutter speed, aperture, and ISO. This week we will be discussing the tips, techniques, and mindset to combine these elements to give you greater control over your photography and to help bridge the gap between the shot we've got, and the shot we want.
By Justin Clark4 years ago in Photography
Capturing Magic
In the world of photography, timing is the key to everything. While skilled compositions and technical proficiency are undoubtedly crucial, the perfect lighting can create the perfect photo. Nowadays, we can determine any light ourselves and are no longer dependent on any natural light source, thanks to the developed technology. We can turn every day into a night by using the right filters. And we can illuminate every night to be seen as a day. A typical process, especially in the film industry.
By Krishan Mubashar9 days ago in Photography
Photo Tool: AI Photo Editor
The AI photo editor streamlines complex image editing tasks, empowering users to achieve professional-looking results effortlessly. With a wide range of AI editing tools, including automatic enhancement, object detection and removal, background manipulation, portrait retouching, and stylization. This editor simplifies the editing process while delivering captivating outcomes.
By xia sophia2 days ago in Photography


Comments
There are no comments for this story
Be the first to respond and start the conversation.