
Netflix and Stretch!
Get creative with your down time. Practice some easy yoga while binge-watching your favorite show!


Nobody is alone in enjoying some Netflix in the evenings! I personally love popping on a suspenseful series to wind down before bed. It’s been a tradition for everyone to zone out with all sorts of on-screen entertainment.
Our days are long and full of busy work. I hear it all the time from my team members! It’s hard enough to squeeze in our workouts or clean the house.
Which is why we came up with an awesome idea; multi-tasking!
The average person today is no stranger to getting multiple things done at once, but sometimes we forget what can be accomplished while chillin’ on Netflix.
Since I do use yoga to relieve chronic pain and stay flexible, I take every chance I can to stretch. Including my Netflix time! This got me thinking about those who are also tight, in pain or looking to increase flexibility.
It’s hard enough going to Pinterest to find “Easy Yoga Poses.” The pictures don’t always come with captions, which is important to achieve the proper foundation. There are options for those that are less flexible or just beginning. Why not create a detailed list for easy reference?
I’ve jotted down some excellent beginner stretches and added a couple of the more advanced variations. With quality photos and detailed instruction, anyone can do it!
So grab a snack, a glass of wine, and sit on the floor this time! We’re gonna get flexy with some Netflix and stretch!
Figure 4—Reclining Pigeon

Picture edited from WikiHow.
My tight hips personally love this pose! It’s also great for lower back pain or those of us that spend all day on our feet. It's also referred to as "Reclining Pigeon" because the stretch is similar but easier to achieve than Pigeon Pose. What’s fun about this one, is you get to lay down! It's possible to do it on a bed, but the back won't have proper support. I do recommend laying on the floor, and pull out a mat if you have one.
While on your back, keep the knees bent and your feet flat on the ground. Raise your right leg, bring it towards you, and rest the foot against the front of your left knee. See above image for reference.
It’s important to keep this foot flexed while twisted in this position to keep the knee safe. A flexed foot helps prevent unnecessary tension. The idea is to create a "4" with the legs.
The stretch will happen in the outer hip/thigh. You may even feel it in the booty! If the stretch is felt from simply resting the foot on the knee, then feel free to stay there! The hip can be opened more by gently pressing against the right knee.
If you don’t feel anything, there are further steps to deepen the stretch:
Reach the hands forward and take hold of the left thigh. Lift the left foot, gently pull the left leg towards the chest, and use the right elbow to keep the right leg from turning in. I want to remind that is a gentle tug. Once the stretch is felt in the right hip, relax and hold. Also remember to keep the shoulders down, away from the ears. Ensure the back is flat on the ground to protect and stretch the spine.
You can stay in this pose as long as you like! When you’re ready, slowly set the left foot down (if you deepened the stretch) and use your hand to assist the right leg/foot out of the position. Repeat with the left leg to stretch both sides.
Pigeon Pose

Photo by Stump Photography
For those who are already a bit flexible, or looking for a deeper stretch, Pigeon Pose is the next step up from a Figure 4! If this pose hurts your knee or outer hip in any way, try practicing Figure 4 for a time until your flexibility increases. It’s better to build up to a pose instead of forcing your body into it. On a side-note; Pigeon Pose is great to practice if you’d like to do a split in the future! It stretches the muscles needed to be loose for vertical splits.
It’s best to start in Downward Dog or Plank position. From here, you have more space to step into the position.
First, bring your right leg forward, aiming between your arms. Place the right leg on its side, bent at a 45-degree angle. The smaller the angle, the better it may feel on your knee. Aim the leg in the center of your body. See above image for reference.
Keep the left leg (the back leg) flat on the ground and straight behind. The stretch is felt in the outer hip and inner thigh.
You can stay in an upright position with your hands or forearms on the ground. If it is comfortable for you to bend forward, ensure you are laying your torso over the leg. Keep the weight even on both sides. If you’re super flexy and can lay completely over the right leg, it’s more comfortable to use the arms/hands as a pillow! Ensure the spine is long and flat.
You can stay in this position for a while, but if the bent leg starts to fall asleep, come out of the pose. Use Downward Dog as a counter-stretch. Make sure to stretch both sides to stay even!
Hamstring Stretches

Photo by rawpixel on Unsplash
It’s possible to stretch the hamstring and legs while laying down or sitting up! If it hurts the lower back to bend over, a pose on your back may benefit more. This will not only protect the back, but also relieve any lower back pain.
Sitting Up:
While sitting tall with the legs straight in front, ensure the feet are flexed. Inhale and lengthen the spine. Hinge from the hips, and either hold the feet or rest the hands on the shin.
While it’s not required to keep your back straight, hunching from the shoulders may cause discomfort. If this fold causes pain to the lower back; use a strap, towel, or small blanket. Place the strap on the balls of the feet and pull towards you. It’s a small tug that can be felt. Even if your fold is short.
A strap is useful to move the focus on keeping the spine long and practice hinging at the hips. It may also help to instead reach for the ankle instead of the foot.
While it is a simple stretch, it will be felt in the legs and even the foot. Sitting in this pose for 30 seconds to 2 minutes will give maximum benefits.
It is also useful to bend one leg in, placing the foot inside the thigh. This way it is possible to stretch one leg at a time. Ensure the straight leg is centered with the body. Remember to fold from the hips and keep the spine long!
Hamstring Stretch, Laying Down

Picture from Shutterstock
As stated above, forward folds can sometimes be too much for the lower back. But have no fear! There is another way to stretch not only the hamstrings but the spine as well.
This pose is best done with a strap, but the same result is achieved with a towel or small blanket. The strap is used as leverage to fully stretch the hamstring since we can’t usually grab our foot properly while on our back.
Laying down, start with both legs bent, Like the start of a Figure 4.
Raise the right leg and place the strap on the ball of the foot. Keeping a taut grip on the strap, straighten the right leg. It’s important to keep your shoulders flat on the ground. See above image for reference.
The important part here is to straighten the leg to your ability. If it is straight, but farther away from the body, that’s okay! No need to crank the leg towards your body if it can’t. Personally, mine still hover at an angle when straightened in this pose. Stretching and yoga are all about building on your personal ability.
To deepen this stretch, straighten the left leg as well and set it on the ground. The idea here is the legs create a 90-degree angle, with one leg on the ground and one straight up. Again, there’s no need to aim for a perfect angle with your legs. The lower leg is there to deepen or lessen the stretch.
You can stay in this stretch as long as you like! When you feel ready, slowly set the right leg down, bend the left leg, and repeat on the other side! Remember to keep your back flat on the ground, including the shoulders! The strap is there to give more length and reach.
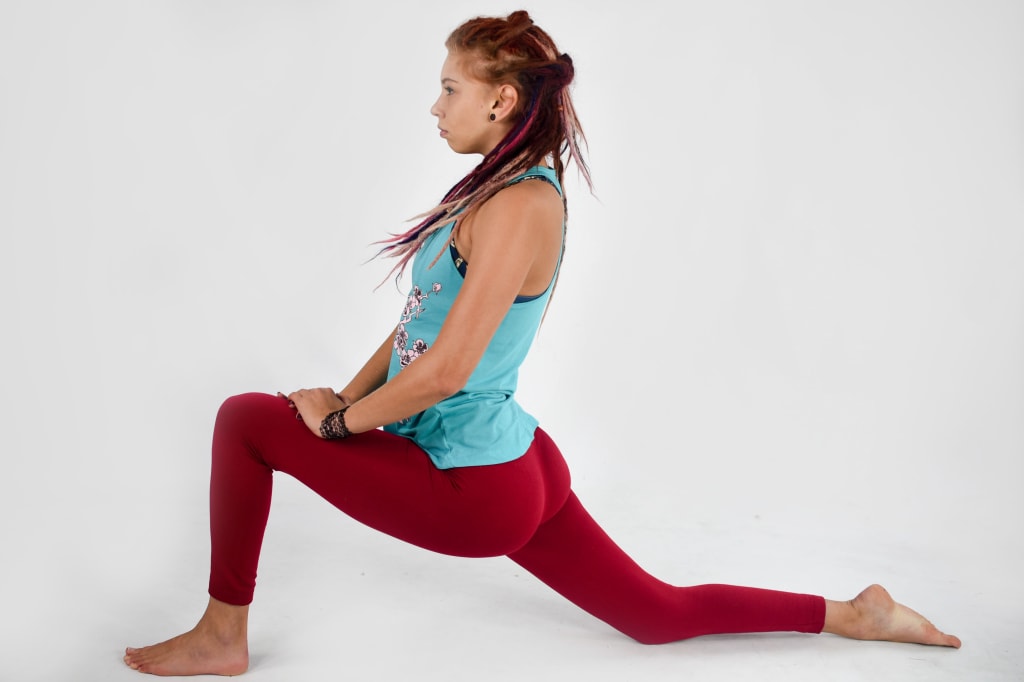
Low Lunge

Photo by Stump Photography
This lunge is my absolute personal favorite! The way it loosens the hip-flexor feels amazing. Especially at the end of a long day or after a workout.
The hip flexor is a muscle that resides at the very front of the hip. Where the thigh meets the hips.
Most people can benefit from this, since we don’t do much to loosen this area daily.
I truly want to advise anyone doing this for the first time, or on a day you feel particularly tight: move slow! If the hip is very tight, it may feel uncomfortable during the initial step into the pose. While we should move slowly into every stretch or yoga pose, I felt it was important to remind everyone before this pose specifically. It feels awesome, but you have to set up the foundation slowly.
I recommend starting in Plank or Downward Dog again. These starting points give you a much better gauge of how far your legs should be behind you.
To stretch the right hip first, step your left leg forward. Place the foot between the hands and ensure the knee is stacked right above the ankle. Be aware not to push the knee in front or far behind the foot. This creates unwanted strain on the knee.
The next step is to lower the right knee to the ground and flatten the top of the foot. Don’t keep the toes curled up. Shift the knee slightly back and you should feel the stretch start in the front hip. If resting on the top of the knee is too uncomfortable, use a pillow or a towel to ease the pressure! See above image for reference.
Once the legs are properly set, you can raise up and rest the hands on your knee. Allow the hips to sink down so the stretch can deepen, but refrain from arching the back. Inhale, lengthen the spine up. Exhale, let gravity pull the hips down while keeping the back tall and straight.
If you wish to go even deeper, raise the arms on the inhale and lean back from the hips on the exhale. This is not a backward arch. It’s important to keep the spine long so no pain is created in the lower back. This pose may create a slight kink to the lower back, which is why it is so important to be aware of the spine.
Resting in this pose for at least 30 seconds will give the most stretch to the hip flexor. When you are ready to switch to the next side: place the hands on the ground, curl the right toes under to raise the back leg, and step the left leg back to meet the right. Leaning back into Downward Dog can be a good counter stretch to this Low Lunge. From here, step the right leg forward this time and repeat the steps above on the new side!
Bound Angle

Photo by Stump Photography
One of the easiest but more intense stretches is the Bound Angle with a Forward Fold. Super simple to set up! However, it takes regular practice to deepen the fold and increase flexibility.
Sitting on the floor, instead of crossing the legs (like the photo), place the inside of the feet against each other. It’s like making a butterfly with your legs! The closer the feet are placed to the body, the deeper the stretch. You will feel this stretch inside the hips and inner thighs.
The next step is to simply fold forward. Holding the ankles and using the elbows the keep the knees down. There is no need to hunch the back so the head is closer to the ground. Like all forward folds, the hinge should be from the hips and the spine should stay long and flat.
While simple, it is difficult to achieve that “perfect pose.” But you can sit in this pose as long as you like, enjoying some tv while hinging over the hips. Don't ever push your body to fold more or go deeper. It's important to fold and stretch as much as your body allows.
Ready to get started?
All of these poses and stretches will increase your mobility over time. Using the breath to relax into any position is important. While there is a decent amount to focus on, once the foundation is properly set, let gravity and your body do the rest! A huge part of stretching is allowing the body to settle into it. Which is why these are perfect to practice while watching TV!
So, since there’s no reason to put yoga and your body to the side anymore, why not jump right into it? If you’re reading this while the television is running: Scroll back up and try out a pose! Let go any expectation and figure out your own body’s abilities.
While I did say grab a glass of wine, I also recommend having some water either during or after the stretch. This will help relax the muscles even further!
Follow my Instagram! Contact me here to learn all the yoga basics, for free, in just two weeks!
Check out my business page to join me and my team live every other Thursday for Yoga and Wine!
Thanks for stopping by!
Stay honest, healthy, and happy.
About the Creator
Kylie Jane
Dog Mom of Four. CCPDT-KA Dog Trainer.
Gratitude Blogging and sharing knowledge
Keep reading
More stories from Kylie Jane and writers in Longevity and other communities.
Alternatives to sugar
In industrialized countries, daily sugar consumption is very high. It is close to 100g of sugar per day per inhabitant, whereas it should not exceed 50g as part of a balanced diet, i.e. when the recommended daily calorie intake is between 1800 and 2600 calories (variable according to sex, weight, height, activity, etc.).
By Pape Mouhamet Senea day ago in Longevity
A Hiatus Turned Reflection
No, I wasn't dead, nor fighting off some great mystical beast tyrannizing a group of villagers. To those who look forward to what I have to say, or to put it better, write, I am genuinely sorry for my disappearance from the Vocal platform and community.
By Dailyn Townesa day ago in Humans

Comments
There are no comments for this story
Be the first to respond and start the conversation.