
Upcycling: Cloth-Covered Journal
Giving an Old Book a Second Life


Eight years ago, I began journaling for the first time in my life. It is no coincidence that this decision came shortly after dating the woman who is now my amazing wife. We worked together in the same public library. Positive changes were happening in every aspect of my life and I wanted to document the journey – the good, the bad, and the embarrassingly funny. The great thing about journaling is that I feel it is not only therapeutic, but it helps maintain perspective when I need a reminder of how far I have come in my journey to become a better person and all the goals I have achieved.
I am now a librarian and have filled 9 journals with our adventures and challenges. As a creative person who enjoys writing, I have an affinity for handmade journals. Libraries often have to replace outdated and damaged books, so I decided to try to create my very first upcycled cloth-covered journal by saving a hardcover book that would have tragically met its end in a dumpster. Here's one great way to give an old book a second life:
Supplies:
1 old standard-sized hardcover book (6” x 9”)
1 Fiskars Easy Action scissors
1 Fiskars craft scissors
1 Fiskars rotary fabric cutter
1 Fiskars flexible, non-skid metal ruler
1 Fiskars Rotating Cutting Mat
1 box cutter or craft knife
1 pencil
1 black Sharpie marker
1 roll of duct, Gorilla, or DuPont Tyvek Sheathing Tape
2-4 large paperclips (as needed)
1/2 yard of medium weight cotton material of your choice (for the cover of the journal)
1/4 yard of medium weight canvas, faux suede, cork, or pleather material or your choice (for the spine of the journal)
1 - 12” x 12” sheet of cardstock scrapbook paper or any design of your choice (for the inside flaps of the journal).
1 - 8.5” x 11” sheet of thick card stock (i.e. as thick as cereal box card stock) long enough to cover the inside of the spine of the book
1 small bottle of Beacon Fabri-Fix Permanent Adhesive
1 hammer & nail or a stitching awl tool
30 sheets of 8.5” x 11” printer paper
1 roll or bundle of embroidery thread (any color)
1 large eye blunt sewing needle
1 large button. Any style of your choice.
1 strip of beading cord elastic
1 metal bulldog binder clip (or a similar strong clip/binder)

Steps:
Journal Cover
1. Find an old hardcover book and remove the “guts” (pages) with your box cutter knife. If you don’t have an old hardcover book lying around at home, you can probably find one very cheaply in your local thrift store or public library. Open the book so that the two covers are touching in order to see the gap between the pages and the cover. This will reveal where you need to cut. *Please be careful while doing this process and cut slowly.

2. Use duct, Gorilla, or DuPont Tyvek Sheathing Tape to reinforce the spine of the book. Use your Fiskars Easy Action scissors to cut off any excess tape. *If you are unsure about the integrity (strength) of the spine of your book, you may want to use additional tape on each folded edge of the spine in order to reinforce it even more.

3. Cover the tape with a medium weight cotton material of your choice, about the same thickness of a bedsheet. You can use the same cloth as the cover, if you choose. The material needs to be thin but strong. Use your Fiskars craft scissors to cut the material about 1/2-inch wider than the left and right sides of the duct tape. Make sure the top and bottom of the spine cover the tape as well. Use the Beacon Fabri-Fix Permanent Adhesive to glue down the fabric to the book cover.

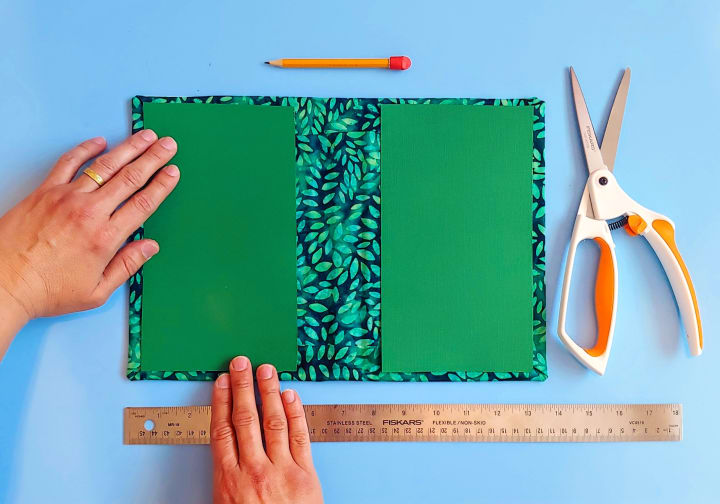
4. Place your open book cover on top of the fabric cover. Make sure the cloth’s pattern is facing down. Use your Fiskars craft scissors to cut the fabric, leaving a 1-inch border beyond all of the edges of the book cover. *It is OK if you do not cut perfectly straight because the edges will be folded inside the journal and covered up later.

5. Place a nickel-sized glob of Beacon Fabri-Fix Permanent Adhesive on the inside corners of your book cover and fold the cloth corners down on top of the glue.


6. Place a generous line of glue on each one cloth border at a time (including part of the folded corners) and flip the book cover on top of the glued border so that the cloth is tight and does not scrunch up.


7. Measure and cut your cardstock scrapbook paper with your Fiskars Easy Action scissors so that they fit inside of the front and back book covers with a 1/2 inch border on every side, including the inside folds.
8. Place a generous amount of glue on the back of each sheet of scrapbook paper, making sure to cover from center to the edges of the paper. Use your hands or a rolling tool to flatten the scrapbook paper onto the inside edges of the front and back book cover. Let the glue dry while you go have a well-deserved snack and/or cup of coffee or tea. *You may choose to place a stack of magazines or heavy books on top of the glued scrapbook paper while it is drying.

9. To create a spine cover, use your Fiskars rotary fabric cutter and metal ruler to cut a straight strip of the medium weight canvas, faux suede, cork, or pleather material or your choice. The width of the spine cover should cover about 1-inch of the front cover and then wrap around the spine to cover about 1-inch of the back cover.

10. Place a generous amount of Beacon Fabri-Fix Permanent Adhesive on the spine of the book cover and the 1-inch margin where the spine cover will be placed.
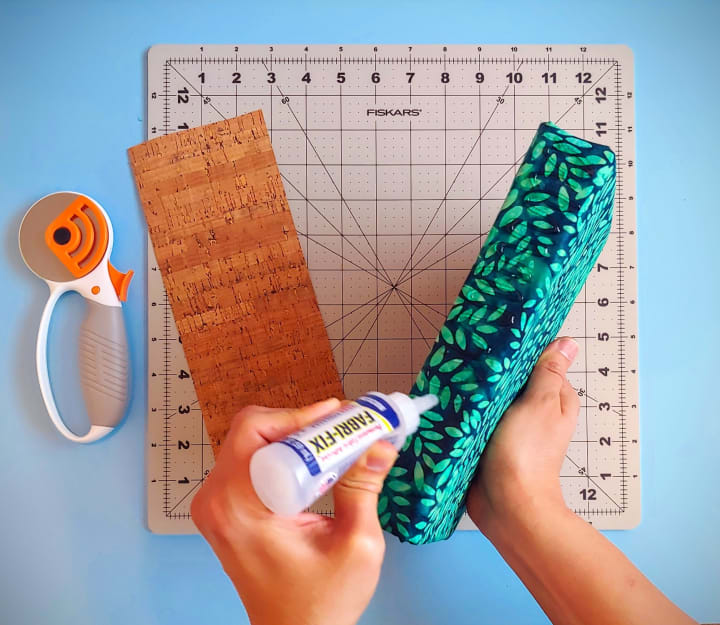
11. Place your spine cover material on the spine of the book cover. *Make sure the material is evenly aligned before pressing it down onto the glue. You may have to add a little extra glue on the edges of the spine cover material.

Button Clasp
1. To make a button clasp for the journal, measure and place a button in the center of the inside front cover, about a half-inch away from the edge. Use a pencil to mark where the button holes should be. Repeat this process on the inside back cover of the journal for the elastic cord.
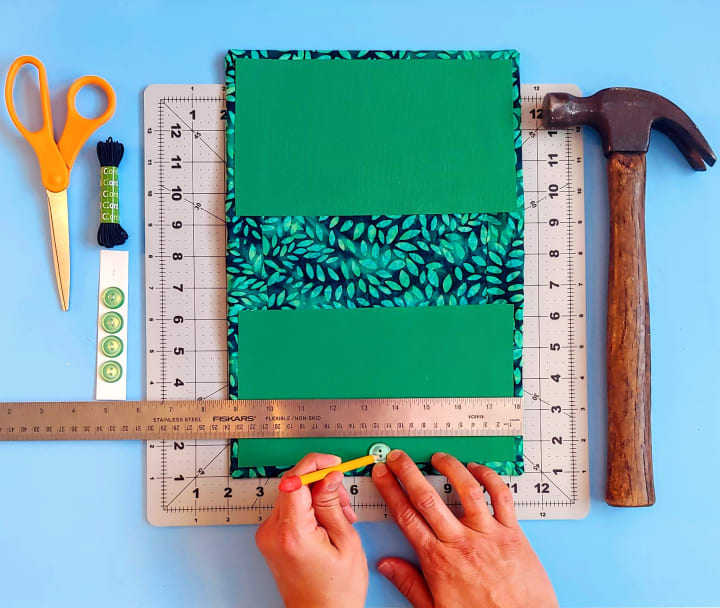
2. Use a hammer and standard-sized nail (or a stitching awl) in order to punch the holes needed to sew the button to the front cover and the elastic cord on the back cover. *It is recommended that this process be completed on a solid surface such as placing the Fiskars rotating cutting mat on a sturdy counter or on the floor.

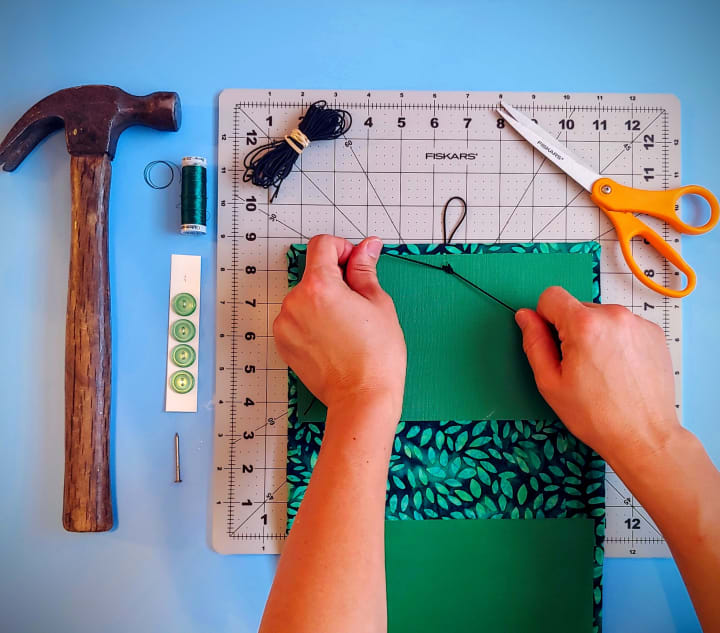
3. Sew the button on the front cover of the journal with your sewing needle and embroidery thread. Make sure to tie and cut-off the excess string on the inside of the cover.

4. Feed the elastic cord through the holes on the rear cover of the journal. Make sure the loop is just long enough to be taut (pulled tight, not slack) when it is wrapped around the button on the front cover with 60 pages placed inside the journal. Tie the elastic cord with a triple knot on the inside of the back cover. Cut-off the excess string.
Journal Paper Insert
1. Use the Fiskars metal ruler and a pencil to measure two strips of cardstock that will comfortably fit inside the spine of the book cover. Then cut your strips using a box cutter or craft knife. These strips should be glued together with the Beacon Fabri-Fix Permanent Adhesive in order to provide a strong backing for your journal pages. The strips of cardstock should be just narrow enough that you are able to easily close your book cover with no resistance. *Feel free to decorate the strip of cardstock with colored ink stamps and stencil patterns of your choice.

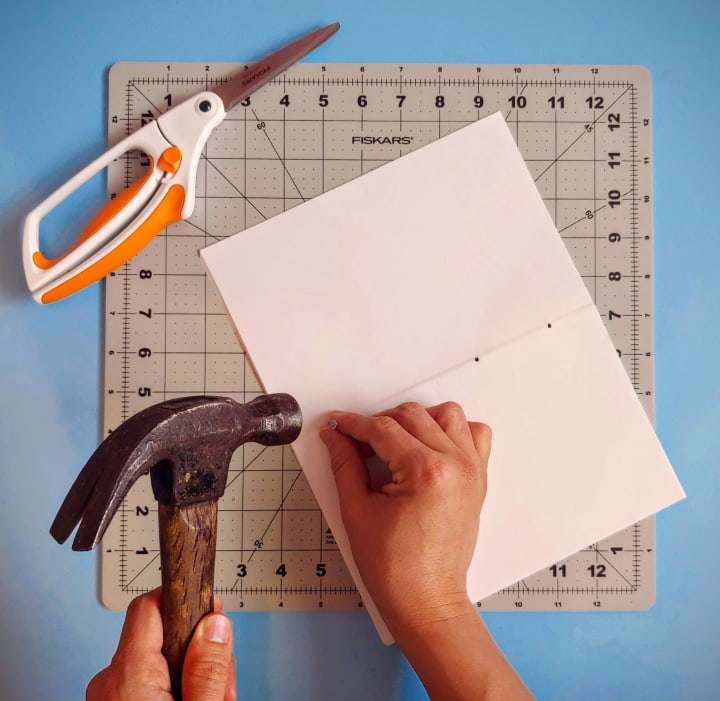
2. Measure and mark your signature holes on the strip of card stock. This is where you will be threading the embroidery floss to hold your paper together within the journal. In this example, we will mark 3 sets of 3 dots in a horizontal line with a Sharpie marker or pencil. *Make sure there is a little space between the dots and the edges of the strip so that it does not become a weak spot.

3. Use a hammer and nail (or a stitching awl tool) to punch out holes where the dots are marked.

4. Fold your 8.5”x 11” interior pages in half. There should be 3 sections containing 10 pages each (30 pages total). This should give you a 60-page journal after each section is folded in half.

5. Place the 3 sections inside the book cover in order to make sure they are the same size or slightly smaller than the edges of the cover. *You may need to trim the pages if they are too large with your metal ruler and box cutter knife.

6. Center your folded sections of paper on top of the strip of card stock. Use a pencil or marker to mark where the holes should be placed for each section of folded paper. *Use paperclips to keep the pages from moving.

7. Fold each section backwards so that they will line up evenly with the crease of the paper and then punch the 3 holes where they are marked with a pencil/marker.
8. Measure and cut 3 strings that are 3 times (3x) the height of the book.

9. Thread the string through the first set of holes, beginning with the center hole on the inside of the folded pages and exiting through the center hole of the card stock strip. Then thread through the top hole of the card stock and through the top hole of the folded pages. Thread back in through the bottom hole; and finally back through the original center hole. When you finish threading, you should have 2 string tails sticking out of the center hole inside of your folded pages.

10. Tie the 2 string tails together 3 times firmly but not so much pressure that it causes the holes to tear. Repeat this process for the next 2 sections of folded paper. Cut any excess string. *If your thread is thin, you may want to double the length and fold it in half in order to reinforce the threading.

11. Place your threaded pages inside the book cover in order to make sure they still fit perfectly. You can trim the pages further, if necessary. Place a generous amount of Beacon Fabri-Fix Permanent Adhesive on the back of your cardstock spine and place your pages firmly inside the book cover.


12. Clamp your pages and journal cover together and let the glue dry for about an hour.

Congratulations, you’re done! Enjoy your new handmade journal and record some positive memories!
About the Creator
Luis Aponte
Hello. I am a librarian and U.S. Air Force veteran who enjoys teaching technology courses and helping people access information that they need.
Keep reading
More stories from writers in Lifehack and other communities.
How to leave behind a meaningful inheritance
Let's embark on a profound exploration of the significance and essence of life letters – those intimate narratives that encapsulate the very fabric of our existence, weaving together the threads of our past, present, and future into a tapestry of meaning and purpose. At the heart of this journey lies the recognition of life's fragility and the poignant realization of its fleeting nature, epitomized by the stories of individuals like Bill and myself.
By Ugochukwu victor5 days ago in Lifehack


Comments (1)
Great article with step by step instructions. Even doing those morning pages from The Artists Way; what you write down first thing each morning can really take you by surprise. Top story well deserved.