
The Ultimate Guide to Making Instant Pot Chili
A Hearty and Quick Meal for All Seasons

There's nothing quite like a bowl of steaming, flavorful chili to satisfy your cravings, especially when it’s made effortlessly in an Instant Pot. This beloved kitchen gadget transforms the traditionally long process of chili-making into a quick and easy task, without compromising on taste or quality. Whether you're a busy professional, a parent on the go, or someone who loves cooking but hates the mess, the Instant Pot is your best friend. In this post, we'll dive into a step-by-step guide on how to make the perfect Instant Pot chili, complete with tips, variations, and serving suggestions.
Ingredients You’ll Need
Before we jump into the cooking process, let’s gather the ingredients. Here’s what you’ll need for a classic beef chili:
- Ground beef: 1 pound of ground beef (you can substitute with ground turkey or chicken for a leaner option).
- Onions: 1 large onion, finely chopped.
- Garlic: 4 cloves of garlic, minced.
- Bell peppers: 2 bell peppers (any color), chopped.
- Tomato paste: 2 tablespoons.
- Canned tomatoes: 2 cans (14.5 ounces each) of diced tomatoes.
- Canned beans: 2 cans (15 ounces each) of kidney beans, drained and rinsed (feel free to mix with black beans or pinto beans).
- Beef broth: 1 cup.
- Spices: 2 tablespoons chili powder, 1 tablespoon cumin, 1 teaspoon paprika, 1 teaspoon oregano, 1 teaspoon salt, 1/2 teaspoon black pepper, and a pinch of cayenne pepper (optional for heat).
- Olive oil: 2 tablespoons for sautéing.
- Optional add-ins: Corn, jalapeños, and a splash of beer for extra depth of flavor.
Step-by-Step Instructions
Step 1: Sauté the Aromatics
Set your Instant Pot to the sauté setting and add the olive oil. Once the oil is hot, add the chopped onions and bell peppers. Sauté for about 3-5 minutes, or until the onions become translucent. Then, add the minced garlic and sauté for another minute until fragrant.
Step 2: Brown the Meat
Add the ground beef to the Instant Pot. Break it up with a spatula and cook until it’s browned and no longer pink. This should take about 5-7 minutes. If you’re using a fattier cut of beef, you might want to drain excess fat before proceeding to the next step.
Step 3: Incorporate the Tomato Paste
Stir in the tomato paste and let it cook with the meat and vegetables for about 2 minutes. This helps to deepen the flavor of the chili and eliminates the raw taste of the tomato paste.
Step 4: Add the Remaining Ingredients
Add the diced tomatoes, beans, beef broth, and all the spices. Give everything a good stir to ensure the spices are evenly distributed. If you’re adding any optional ingredients like corn or jalapeños, now is the time to include them.
Step 5: Pressure Cook the Chili
Secure the lid on the Instant Pot and set the valve to the sealing position. Select the "Manual" or "Pressure Cook" setting and set the cooking time to 20 minutes. It will take a few minutes for the Instant Pot to come up to pressure before the cooking timer starts.
Step 6: Natural Release
Once the cooking time is up, allow the pressure to release naturally for about 10 minutes, then switch the valve to the venting position to release any remaining pressure. Be cautious of the steam as it can be very hot.
Step 7: Final Touches
Open the lid and give the chili a good stir. If the chili appears too thick, you can add a bit more beef broth to reach your desired consistency. Taste and adjust seasoning as needed.
Serving Suggestions
Your Instant Pot chili is now ready to be enjoyed! Here are some ways to serve it:
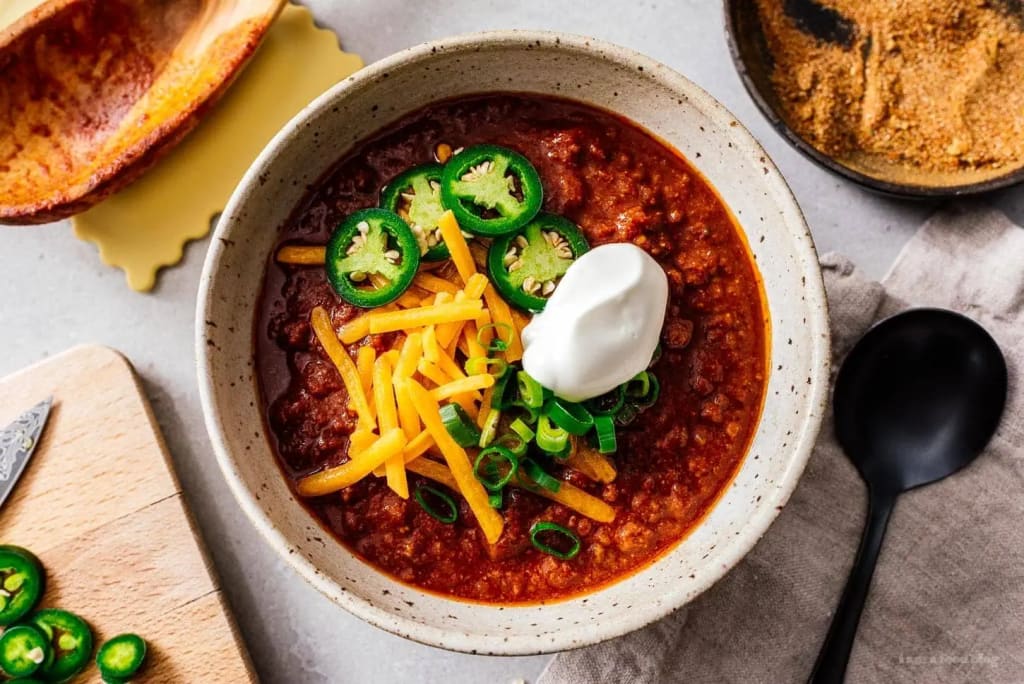
- Classic style: Ladle the chili into bowls and top with shredded cheese, sour cream, and chopped green onions. Add a side of cornbread or tortilla chips for a complete meal.
- Chili Dogs: Top your favorite hot dogs with a generous scoop of chili and some shredded cheddar cheese.
- Loaded Baked Potatoes: Split a baked potato and top it with chili, cheese, and a dollop of sour cream for a hearty and filling dish.
- Chili Mac: Mix your chili with cooked macaroni and top with cheese for a delicious chili mac.
Tips for the Best Instant Pot Chili
- Spice levels: Adjust the amount of cayenne pepper to control the heat level of your chili. Start with a small amount and add more if you prefer it spicier.
- Flavor development: For even deeper flavors, make your chili a day ahead. The spices and ingredients meld together beautifully when allowed to sit overnight.
- Vegetarian option: To make a vegetarian version, skip the meat and add more beans or use a meat substitute like tofu crumbles or a plant-based ground meat alternative.
- Thickening agent: If you prefer a thicker chili, you can add a slurry made of cornstarch and water at the end of the cooking process. Simply mix 1 tablespoon of cornstarch with 2 tablespoons of water and stir it into the chili until it thickens.
Making chili in an Instant Pot is a game-changer for those who love a hearty meal without the hassle. This method not only saves time but also locks in flavors, making every bite rich and satisfying. Whether you’re cooking for a crowd or meal prepping for the week, this Instant Pot chili recipe is sure to become a staple in your kitchen. Enjoy the convenience and the deliciousness of a homemade chili that tastes like it’s been simmering all day. Happy cooking!
About the Creator
Milon Barmon
Hey, My name is Milon Barmon. I'm a Blogger.
Enjoyed the story? Support the Creator.
Subscribe for free to receive all their stories in your feed. You could also pledge your support or give them a one-off tip, letting them know you appreciate their work.
Keep reading
More stories from Milon Barmon and writers in Lifehack and other communities.
How to Make Huevos Rancheros - A Delicious Mexican Breakfast
Huevos Rancheros, or "rancher's eggs," is a traditional Mexican breakfast dish that is both hearty and delicious. It's a perfect way to start your day with a flavorful punch. This dish typically consists of fried eggs served on lightly fried corn tortillas, topped with a homemade salsa, and often accompanied by refried beans, avocado, and cheese. In this blog post, we'll walk you through the step-by-step process of making authentic Huevos Rancheros, with tips to customize it to your taste.
By Milon Barmon17 days ago in Lifehack
Unlocking the Health Benefits of Green Tea: A Comprehensive Guide
What Are The Benefits Of Green Tea? It’s rather true that a nice cup of tea can be a wonderful way to relax after a long day. In addition, research indicates that beyond its effect on your mind, green tea benefits your body and brain in ways you never imagined. This wonderful substance contains a rich collection of antioxidants that should help you effectively fight oxidation, excess weight, cancer, and improve brain function.
By WALID ABDIN2 days ago in Lifehack
Discover the Elegance of Dulha Sehra Online: Your Ultimate Guide to the Perfect Groom's Accessory
In the rich cultural tapestry of Indian weddings, the Dulha Sehra stands out as a symbol of tradition, honor, and elegance. As an essential accessory for the groom, the Sehra not only enhances the visual appeal but also carries deep-rooted cultural significance. With the convenience of online shopping, finding the perfect Dulha Sehra has never been easier. This comprehensive guide will explore everything you need to know about purchasing Dulha Sehra Online, from its historical importance to modern trends and shopping tips.
By Ritvi Jewels4 days ago in Lifehack


Comments
There are no comments for this story
Be the first to respond and start the conversation.