
How to Optimize Windows 11 for best performance
steps you need to follow
Windows 11 is the latest version of the Microsoft Windows operating system. It was released on September 25, 2015. It is the successor to Windows 10. Windows 11 is designed to be more touch-friendly and user-friendly. It offers more new features and enhanced security features than its predecessor. Windows 11 comes with several improvements over the previous version. These include improved security, faster boot times, a revamped Start menu, an updated Windows Store, and Cortana voice assistant. In addition, it offers new apps and improved voice controls for games and media playback. It also supports full-screen applications, which allow users to see more of their computers’ screens.
We all know that Windows 11 is a fast and reliable operating system, but some users experience slowdowns and even freezes when using it. This problem can be caused by a variety of factors, such as poorly optimized software or hardware, virus attacks, and driver issues. Fortunately, you can speed up your system by optimizing it and reducing the amount of software running in the background.
In this article, we will cover some of the best methods you can use to speed up Windows 11. Let’s get started!
1. Install windows updates properly
Windows updates are an important part of keeping your computer protected from security threats. By installing them regularly, you can help make sure that your computer is up to date and configured with the latest security patches to protect against emerging threats including viruses, malware, and spyware.
1. Click on the Windows icon in the bottom left corner of your screen and click “Start“.
2. Type “Windows update setting” in the search bar and press Enter.
3. In the window that opens, click on “Check for updates.”
4. If an update is available, select it and click “Install all.”
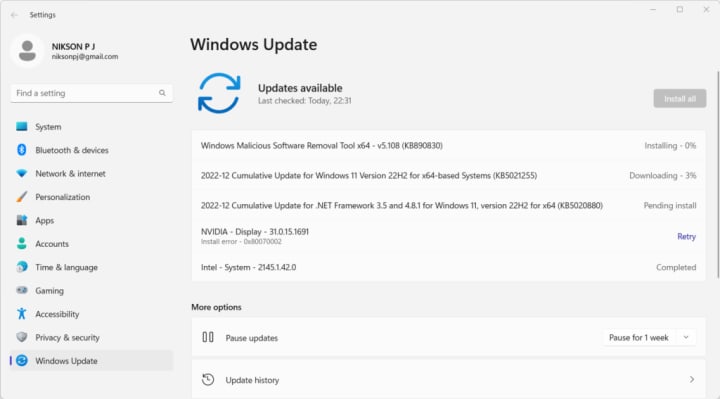
5. When the download is finished, click “Close” to close the window.
2. Disable unnecessary startup programs
There are countless programs that start automatically when you turn your computer on, but many of them are unnecessary and can even slow down your computer. That’s why you need to disable unnecessary startup programs and keep your PC running smoothly!
1. In Windows, launch the Settings app.
2. On the left side of Settings, choose Apps and Select the Startup option
3. To disable any startup apps that are now active, click the toggle switches next to them.
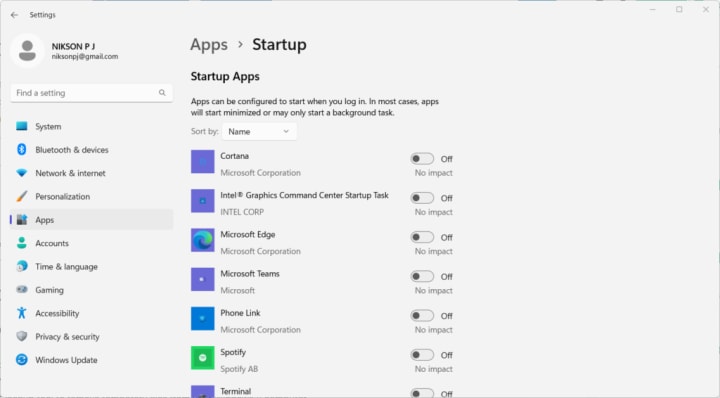
Once you reboot your computer, the program you disabled will no longer start up. You can also disable startup programs using the Task Manager utility in Windows.
3. Clear temporary files
If you are using Windows 11, and find that your computer is taking a long time to start up or feels sluggish, you may have a lot of temporary files stored on your system. Temporary files are files that are no longer needed and can be deleted to help improve the performance and speed of your computer. There are many tools available to help you delete temporary files in your Windows 11 system, including the built-in Disk Cleanup tool. The steps below will guide you through how to use the Disk Cleanup tool to remove temporary files from your Windows 11 computer.
Windows 11 comes with the “Temporary Files” feature. This feature helps you to clear your temporary files automatically. Here are the steps to clear your temporary files in Windows 11.
1. Open the Windows Settings from the Start menu
2. Select System in the left-hand menu and then select Storage
3. Click on the Cleanup recommendations and choose the files to cleanup
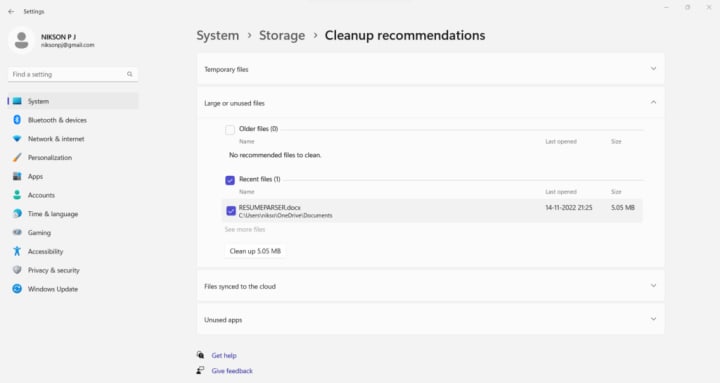
4. A list of temporary files will appear, select the items you wish to clean and click on Clean up – then your files will be deleted from your computer! Clearing the temporary files can help you to save space on your computer.
4. Perform disk clean up
Disk Cleanup in Windows 11 is a great way to free up disk space and improve system performance. Disk Cleanup helps remove unnecessary files from the hard drive, such as temporary Internet files, program installers, and other files that are no longer needed. The tool also lets you manage your Windows Update history, which can be especially helpful if your system has been running for a long time and has accumulated a large amount of updates. Additionally, Disk Cleanup can help identify and remove unnecessary system restore points, which can help reduce the amount of storage space used by the system.
1. Open the start menu and type “disk cleanup” into the search bar.
2. Select “Disk Cleanup” from the list of available programs.
3. Select the drive you want to clean up and click “OK”.
4. Select the types of files you want to clean up and click “OK”.
5. Review the list of files to be clean up and click “Clean up system files”.
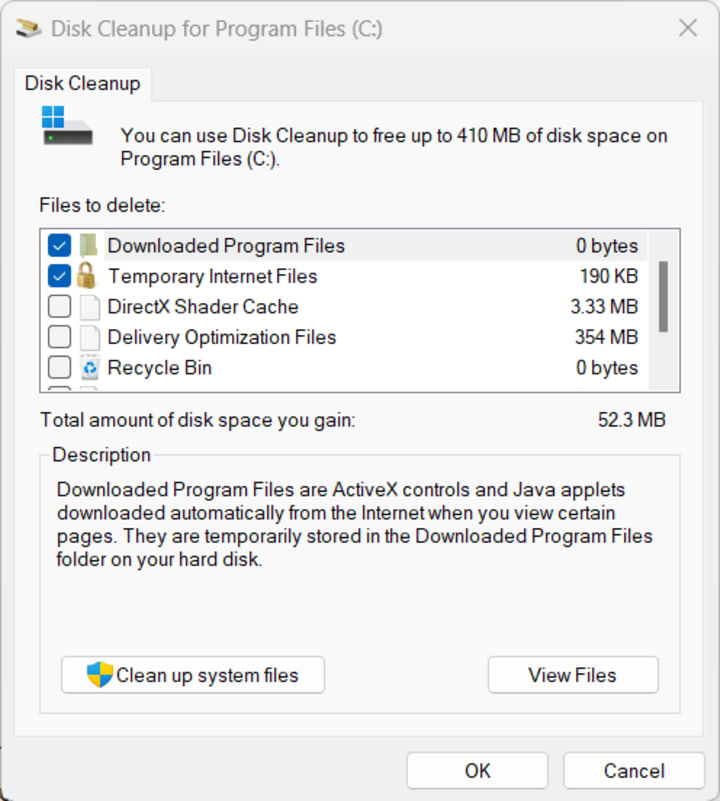
6. Once the process is complete, you will be able to view the amount of disk space that has been freed up.
5. Enable storage sense
Storage Sense is a feature that allows you to manage your storage space on your computer. It helps you to free up space so that you can keep your computer running faster and more efficiently. You can automatically remove unnecessary files from your computer or you can select specific files to be removed. It can also help you to find and remove duplicate files, which frees up even more space on your computer.
Storage Sense can be enabled in Windows 11 by following the steps below:
1. Go to Settings and Click on System.
2. Select Storage and Toggle on the Storage Sense switch.
3. Select the frequency you want Storage Sense to run.
4. Click on “Run Storage Sense Now” if you want to start the cleaning process right away.
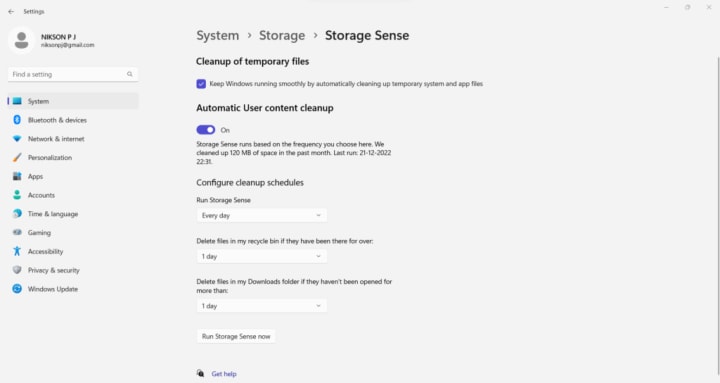
Storage Sense will now be enabled and will run at the frequency you have set.
6. Check for low disk space & free up space
Low disk space memory can cause a laptop to slow down or even crash, so it is important to free up disk space regularly. The easiest way to free up disk space is to delete unneeded files and programs, such as those that are no longer used or are taking up too much space. It is also a good idea to check the Recycle Bin and delete any files that have been placed there. Additionally, it can be helpful to use disk cleanup utilities or disk defragmenters to optimize disk space.
7. Install an antivirus program
Antivirus software is essential for any computer user. It is designed to protect your computer from malicious software, such as viruses, spyware, and other unwanted programs. Without it, your computer can become infected with viruses, which can lead to data loss, system crashes, and other problems. Antivirus software helps to keep your computer safe and secure by scanning your computer regularly for viruses and other threats, and removing them when they are detected.
The advantages of antivirus software include:
1. Protection from malicious software: Antivirus software can detect and remove viruses, spyware, and other malicious programs that can damage your computer or steal your personal information.
2. Prevention of data loss: If a virus or malware program infects your computer, it can destroy or corrupt your data. Antivirus software can help to prevent this from happening by scanning your computer regularly and removing any malicious programs it finds.
3. Faster computer performance: Antivirus software can help to improve your computer’s performance by scanning for and removing any malicious programs that can slow down your computer.
4. Reduced risk of identity theft: Antivirus software can help to protect your personal information from being stolen by malicious software.
About the Creator
Keep reading
More stories from writers in Lifehack and other communities.
Building Homes of Your Fancy: Modular Kitchen at Its Best
Considering that you’re starting off on a quest to design the perfect home? There is no need to do so when individuals can utilize the charms of modular kitchens. At least when it comes to the aspect of interior design, few items can match the versatility and aesthetics of the modular kitchen items. It is high time to turn to humanity and discuss the topic of interior design and how such elements of a living room as modular kitchens can change your living environment for the better.Whether you’re either extending your family or just desired to redecorate, modular kitchen cabinets are also highly flexible with a view to grow right along with your kitchen, making it both functional and fashionable for the foreseeable future.
By SpinHomes PVT LTD3 days ago in Lifehack


Comments
There are no comments for this story
Be the first to respond and start the conversation.