
How do you do that? Can you show me how you draw something? I wish I could draw like you.
Every artist has gotten this at some point. It's nice to hear...most of the time. Everyone has their own way of drawing or creating something. Not everyone is going to be the same. You can always find another tutorial somewhere else. However, why scour the interwebs when you can have someone just deliver it to you through social media posts.

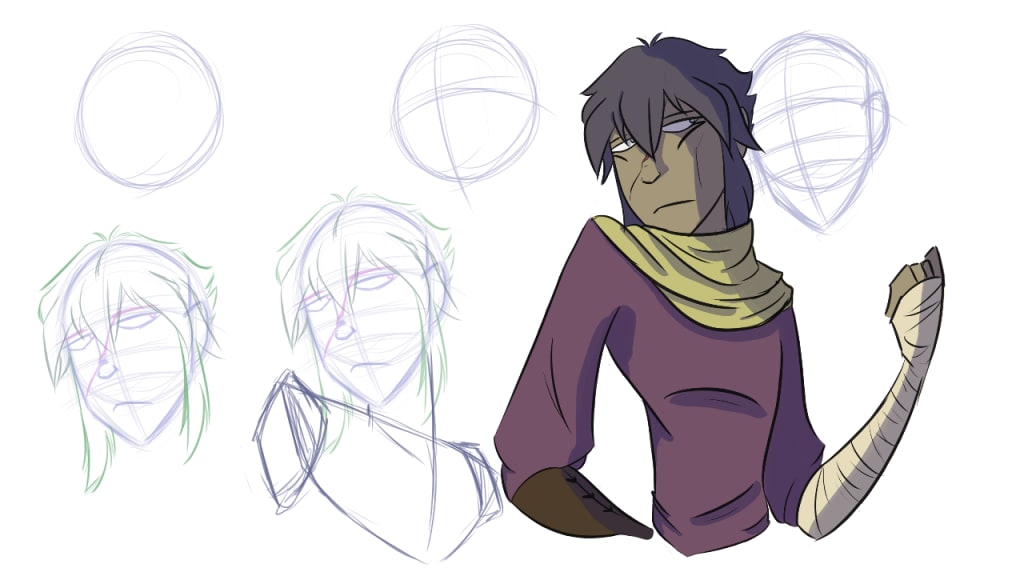
Start with a circle. Then cross two lines in the circle. This will give you a basic direction on where the facial features are going to go. it also helps in lining up the chin with the rest of the face. I will often add in a second line to determine where the jawbone will start into the point for the chin. I then tack on the ear - this part is usually from the to the bottom of the nose. I exaggerate the ear a little for my characters; something about being aesthetically pleasing to me. In the last portion of structuring the face, I add in facial features such as the eyes, nose, and mouth using the lines from the previous step as guides.
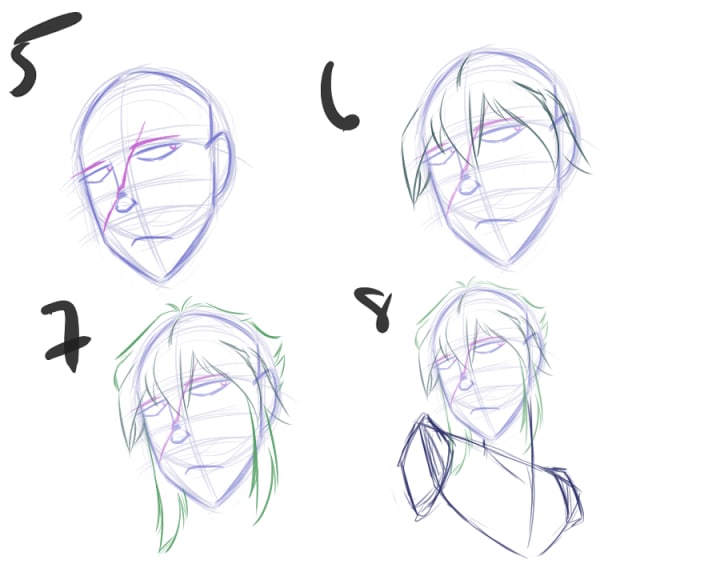
After I have the basic facial features laid out, I add in some of the details to the face. For this particular character, I started with the scar on his face. Then I move on to the eyebrow. The distinguishing feature usually helps with determining how the eyebrows are going to sit on his face for his expression. At least, subconsciously this is what goes through my brain. Once I have some of the details in place on the face, I move on to the front portion of the hair. After a lot of erasing on finding the right placement, I go to the back of the hair and whatever other fantastical details I want for the hair. Once I have the hair figured out, I move on to the neck and shoulders.
This part for me is a little more involved since I tend to vary on proportions sometimes depending on how I am doing for the day. I tend to start with an outline of the neck, erasing constantly until I have a shape that will support the head. I will then make a straight horizontal line to give me a guide on the shoulders. I will then make an odd triangle or trapezoid looking shape to signify the top portion of the chest.
It usually takes me several minutes to determine how the shoulders and chest will work out in relation to one another. Once I am satisfied (er, fed up really) with the placement, I add in the shoulders. Mine are angular because of my style, but a simple oval will do.

The fun part comes next. I have a love-hate relationship with structuring out the pose for any character. I did a really simple pose for this particular project for simplicity's sake. I make cylinder shapes for the arms. When doing a three-quarter view like this, I start on the character's right (our left) so that I can think about if I want to hide the other arm.
AKA: I do not want to draw another arm or hand most of the time.
This is one of my favorite poses, so I went with the raised arm on the other side with the closed fist. It feels more uncaring or polished slightly. It is very much in this character's personality for this.
Once the pose and arms are figured out from the waist up, I begin outlining the clothing.

Line art and details are the last things I will do. This gives me an opportunity to build the character's outfit to showcase who they truly are. This can be of any outfit that you like. I usually have a concept in mind of where the character came from. Then I do a little research into the type of clothing they would wear.
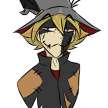
This character comes from a desert-like area. The scarf around his neck is big enough to use as a hood and face-covering for sandstorms. He has a nod to the Egyptian culture with the kohl detail for the eyes. It is not a historically accurate representation since he is from a fantasy setting.
This is where you can add in other details that someone might want to wonder about your character too. For example, the bandage on this guy's arm gives the thought that maybe he was injured at some point.
Once done with putting in the remainder details on your character at this stage, you can start thinking about clothing details. You can make lines during the line art stage of this or wait until you have color in your character first. It is completely up to you. I like to add clothing detail during the line art stage so that I do not overthink when I am working on color.
...
How do you do that? Can you show me how you draw something?
I just simply start with a shape and then add on to it until it resembles something. I do a little bit of research on what I have in my head, more specifically: for poses. I start from the head and then go down.
Do not compare yourself to anyone. Do not wish you could draw like someone. You have your own unique style that you can develop to be better. It is just a process. Every artist has their own process. Use them as guides to help better yourself.
Do not compare.
Pick up your pencil and play with shapes.
About the Creator
In_Sketched
I am just a hobbyist writer. I have a lot of concepts roaming around in my head that I do not have enough notebooks or sketchbooks to places them all in. I am mainly an artist as opposed to a writer.
Keep reading
More stories from In_Sketched and writers in Lifehack and other communities.
Intermittent Fasting for Rapid Weigh loss
Start writing...Intermittent Fasting is extremely popular worldwide. It turns out to be an effective way to lose weight. With intermittent fasting you alternate short periods of eating with periods of fasting to effectively lose weight.
By Elhassan Errezzaki5 days ago in Lifehack


Comments
There are no comments for this story
Be the first to respond and start the conversation.