


My guess is that if you love cheese of any kind, mozzarella is one that will always be on the list as a favourite. What's not to love about it? It's great to have in a salad, a sandwich, or as part of almost any meal that you can think of, really; and let's not forget the best way - melted as a topping on a pizza. Seriously, the more on a pizza, the better; all gooey and delicious, the melted strings of cheesy goodness as you pick up a slice - drool, drool.....sorry, I forgot what I was talking about for a second. Where was I?
Along with whole milk ricotta, learning to make mozzarella was one of the first that I made, and I was quite surprised to find that it's not as difficult to make as it might seem. Having said that, it can take a little practice when stretching the cheese properly, but that's really the only tricky thing about it. My technique for stretching the cheese definitely needs work (just watch my video, you'll see what I mean), but that's just another reason to keep making more, not that I need an excuse to make it.
Below is the recipe that I use when making mozzarella. You can follow the steps below, or watch this totally amateur video that I made during lockdown last year. Either way, I hope you enjoy it.
Ingredients
- 4 Litres Unhomogenised Milk, chilled
- 2ml Calcium Chloride
- 1 & 3/4 tsp Citric Acid mixed in with 1/4 Cup Cooled Down Boiled Water
- 2ml Vegetarian Liquid Rennet or 1 Tablet dissolved in Cooled Down Boiled Water
- 100g Non-iodised Salt
- 1 Litre Cooled Down Boiled Water
- Ice Cubes
Equipment
- 2 Large Pots
- Draining Spoon
- Whisk
- Thermometer
- Muslin Cheese Cloth (Butter Muslin Cloth), damp
- Large Knife
- 2 Large Bowls
- Colander
Step 1.
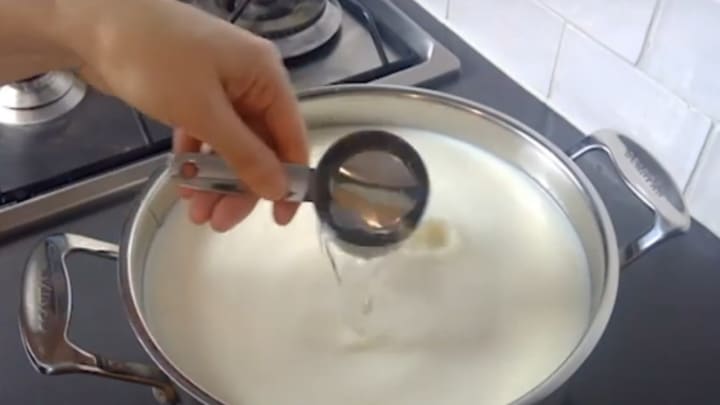
In a pot, add the calcium chloride to the chilled milk, then stir in the diluted citric acid and stir gently with the whisk.
Step 2.
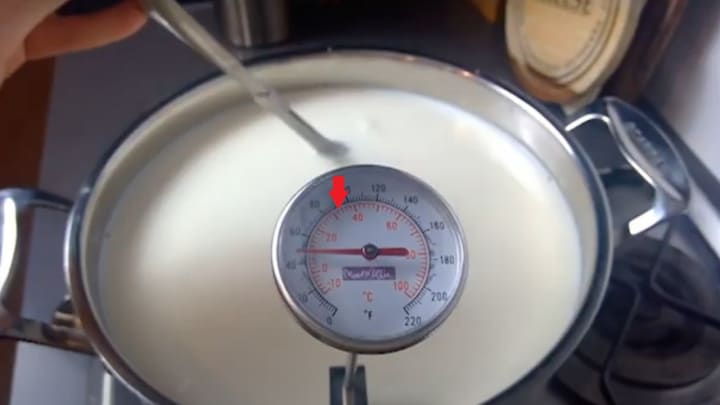
On a low heat, heat the milk up to 32°C (about 90°F), stirring constantly.
Step 3.
Take the pot off the heat and add the rennet that's been mixed in with the water to the milk. Give it a stir, then cover and leave it to set for 25-30 minutes.

Step 4.
With the knife, check the curd for a clean brake by gently cutting into it. If it's not ready, leave it sit for another 5 or 10 minutes and check again. If it's ready, cut the curd into approximately 3cm cubes.


Step 5.
Put the pot back on to the stove and slowly heat the curd up to 45°C (about 113°F).
Step 6.
Maintaining the heat at 45°C (about 113°F), gently stir and cut any larger pieces of curd. Keep a constant eye on the temperature, as it must not go over 45°C / 113°F.


Step 7.
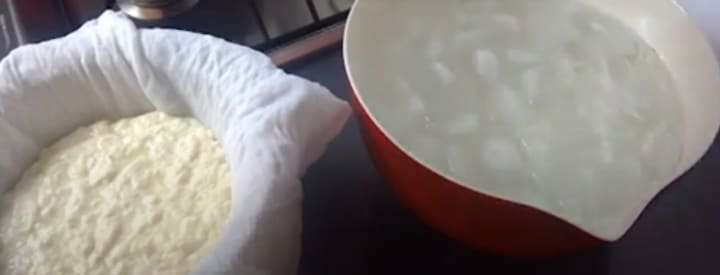
Transfer the curd to the damp muslin cheese cloth that's been lined on a colander and sitting on a bowl to drain.

Step 8.
Whilst the curd is draining, make up a brine with the 100g non-iodised salt, 1 litre cooled down boiled water, and ice.
Step 9.
Prepare another pot with plain water and heat up to 70-75°C (about 160-170°F).

Step 10.
Wearing rubber gloves, take a handful of the curd and place it in the hot water for a few seconds. Gently start to stretch the curd until it becomes smooth, shiny, and elastic. Roll into a ball and gently squeeze between your thumb and index finger. Place into the salted ice water for 10 minutes. Repeat with the rest of the curd.


Step 11.
Use straight away, or put the mozzarella into a container and cover using the left over whey. Store it in the fridge and it keeps for about 2-3 weeks.
*All equipment and specialty items such as the calcium chloride, citric acid, and cheese cloth can be found at your local cheesemaking specialist.
About the Creator
Jess Boyes
From Melbourne, Australia, I love creative writing and food, particularly a good quality cheese or some sort of dairy.
Keep reading
More stories from Jess Boyes and writers in Feast and other communities.
Make Your Own Pasta
I recently bought a pasta attachment for my Kitchen Aid mixer and I have never enjoyed cooking so much. It might seem simple and silly--dried pasta in the store is fairly inexpensive and its a labor of love to mix up the dough and cut it into whatever type of pasta you're craving, but it truly has been so much fun. When I first began making my own pasta I mixed the dough by hand as most of the websites recommend (and rather, insist upon) but I've recently turned toward mixing the dough in my mixer and man-oh-man is that a time saver (and a muscle saver too). I just put the mixer on the first setting and let it slowly combine all the ingredients. I usually mix for ten minutes total or so, adding a little bit of water here and there if I think the ingredients aren't combining after a reasonable amount of time. It's super slick! I figure I'm using my mixer anyway with the pasta attachment, so there really isn't much of a reason not to use it for the dough creation process as well. Call me a cheater, whatever. I can handle it.
By Lizzy Gabrick6 days ago in Feast


Comments
There are no comments for this story
Be the first to respond and start the conversation.