
How to Make Sliced Jerky
This will be your go-to jerky recipe.

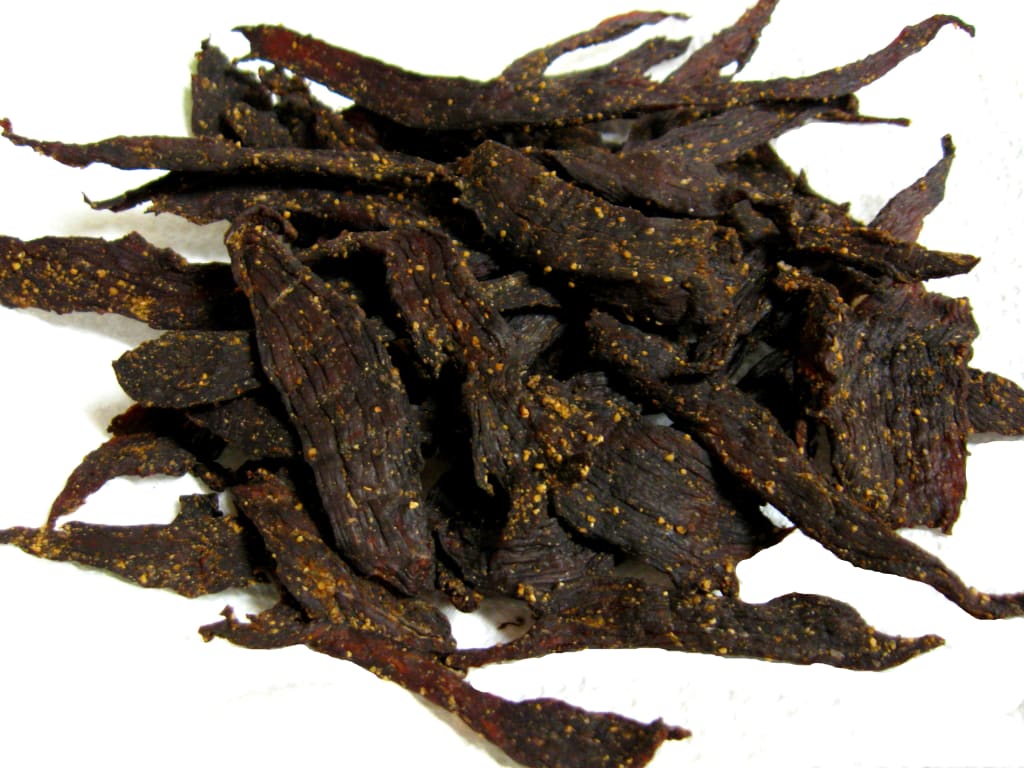
Sliced Jerky Recipe
Ingredients:
- 4 pounds of venison, sliced (You can use beef, chicken, turkey, or whatever you prefer.)
- 4 teaspoons of liquid smoke
- 4 teaspoons of salt
- 4 teaspoons of garlic salt
- 4 teaspoons of Accent Flavor Enhancer
- 4 teaspoons of onion powder
- 4 teaspoons of ground black pepper
- 1 cup of Worcestershire sauce
- 1 cup of soy sauce
Check out my video on Rumble...
Getting It Done:
The first thing is first, please remove all sinew, fat, gristle, and anything that isn’t beautiful red meat. It affects the taste and texture.
You can use whatever meat you have available. I used venison for this recipe. You can calculate the nutrition facts at myfitnesspal.com. You can also use an online recipe calculator/divider to get the right ingredients for the amount you want if the yield is too large or too small.
It’s easier to cut the meat if it is placed in the freezer for maybe 20 minutes beforehand, just long enough for it to firm up. Use disposable gloves to help you grip the meat and make better cuts. Cut the meat into 1/8 inch thick pieces or strips. The length is not really important.
Mix the dry ingredients together in a medium-sized bowl and then add the wet ingredients and mix well.
Line a large bowl with a gallon-sized freezer bag. Place the meat slices into the bag and pour the liquid mixture over the meat. Move the meat and marinade around inside the bag. Make sure the liquids are fully covering the meat. Press the excess air out of the bag, seal it, and refrigerate.
Let the meat marinate for at least 2-3 days. Yes, I said 2-3 days. The longer the meat soaks, the better the flavor. At least twice a day, get it out of the refrigerator and mix it up. This helps ensure that all of the slices of meat are flavored.
When ready to dehydrate, place a food strainer in the sink. Dump the meat into it and let it drain for a few minutes. Place a large piece of wax paper on the countertop or table. Cover it with two layers of paper towels and rip off several extra paper towels to use later.
Lay the strips on the paper towels in a single layer. Pat each piece dry with paper towels, but not too dry. Do not squeeze it out or anything. Make sure you can still see some moisture.
Place each strip in a single layer on the dehydrator trays. Do not overlap. Please allow space between the pieces of meat so the heat and air can circulate well. Continue with layers as needed. Put dehydrator top on, plug it up, set the correct temp, and wait!
All dehydrators are not all the same, so please read the instructions to your dehydrator. Those instructions will specify the temperature and the duration of dehydration. I have a NESCO® brand dehydrator. I put it on the highest setting, and it usually takes between 4-6 hours to get done.
When Is Jerky Done
Take a piece of jerky out of the dehydrator and bend it.
- If it bends only a little and then breaks, it is done!
- If it bends easily or feels very moist, it is not done.
- If it will not bend but breaks instead, it is overdone.
When the jerky is done, lay the slices on paper towels and let it stand for a couple of hours so any remaining fat or oils can be absorbed. Then put it in a freezer bag or vacuum seal bags. It can be refrigerated or frozen. To thaw, place the frozen jerky in the fridge to thaw overnight.
I hope you enjoy the recipe! Please share if you liked it. I appreciate your support very much.
Visit my profile if you would like more delicious meals. Check out some of my recent recipes: Jalapeno Cheddar Venison Summer Sausage, and Smoked Venison Backstrap.
Maybe you have a sweet tooth and need something sweet. Try my Super Simple Black Walnut Cake With Cream Cheese Icing.
This jerky recipe was originally published at deerrecipes.online. I am the owner of Deer Recipes. I am in the process of moving all of my recipes to Vocal.Media. Please bear with me during this transfer. I appreciate my readers more than I can express.
Check out my author profile on Vocal.Media if you are looking for more recipes. Please consider subscribing to me, Amanda Payne. It is free! I will be posting many more recipes in the future.
Likes, pledges, and tips are welcomed and appreciated but not necessary. You can also find me on Pinterest and Rumble.
About the Creator
Amanda Payne
An avid beekeeper, crafter, foodie, photographer, and nature girl.
Keep reading
More stories from Amanda Payne and writers in Feast and other communities.
Free Cone Day!
Call the roller of big cigars, The muscular one, and bid him whip In kitchen cups concupiscent curds. Let the wenches dawdle in such dress As they are used to wear, and let the boys Bring flowers in last month's newspapers. Let be be finale of seem. The only emperor is the emperor of ice-cream.
By Kendall Defoe 7 days ago in Feast


Comments
There are no comments for this story
Be the first to respond and start the conversation.