
Recording at home (quick guide)
Microphone input level & placement


Artist? Producer? Mixing Engineer? Just for fun? Whatever your experience level, you’ll find some helpful tips or at least re enforce/refresh some forgotten knowledge!
I’d like to keep this short, sweet and simple so let’s get into it!
In this article I’ll be sharing with you some handy tips to help get you started in recording vocals. These tips can be applied as a basis for any other instrument.
I’ll be touching on input levels, microphone room placement and approximately to help get the clearest sound possible with just positioning of the mic.
This leads me to step one.
𝐌𝐢𝐜 𝐢𝐧𝐩𝐮𝐭 𝐥𝐞𝐯𝐞𝐥
Assuming you already have a Daw like protools, logic, ableton, reason etc and everything’s set up, then it’s important that you know how to set your microphones input correctly.
Once your microphone is plugged in and armed to record you want to ensure you’re playing or singing into the mic as loud as you’re going to whilst adjusting the input level. This is achieved with the pre amp on your audio interface. (sound entering microphone into the computer)
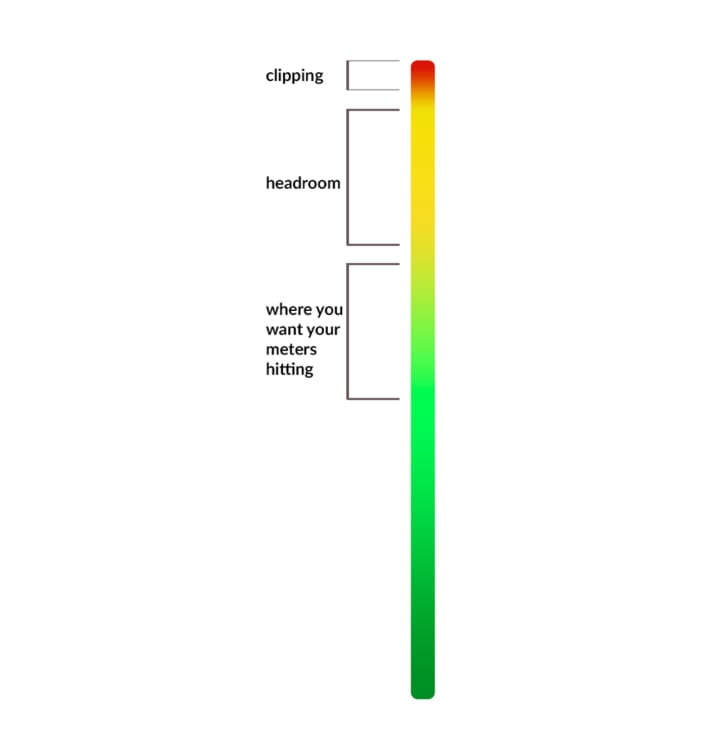
You want the little metre on your track to be averaging around the halfway point a little higher is fine For the loudest parts and not to low.
This is a sweet spot when recording digitaly.
It’s important NOT to clip as it results in a horrible distorted/cut off sound. And to low is too close to the noise floor (This is the natural noise produced by the microphone) which isn’t a sound we want in your hot #1 single.
See below where you want to be vs where not to be with your input level.
𝐌𝐢𝐜 𝐩𝐥𝐚𝐜𝐞𝗺𝐞𝐧𝐭
So your input level is set perfectly so it’s time to record right?
Hold on a sec, let’s go over something just as important as your input level and that’s microphone placement.
But first make sure you got yourself a pop filter (this filters the pop sounds from air blowing out of your magical pipes into the microphones sensitive diaphragm).
Aight! Back to placement.
By placement I’m referring to it’s position in the room and distance from the performer. Both factors impact quality of your recording immensely!
Let’s begin with position within the room.
Ideally you’d want to have treaded the room acoustically prior to recording (or just hang up a couple of thick blankets).
A great tip for the microphone’s position is to place it’s back towards any sources of external sounds that could bleed into the room while recording.
Most Cardioid condenser Microphone’s pick up the most sound from front and reject sound from the back. And just to be safe why not make it a habit with all microphones for now.
Next we want the microphone off centre in the room, being in the middle of the room can creat strange node frequency’s. And keep as far from any hard surfaces or walls to avoid the sound reflecting directly into the microphone.
Now Just a little tip for how far from the mic you want to be standing and I’ll let you go record that hit you keep yarning on about.
A good rule of thumb is to not get closer than the pop filter or an even more ideal place is to get about 20-30cm back. Although, depending on the sound you’re going for you can play around with the approximity effect. (The closer you are, the more bass is picked up and the further you are introduces more room sound).
Ideal mic proximity below.

And there we have it, a brief guide to recording in your home with clever placement techniques and correct input levels!
- Hyam
About the Creator
Hyam Studios
Production/Mixing/tips and reviews
Keep reading
More stories from writers in Beat and other communities.
Frankie's Song of the Week: Espresso - Sabrina Carpenter
A little something different from me while I deal with the strain of writers block. I thought I'd do a song of the week, because I have been surely annoying my neighbours and my friends with this absolute musical GEM. I am of course talking about Espresso by Sabrina Carpenter.
By Frankie Martinelli7 days ago in Beat
Exploring the Artistry of Wayne Dreadski in "Highroller"
Wayne Dreadski is an emerging artist hailing from the Gullah Geechee South Carolina corridor area. Influenced by the rich cultural heritage of his hometown, Wayne Dreadski's music reflects the vibrant spirit and energy of the region.
By mysoundMusic2 days ago in Beat
📢 Raise Your Voice Thread: 04/25/2024
Our “Raise Your Voice Threads” are hosted every other Thursday at 12PM ET to offer creators more avenues to uncover exceptional stories on Vocal. As we are continuously searching for fresh creators and inspiring stories, this thread provides an opportunity to exchange and discuss the stories that have moved and motivated us on Vocal.
By Raise Your Voice by Vocalabout 19 hours ago in Resources


Comments
There are no comments for this story
Be the first to respond and start the conversation.