
Canes and Cane Travel For the Blind or Visually Impaired
A multi-part series on blind travel.

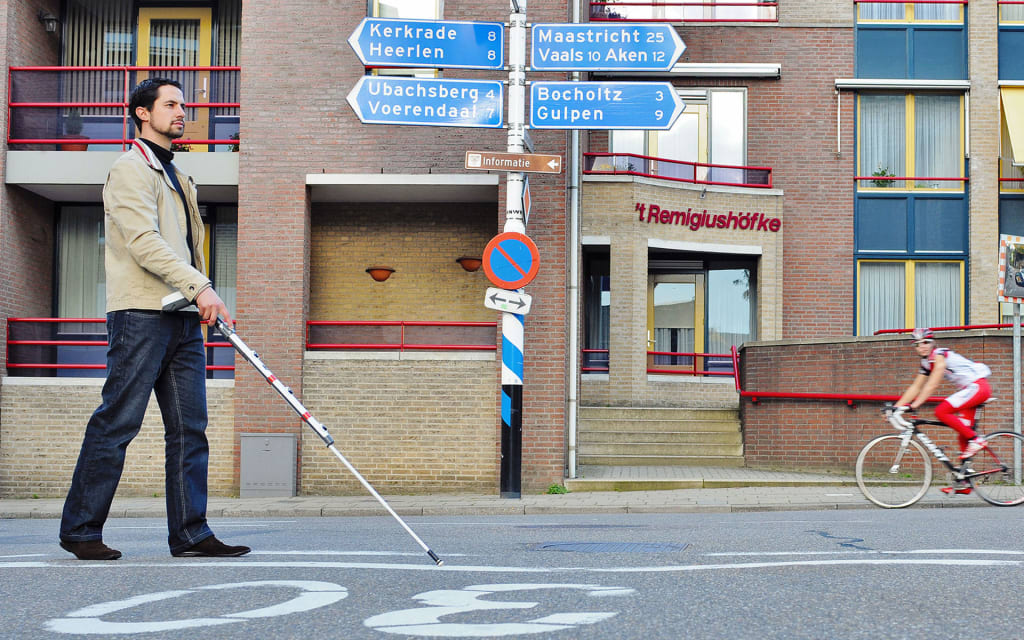
The next step in the process of learning how to travel independently while blind is learning how to use canes and practicing cane technique. Depending on the city you live in, your physical limitations, how much and how far you travel and other individual needs, cane usage will vary slightly. Your cane instructor will show you specific tricks and techniques that work best for you and suit your travel needs.
Cane Types
Aluminum Cane: There are many types of canes. The most common type is an aluminum cane. The aluminum cane is usually black and white, equipped with a golf grip for maximum traction. The bottom of most canes are red, but that varies; there are countless variations of canes on the market with different colors, patterns, and shapes.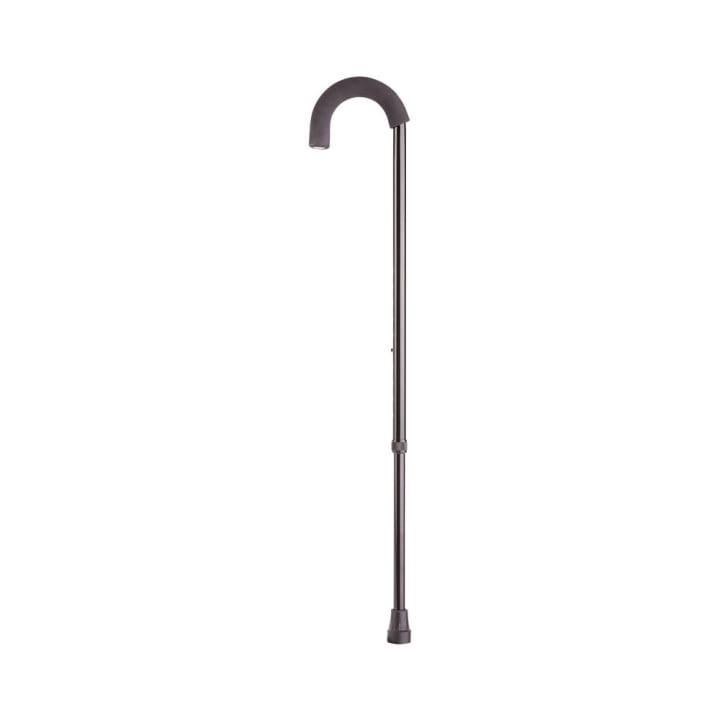
crook cane
Crook Cane: One cane I have never used myself is called a crook cane. Here's an image of it (right).
The main differentiating feature of the crook crane is its handle, which is very different from the typical straight model, and some people prefer this type of cane. Crook canes, or canes with a rounded handle, are particularly beneficial when you're on-the-go or spending the day traveling around; This is the easiest cane to hang on your arm when you are not using it.
Fiberglass Cane: The next type of cane is a fiberglass cane. I have not personally used this type of cane, either.
Graphite Cane: The next type is graphite. The graphite cane is very sturdy, and typically doesn't break as easily as an aluminum cane.
Slim Line Cane: The slim line is not one I'm too familiar with, but it is a different type of cane.
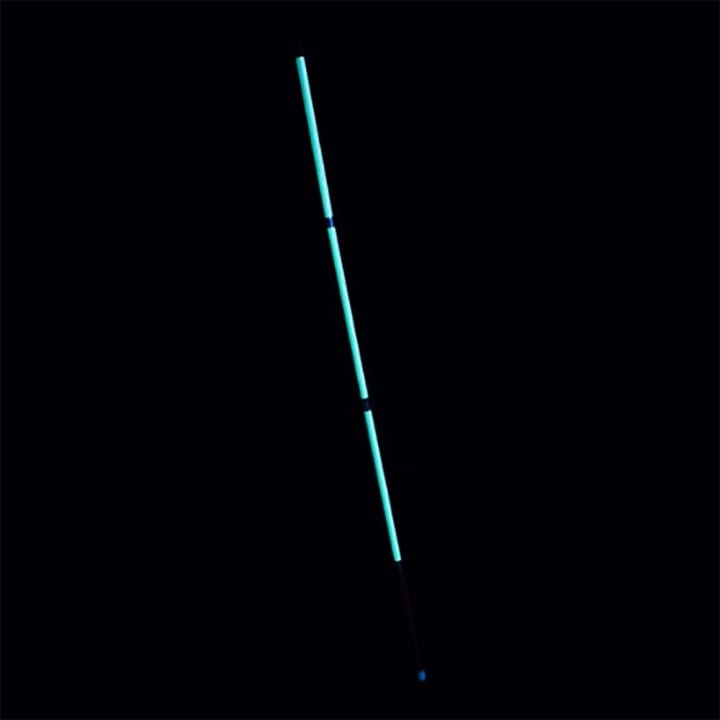
Maxi Aid Glow Green Identification Cane
Telescopic Cane: The final cane I'll mention is called the telescopic cane. These canes do not fold, but a rod which, like a telescope, has tubular sections that slide one into another. The collapsible and compact nature of telescopic canes make it highly useful for those who do not need the cane all the time, so they can easily collapse it and stow it away in a backpack (it's a great model for travelers). The telescopic cane is also adjustable (since the rod collapses into itself) which allows people some extra flexibility.
The one I recommend is called the Maxi Aid Glow Green Identification Cane (pictured above). This cane has material that glows in the dark, and the illumination lasts for about 6 hours. It charges with sunlight or artificial light in a room. It does not take long to charge, which is nice. The green glow helps notify others of your visual impairment when walking around at night, similar to blinkers and night reflectors on a bike.
When a mobility instructor teaches someone who is young, they may be given a cane and asked to show them how they think the cane should be used. This gives the mobility instructor an idea if you have had experience with a cane, or maybe they want to see how you think it should be used.
While learning cane usage myself, I've had the cane go directly into my gut, and it hurt. The instructors teach specifics on how exactly to use the cane, but only after they give you the opportunity to show them how you think the cane should be used.
Cane Usage
Cane usage is usually done with the right hand, and you are taught to put your hand within the double loop. Your hand goes on the rubber part with your first finger next to your thumb on the grip indentation. With the glow green cane, this is marked with tape. The cane is outstretched as far as it can go.
Sizing the Cane
Each cane is sized up to the person's underarm, or just above the heart. Some instructors may indicate that you should have the cane go as high as your chin. I recommend people do what is best for their needs, but it is recommended to adjust according to the armpit.
How to Use the Cane
There are several ways to use the cane. One is a touch technique where you tap each time you take a step. This is done by starting with your left foot and the cane tapping to the right. When the right foot steps, you tap on the left. This technique works with all canes, regardless of the type of cane. This is known as constant contact.
The next technique is a touch and drag. You touch the cane to the ground on one side and drag or slide the cane toward the other side. You get more of your surroundings with this technique, but it can wear the tip out.
The final one is pretty much a drag technique where the cane is on the ground at all times and you move it side to side from one shoulder to the other. This will pick up everything in its path and could trap you in the gut if you aren't careful.
Please check out the White Cane Travel site for resources of sites that sell canes of all different types and models. There are canes that come with various options for tips as well–check with the manufacturer or distributor on what cane would work best.
If you have any questions, I'm just a message away, please get in touch. My next article will talk about crossing streets and an introduction to bus travel. See you then!
Other articles in our series:
How Do You Travel When You Can't See?
Mobility Training: The First Step Toward Traveling Independently
About the Creator
Keep reading
More stories from Jared Rimer and writers in Wander and other communities.
Mobility Training: The First Step Toward Traveling Independently
Hello again folks, welcome back to the series on traveling when you're blind. In my last post I talked about how we, as blind people, need to do things differently, and provided an example on how this is done.
By Jared Rimer7 years ago in Wander
Telluride
Nestled in a remote valley of the jagged San Juan Mountains in Colorado, Telluride draws visitors from around the world with its blend of old Western charm, vibrant contemporary culture, and breathtaking scenery. Originally a mining town, Telluride boomed in the late 19th century with the discovery of gold, silver, and, you guessed it, Tellurium. It was in Telluride that Butch Cassidy and his gang robbed one of their first banks. Telluride played a huge role in the creation of the Labor Movement with its mining worker strikes in the early 1900’s. And it became one of the first towns in the world to have commercial alternating current electricity thanks to Nikola Tesla and George Westinghouse.
By Jody Holmana day ago in Wander


Comments
There are no comments for this story
Be the first to respond and start the conversation.