
How to Digitize an image for Embroidery
Embroidery Digitization Made Easy: A Step-by-Step Guide for Beginners


Discover the secrets to digitizing an image for embroidery with ease! Follow our step-by-step guide and learn how to select the right image, clean it up, convert it to a suitable file format, and create a stunning embroidery design using embroidery digitizer software. With our tips and tricks, you can create the perfect embroidery design in no time. Start your embroidery journey today!
Before starting we have an amazing offer, digitize anything from professional digitizers online for just $0.99 per thousand stitches.

Why Should you know how to Digitize an image for Embroidery?
Embroidery is a beautiful and intricate art form that has been practiced for centuries. In recent years, digitization has made it possible to create stunning embroidery designs using a computer. Digitizing an image for embroidery can seem like a daunting task, but with the right tools and techniques, it can be a rewarding and enjoyable process.
In this article, we will explore the steps involved in digitizing an image for embroidery, as well as some tips and tricks to help you create the perfect design.
Read Artice: How to convert an image to an embroidery file for free
Detailed Process of Digitize an image for Embroidery
Step 1: Select the Image to be Digitized
The first step in digitizing an image for embroidery is to select the image you want to use. The image should be of high quality and resolution, and should be free from any imperfections such as scratches or dust. If you do not have a digital copy of the image, you will need to scan it using a scanner.
Step 2: Clean Up the Image
Once you have selected the image, you may need to clean it up to remove any imperfections or unwanted elements. This can be done using a graphics editing software, such as Adobe Photoshop or GIMP. Some of the common editing techniques include cropping, adjusting contrast and brightness, removing unwanted objects, and sharpening the image.
Step 3: Convert the Image to a Suitable File Format
The next step is to convert the image to a suitable file format for embroidery digitization. The most common file formats used for embroidery are JPEG, PNG, and BMP. It is important to note that the file format used will affect the quality of the final embroidery design.
Step 4: Import the Image into Embroidery Digitizer Software
Once the image has been converted to a suitable file format, it can be imported into embroidery digitizer software. There are many software options available, including Wilcom EmbroideryStudio, Tajima DG/ML by Pulse, Hatch Embroidery Software, Brother PE-Design, and Melco DesignShop.
Step 5: Trace the Design and Create a Vector-Based Path
The next step is to trace the design and create a vector-based path. This is where the digitizer software comes in. Using the software, you can trace the design and create a vector-based path that will be used to create the embroidery stitches. It is important to pay attention to the details of the design, such as the curves and angles, to ensure that the final embroidery design is accurate.
Step 6: Assign Stitch Types and Parameters to the Design
Once the vector-based path has been created, it is time to assign stitch types and parameters to the design. This includes selecting the stitch type, such as satin stitch, fill stitch, or applique stitch, and adjusting the stitch length, width, and density. This step requires some knowledge of embroidery stitching techniques and an understanding of how different stitch types and parameters affect the final embroidery design.
Step 7: Preview the Design
After assigning stitch types and parameters to the design, it is important to preview the design to ensure that it is accurate and to make any necessary adjustments. This can be done using the digitizer software, which will allow you to see how the design will look once it is embroidered.
Step 8: Save the Design in a Suitable Embroidery File Format
Once the design has been previewed and any necessary adjustments have been made, it can be saved in a suitable embroidery file format, such as DST, PES, or JEF. The embroidery file can then be loaded onto an embroidery machine and embroidered onto the fabric.
What are the steps involved in digitizing an image for embroidery?
The steps involved in digitizing an image for embroidery typically include:
- Selecting the image to be digitized
- Scanning the image if it is a physical copy
- Cleaning up the image to remove any imperfections
- Converting the image to a suitable file format (such as JPEG or PNG)
- Importing the image into embroidery digitizer software
- Tracing the design and creating a vector-based path
- Assigning stitch types and parameters to the design
- Previewing the design to ensure accuracy
- Saving the design in a suitable embroidery file format (such as DST or PES)
What software do I need to digitize an image for embroidery?
To digitize an image for embroidery, you will need embroidery digitizer software. There are numerous options available, including:
- Wilcom EmbroideryStudio
- Tajima DG/ML by Pulse
- Hatch Embroidery Software
- Brother PE-Design
- Melco DesignShop
How can I convert an image into a stitch file for embroidery?
To convert an image into a stitch file for embroidery, you will need embroidery digitizer software. The software will typically include tools for importing the image, tracing the design, assigning stitch types and parameters, and previewing the design before saving it in a suitable embroidery file format.
What is the best way to prepare an image for embroidery digitization?
The best way to prepare an image for embroidery digitization is to ensure that it is a high-quality, high-resolution image. The image should be free from any imperfections, such as scratches or dust, and should be saved in a suitable file format (such as JPEG or PNG). Additionally, the image should be properly sized and cropped to fit within the embroidery hoop.
How do I adjust the colors in an image to make it suitable for embroidery?
Embroidery digitizer software typically includes tools for adjusting the colors in an image. You can use these tools to change the colors of the design to better suit your needs, or to match the colors of the original image as closely as possible. Additionally, many embroidery machines include color charts that can help you select the appropriate thread colors for your design.
Can I digitize an image for embroidery without any prior experience?
It is possible to digitize an image for embroidery without any prior experience, but it may take some time and practice to become proficient. There are many resources available, such as online tutorials and instructional videos, that can help you learn the basics of embroidery digitization.
What types of images are suitable for embroidery digitization?
Almost any type of image can be digitized for embroidery, but some types of images may be more suitable than others. Simple, high-contrast images with clean lines and minimal shading are typically the easiest to digitize, while more complex images with a lot of detail may require more advanced techniques.
Are there any tips or tricks for digitizing an image for embroidery?
Some tips and tricks for digitizing an image for embroidery include:
- Starting with a high-quality image
- Using a vector-based path for the design
- Paying attention to stitch density and underlay
- Minimizing jump stitches
- Previewing the design before saving it
How long does it typically take to digitize an image for embroidery?
The amount of time it takes to digitize an image for embroidery can upto 8-12 hours normally.
About the Creator
Abigail Kelly
As an embroidery author, I am passionate about the rich history and modern applications of this timeless art form. Join me in celebrating the beauty and versatility of embroidery.
Keep reading
More stories from Abigail Kelly and writers in Styled and other communities.
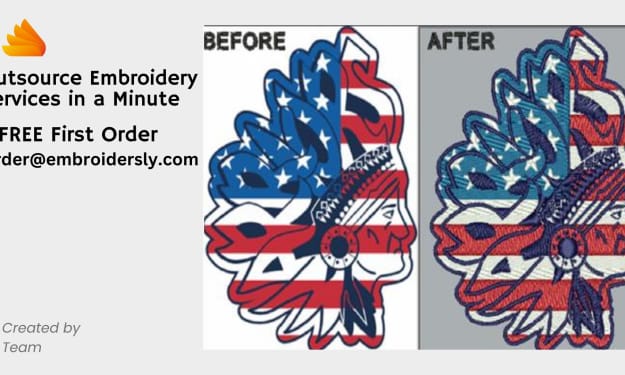
Outsource Embroidery Services in a Minute
Looking for high-quality embroidery services for your business, but don't have the resources or expertise to handle it in-house? Outsourcing embroidery services can be a smart solution. By working with a reliable embroidery outsourcing company, you can get top-notch embroidery design and production without the added expenses of hiring and training staff or investing in equipment.
By Abigail Kellyabout a year ago in Styled
Syna World Tracksuit | A Revolution in Comfort and Style
In recent years, athleisure has transformed from a fleeting trend to a staple in everyday fashion. At the forefront of this evolution is Syna World, a brand that seamlessly merges style, comfort, and functionality.
By John Matthew5 days ago in Styled
Exploring Urban Elegance: The Enduring Allure of Stüssy Jackets
Within the dynamic world of streetwear fashion, few brands possess the enduring charm and legacy of Stüssy. Since its inception in the early 1980s, Stüssy has been celebrated for its fusion of urban grit and sartorial sophistication. At the heart of this acclaim lies its iconic jackets, serving as timeless testaments to craftsmanship and style. In this exploration, we delve into the captivating narrative of Stüssy jackets, with a particular focus on the captivating Stüssy 8 Ball and Zip-Up styles.
By John Matthew5 days ago in Styled


Comments
There are no comments for this story
Be the first to respond and start the conversation.