
The Most Dramatic Before/After Image You’ll See Today: How to Edit Remote Photography
FaceTime photoshoots are a fun trend in the photography world. But how exactly do you edit the photos from these unique shoots?

When the world went into lockdown in March 2020, portrait photographers like myself were at a loss. How exactly could we still take portraits when we couldn’t even leave the house?
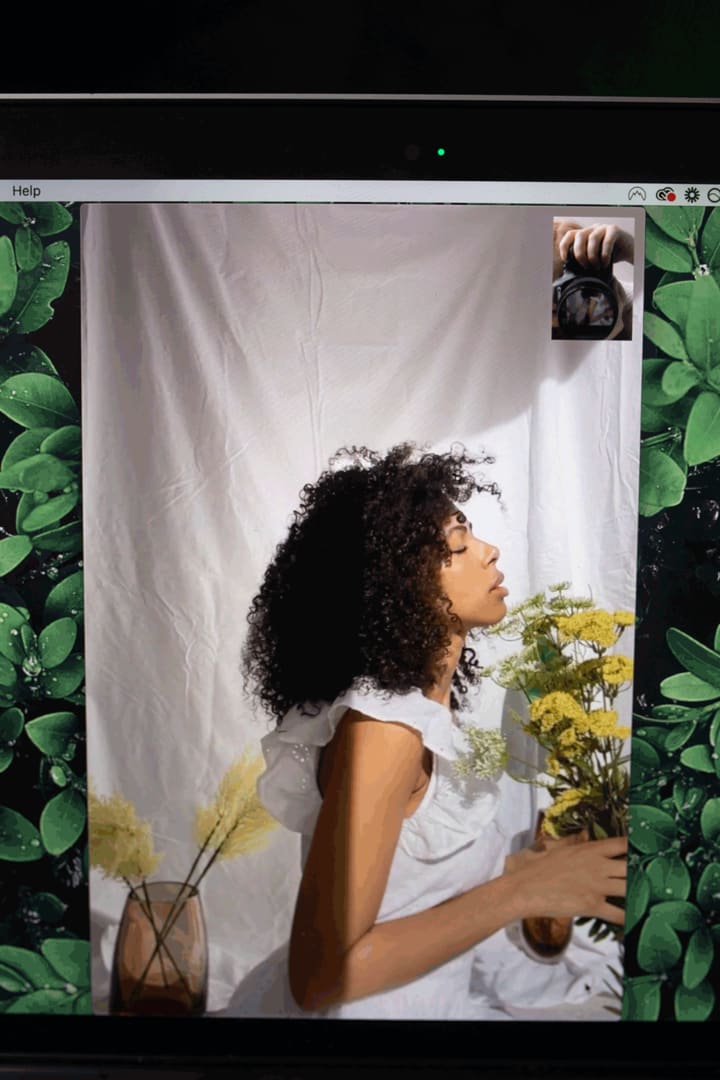
Luckily, where there are constraints, there’s creativity. A new trend emerged: remote photography. Also known as a FaceTime photoshoot, it’s where you do a video call with a model and take their photo by taking photos of the device screen.
Remote photoshoots have been embraced by photographers the world over. Even Vogue has gotten in on the action by publishing photos from various remote photoshoots, including one starring supermodel Bella Hadid.
I first shared tips on this kind of photography in How to Do a Remote Photoshoot in Six Simple Steps. But, I didn't mention the monster of this process: the editing. Today I am going to right that wrong!
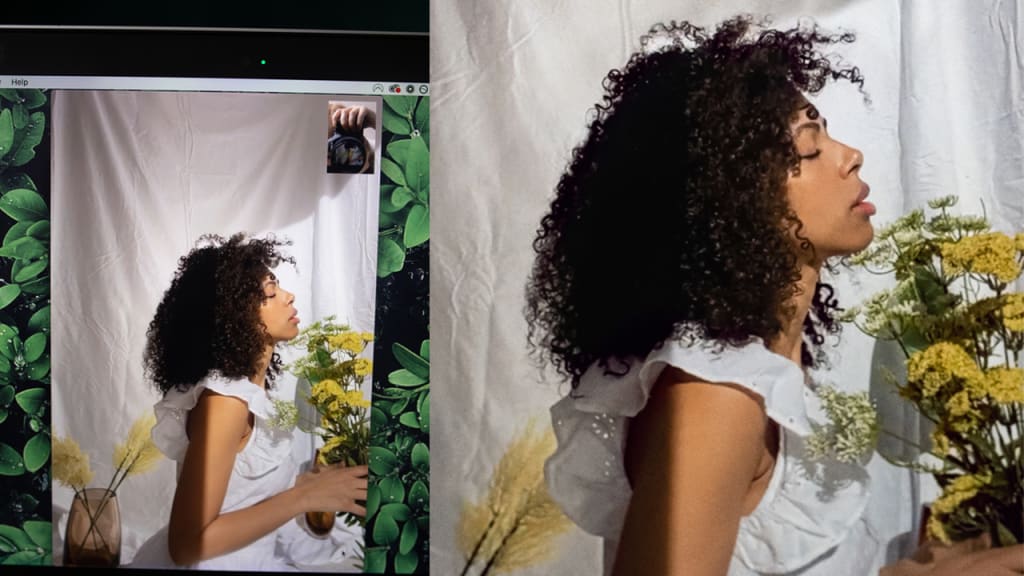
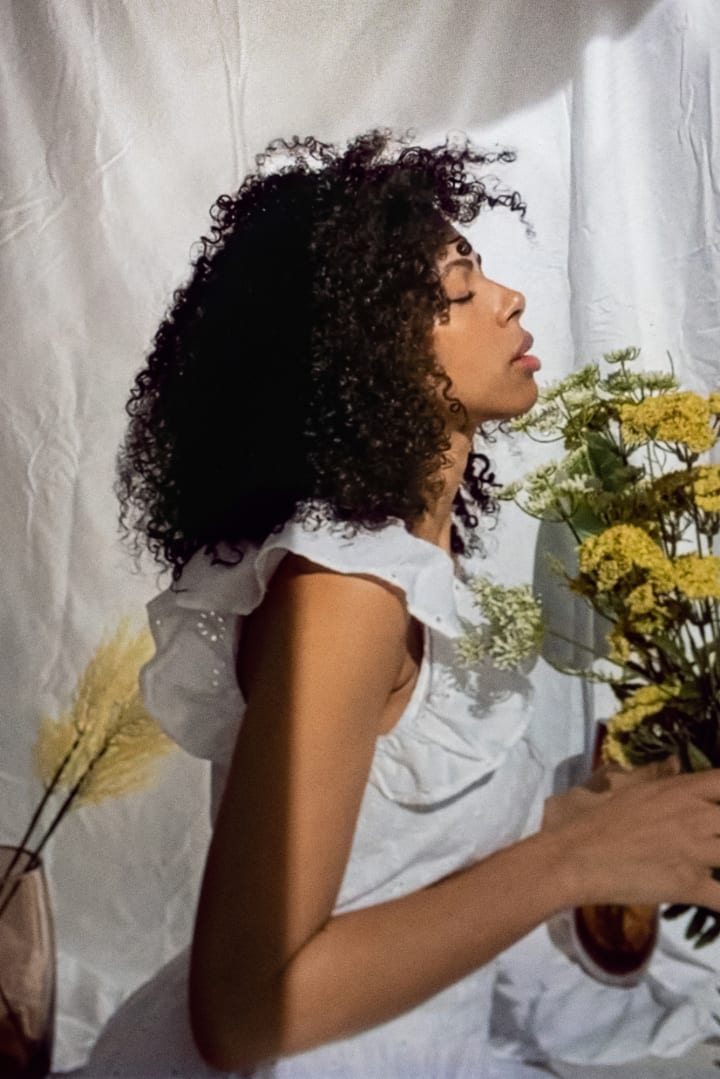
But first, take a look at the most dramatic before/after that I have ever produced:
So how did I do it, and how could you also edit your remote photos in a similar way? Here are the steps…
1. Fix the perspective
When taking a photo of a phone or laptop screen, it’s difficult to shoot at an exact perpendicular angle. Because of this, the image you’ve taken can seem skewed and not true to life. To fix this, you'll want to remove lens distortion and fix the perspective of the image.
How to remove lens distortion in Lightroom:
- Once your image is open in Lightroom, click the Develop tab.
- Go to the Lens Correction section.
- Select the box that says ‘Enable Profile Correction’. If the dropdown menu doesn’t automatically populate with your lens make and model, choose it from the available options.
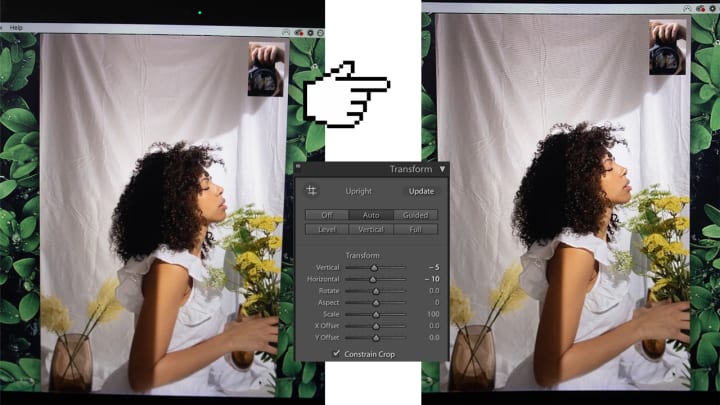
How to fix perspective in Lightroom:
- Scroll to the Transform section.
- Move the ‘Vertical’ slider until the image looks to be correct along the vertical plane. The slider should be moved to the left or the right depending on the image.
- Move the ‘Horizontal’ slider until the image looks to be correct along the horizontal plane. Whether you move the slider to the left or right depends on the image.
Pro tip: it is often fairly easy to fix perspective with remote photography because you can refer to the laptop screen in the image that you shot. Specifically, look at the outline of the video call. Does it look like a rectangle, with 90 degree angles? Tweak the image until it does, and you should see that the model’s dimensions also look accurate.
2. Crop in close
This step is pretty obvious: if you want to make the image look less like a remote photoshoot, you’re going to want to crop in close. Make sure that the model and the background takes up the entire frame, cropping out the desktop, other windows, and the actual laptop. You might even be able to crop out the video of you on the call entirely at this step. If not, no worries, we’ll get rid of that in step 4.
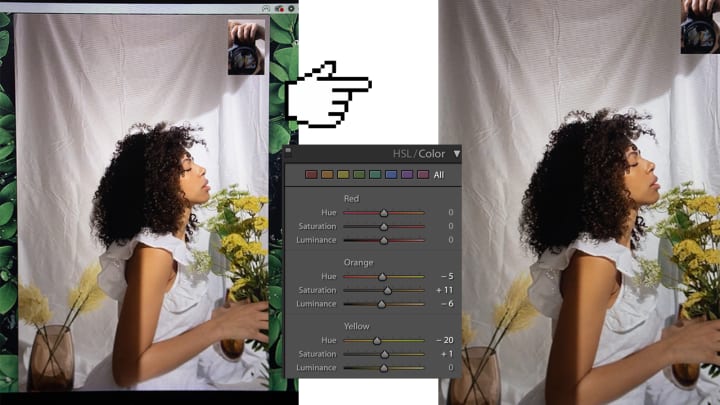
3. Adjust the colors and exposure
Technology is notorious for emitting a blue glow. With this in mind, pay particular attention to the color temperature of your image. Head over to the Basic section on Lightroom. If your image feels too cool, simply slide the temperature bar to the right to make the image warmer.
While you’re at it, make sure the image is exposed correctly. The glow of a computer screen can be quite harsh, so you may need to reduce the exposure here, but, of course, it depends on the image at hand.
Then, with the color temperature and exposure fixed, it’s time for the fun part! Head over to the HSL/Color section and play around with the hue, saturation, and luminosity of each tone, until you settle on a look that you like.
4. Clone any distracting elements
Once you’ve fixed the basic edits and color graded in Lightroom, it’s time to export the image and open it up in Photoshop to take it to the next level.
The most obvious thing you need to fix is that selfie video that shows you taking the photo, usually sitting in the top right corner. You can remove this with the clone stamp tool.
How to clone out distractions in Photoshop:
- Choose the clone stamp tool by clicking the 's' key, or by selecting it from the toolbar.
- With the clone stamp tool selected, zoom in to 100%.
- Find the part of the image that you’d like to edit. Hold 'alt' and select the part of the image that you’d like to sample from, in my case I sampled from the white backdrop.
- Now tap over the area you want to remove. You’ll see that this part of the image has been replaced by the source point.
- Keep tapping over the part of the image you want removed, clicking 'alt' and choosing a new source point where necessary, until it has been completely 'erased'.
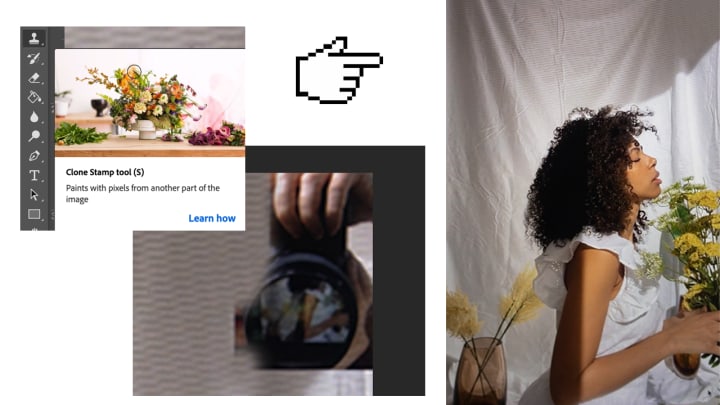
As well as cloning out the image of you taking the photo, you should also look for other distracting elements to remove, like specs of dust on your device screen that are visible in your image.
5. Add a bit of blur
When you take a photo of a screen, you’ll notice a load of little dots on the image: a dead giveaway that this is not a 'regular' photo. If you’ve never edited a photo like this, it can be hard to know just how to fix this issue... are you really going to have to clone stamp them all out individually? Well, no you’re not. I mean, you could try, but it would take you a whole weekend or longer. It's far easier to take a shortcut: add a touch of blur.
With this simple trick you'll taken off the harsh edge of the image. It will make it much less obvious that this is a remote photo.
How to add blur to your image using Photoshop:
- Click Filter > Blur > Gaussian Blur.
- Choose a radius that works for your image. A radius of between 2-6 pixels usually works, as the image will still appear somewhat in focus.
- Click OK. You're done!
6. Add grain (optional)
You've probably realised by now, but just in case you're still overly optimistic: an image from a remote photoshoot is never going to be perfectly crisp nor will it match the technical quality of a photo taken in the 'traditional' way. So why not lean in to the low-quality vibe? One way to do this is by adding grain to the image.
How to add grain to your image in Photoshop:
- Make a layer made from all layers by using the shortcut 'Shift+Command+Option+E' on Mac or 'Ctrl+Alt+Shift+E' on Windows.
- With this new layer selected, go Filter > Noise > Add Noise.
- Crank up the slider as much as you wish (250% worked for my image) and click OK.
- Change the blending mode to 'soft light' and voilà! You've got grain.
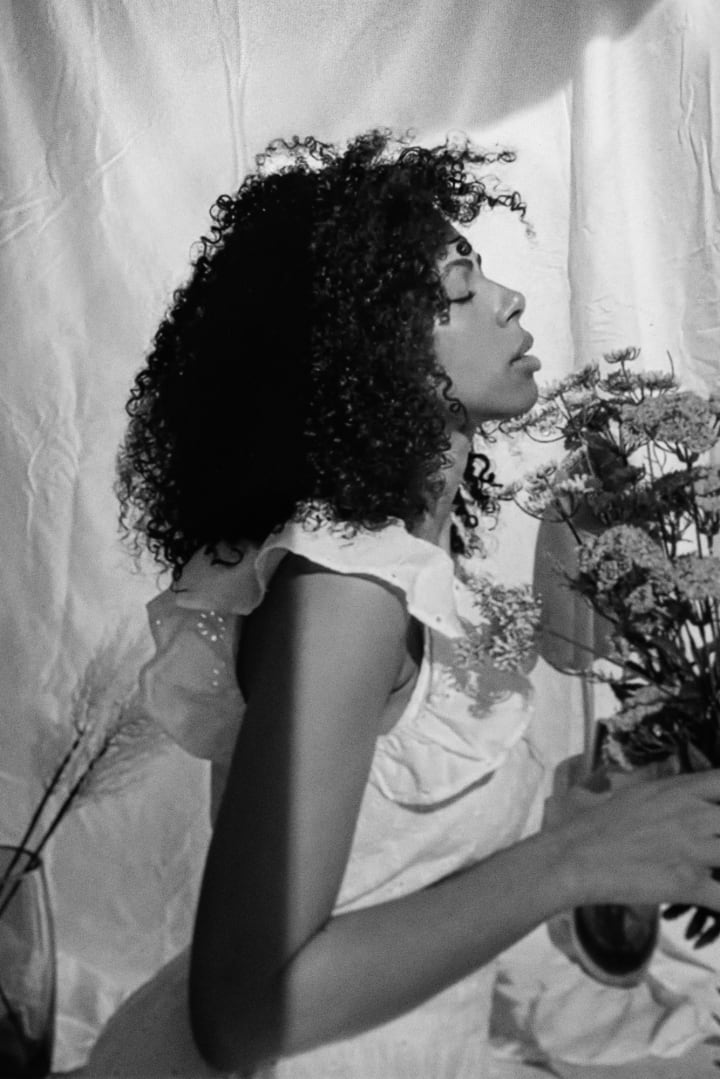
7. Make it black and white (optional)
Sometimes, when taking photos of your screen as part of your remote shoot, strange colors get captured. No matter how much you edit, something just seems a little… off. If this is the case for your image, let me share the most simple fix imaginable: if all else fails, make the photo black and white!
Black and white is super flattering, and it has the added bonus of removing any curious color issues you might be having!
How to make the photo black and white in Photoshop:
- Select Layer > New Adjustment Layer > Black and White.
- Tweak the different color channels until you’re happy with the result.
- To add more contrast and depth, duplicate your new black and white layer. Switch the blending mode to soft light, and take down the opacity until it looks good (try 20% opacity).
There you have it: the steps you need to edit your photos from your remote photoshoot... including a cheeky shortcut to make your editing process 100 times easier (the power of black and white)!
Wishing you the best of luck with your shoot! Feel free to tag me in the caption so I can see, I’m @shotbyclairep on Instagram.
Special thanks to @ritafraccalvieri for modeling for this shoot.
_____
If you enjoyed this, and want even more tips on how to do a remote photoshoot, check out my new course on just that.
About the Creator
Claire Petersen
Berlin-based fashion photographer from Ireland
Keep reading
More stories from Claire Petersen and writers in Photography and other communities.
How to Make a Moodboard for Your Next Photoshoot
Creating a moodboard is a great way for you to clarify your vision and communicate the concept behind an upcoming photoshoot shoot, whether you're working with a full team or only a model. In this article I'm going tell you how you can create your own.
By Claire Petersen3 years ago in Photography
Capturing Magic
In the world of photography, timing is the key to everything. While skilled compositions and technical proficiency are undoubtedly crucial, the perfect lighting can create the perfect photo. Nowadays, we can determine any light ourselves and are no longer dependent on any natural light source, thanks to the developed technology. We can turn every day into a night by using the right filters. And we can illuminate every night to be seen as a day. A typical process, especially in the film industry.
By Krishan Mubashar20 days ago in Photography
Exploring the Art and Craft of Photography: Pursuing Excellence in the Visual Medium
Introduction: Photography is more than just capturing images; it's a powerful means of storytelling, expression, and communication. In today's digital age, where smartphones and social media platforms have made photography accessible to everyone, the pursuit of excellence in this visual medium remains an ongoing endeavor. Best photography transcends technical proficiency; it involves creativity, vision, and a deep understanding of composition, light, and subject matter. This essay delves into the art and craft of photography, exploring what defines the best photography, the elements that contribute to its excellence, and how aspiring photographers can strive for mastery in their craft.
By WILLIAM DIAGO RODRIGUES6 days ago in Photography
OF MOTHERHOOD.
Dear mother-to-be, I wanted to let you know how very, very special I think you are. I don't think there can be any job that is more meaningful than the one you are about to begin, that of being a mom. You are the most important person in the world to your precious unborn baby, and you will be for many years.
By Catherine Nyomenda5 days ago in Writers


Comments
There are no comments for this story
Be the first to respond and start the conversation.