
The Editing Foundations Every Photographer Should Know
From the simple to the complex, these tools and skills can apply to every field of photography.


Photographers can spend years mastering their unique editing style through trial and error. Some of the general editing styles in the photography field are light and airy, dark and moody, and true to color. Being a photographer, I can confidently say, you certainly don't need to fall into a certain category and can be as refined or creative with your editing process/style as you desire. Whatever your distinctive style is, let's jump into some editing 101. These foundation guidelines and tips have been collected over the past seven years of practicing photography myself.

THE BASICS:
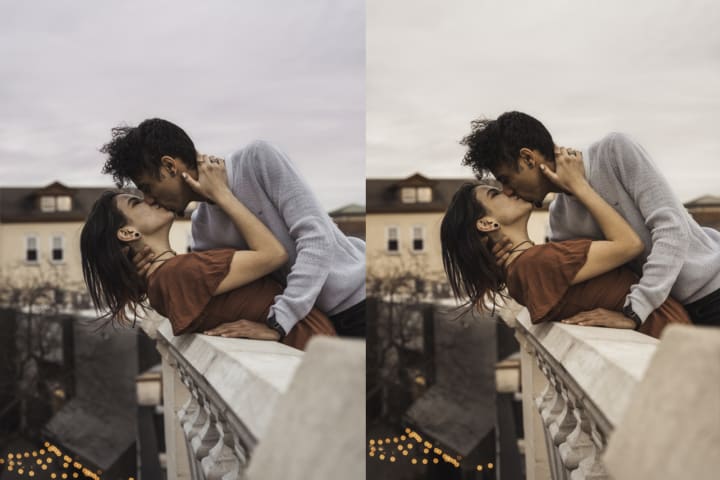
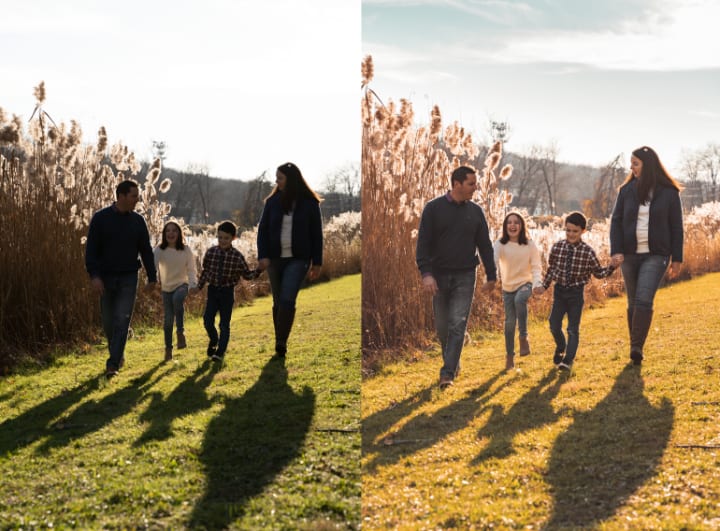
There are a lot of factors that go into editing, so let's just start with the basics. The main editing sliders are contrast, exposure, highlights, and shadows. Exposure is the amount of light per unit area reaching a frame of photographic film or the surface of an electronic image sensor. This can be affected by shutter speed, ISO, and apeature. If you are not a professional, you don't need to sweat these. The more commonly used edits are contrast, highlights and shadows. Understanding these can help determine the mood and aesthetic of you image.

Using the image above as an exmaple, you can see that there are two edits on each side. The left side has lowered shadows and highlights with little contrast while the other has the complete opposite. The left side has a more film aesthetic while the right side has a more moody aesthetic.
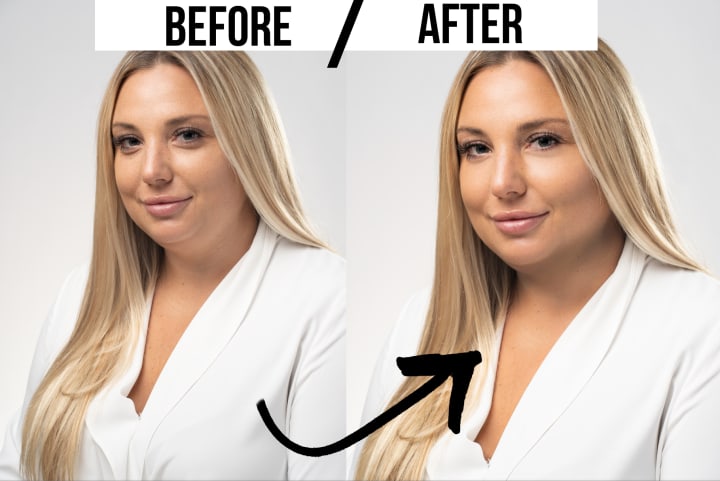
Let's start out with the basics. Headshots are not everyone's cup of tea, however, they can teach you important skills that are applicable across all portraiture. Take this portrait of a woman as an example. My client had expressed she wanted to appear slimmer. I did not manipulate her body or face, I don't personally believe in editing clients that way. To achieve this look, I utilized the dodge and burn tool in Adobe Photoshop. Depending on what editing program you use, "dodge" is a general brightening tool, and "burn" is a general darkening tool. By lightly adding deeper shadows beneath her jawline and cheekbones, I've created the illusion of a slimmer face. To balance that out, I additionally added brightness to the highest points on her face such as her chin, cheekbone, nose, and forehead. Another small editing tip that will make a world of difference is lightening the eyes. This will make the whites and iris color pop in portraits, elevating the connection to the viewer.
Headshots are a prime example that sometimes light adjustments are all that is needed to have a powerful impact.
Have you ever noticed why some photos feel like a warm summer day, and others can feel as cold as a rainy day? White balance is the secret ingredient to coloring the "warmth" and "coolness" of photos. Digital cameras need help to emulate different types of light, compensate for different types of lighting, and render a white object white. Different lighting includes sunlight, overcast skies, indoors under incandescent and fluorescent light.
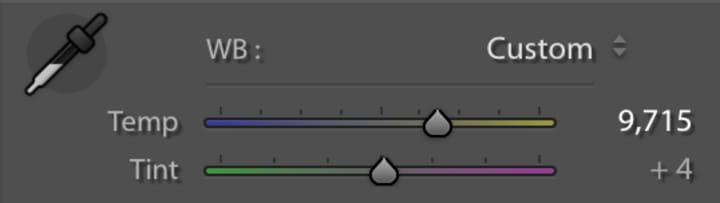
If you are editing in Adobe Lightroom, you can use the color-picker icon to directly select a white area of the image. This will use that selected pixel color as the anchor of white in the image and set it correctly.
White balance dramatically affects skin tone, particularly for people of color. I advise being careful with the warmth of photos that feature colored skin. Too much warmth will manipulate a person's skin tone into an unnatural orange color. This is a common mistake for a photographer that mainly edits paler skin as more warmth can give paler skin subject a sun-kiss glow.
In the winter, paler skin can propose its own unique problem with prominent purple and pink undertones. A quick fix is to adjust the hues of purple and magenta to red as well as play with the saturation and brightness of those colors.

SKY REPLACEMENT AND GRADIENTS
Let's get a little more advanced with editing. Here are some unique edits that can transform a boring image into something eye-catching!
Sky replacement is the solution when the sky is a little too clear and blue. This may seem overwhelming, but I promise it's rather easy. In Adobe Photoshop, use the Color Range tool to select the sky and make a mask. Then insert an image of clouds with a similar horizon perspective. This is important to it look realistic to the natural setting. Then play with the opacity and blending mode of that layer. I suggest switching it to Overlay Mode. By doing those steps I achieved a natural cloudy sky while keeping the same perspective and natural sun glares intact.
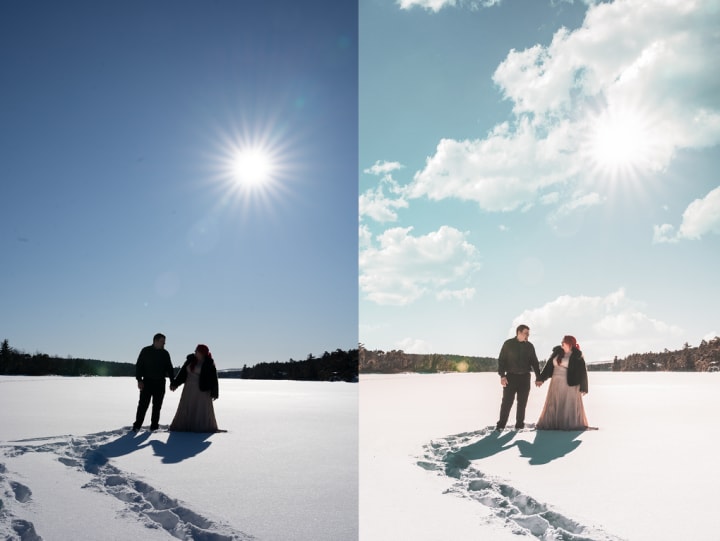
Now let's address the opposite situation, an overexposed sky. Depending on your original image, you may be able to bring that sky back! By using a gradient tool in the corner of your image and adjusting it to lower highlights, more saturation, and a bluer white balance, you can create a blue sky again with cloud details!
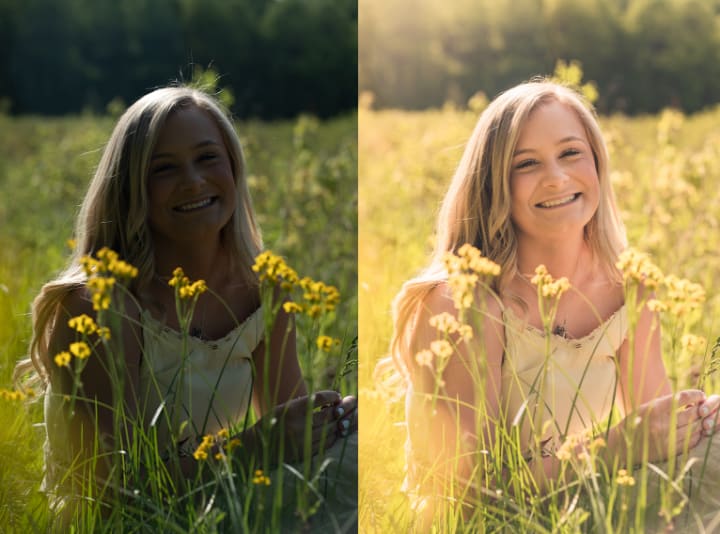
The gradient tool can also be used to bring a wonderful ray of sunshine to your images! Simply place the gradient to a corner of an image, add some brightness and a warmer white balance, and poof! You have a gentle, warm ray of sunshine glazed across your photo. An example would be the image above, where I placed the gradient on the same side where the sun was naturally hitting my subject. This creates a more seamless edit.
PROGRAMS:
As a professional photographer, I prefer to use Adobe Lightroom and Photoshop. Lightroom is perfect for bulk editing while Photoshop is great for giving extra love to individual photos. If you aren't a professional and not looking to learn or pay for Adobe, may I suggest iPiccy. Additionally, you can skip the editing process and hire a freelancer on Fiverr.
MISTAKES TO AVOID WHILE EDITING:
- Don't go crazy with the saturation. I've been there, done that. Oftentimes, only slightly exaggerating one or two main colors looks more eye-catching. Learning basic color theory will help you more knowledgeable on what colors go together as well.
- Keep horizon lines straight. A slanted horizon line is the quickest way to ruin a great photo. The good news: horizon lines can be corrected in post-production. Straightening tools are often found within the crop setting both in professional programs and even in your mobile phone.
- When cropping, use the rule of thirds. This is a commonly used grid for when you don't want a subject directly in the center. This grid will appear while using any cropping tool. Example below!

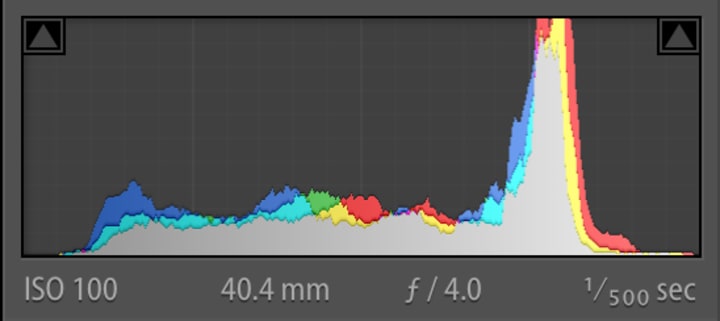
- Don't overexposure or underexpose. You can reference your histogram (below) to see where the ranges fall in the photo. Avoid having high archs at the very left and right.
Sometimes, you have to make some terrible edits to learn how to make amazing ones!
I sincerely hope every photographer that reads this learned something new or got inspired! Crafting an editing style is not an easy task, so learning some of the foundation skills is a fantastic way to start. These guidelines will save you time, energy, and wow your clients every time!
The best way to learn is to practice and experiment! Don't be afraid to play with settings as you learn. Keep learning, keep growing, and above all keep creating!
All images are originals taken by me. Feel free to check out my work here.

About the Creator
Angelica Pasquali
Hi there, I'm Angelica!
I'm a wedding/elopement photographer and climate activist based in New Jersey. By combing art and activism, I create powerful visuals that influence and educate people on global issues. IG: @dawnpointstudios
Keep reading
More stories from Angelica Pasquali and writers in Photography and other communities.
Non-Common, Memorable Wedding Songs
Let's be honest, how many times are you willing to hear "Thinking Out Loud" by Ed Sheeran at a wedding? I get it, some songs are simply popular and fit the mood perfectly. However, your first dance should be unique, special, and not be based on what is "the big hit" for the year.
By Angelica Pasquali3 years ago in Marriage
Capturing Magic
In the world of photography, timing is the key to everything. While skilled compositions and technical proficiency are undoubtedly crucial, the perfect lighting can create the perfect photo. Nowadays, we can determine any light ourselves and are no longer dependent on any natural light source, thanks to the developed technology. We can turn every day into a night by using the right filters. And we can illuminate every night to be seen as a day. A typical process, especially in the film industry.
By Krishan Mubashar9 days ago in Photography
Photo Tool: AI Photo Editor
The AI photo editor streamlines complex image editing tasks, empowering users to achieve professional-looking results effortlessly. With a wide range of AI editing tools, including automatic enhancement, object detection and removal, background manipulation, portrait retouching, and stylization. This editor simplifies the editing process while delivering captivating outcomes.
By xia sophiaa day ago in Photography


Comments
There are no comments for this story
Be the first to respond and start the conversation.