
How to Check and Adjust for Dynamic Range
To Get the Best Exposure for Your Images


Most photographers are familiar with the term HDR, but do you understand what it means? Unfortunately, the term has become synonymous with the over-processed and over-saturated images that were popular a few years back. These images were created by taking multiple frames of the same scene at different exposures — sometimes dozens, and then compositing them in post-processing. This produced images with no dynamic range at all.
Now, I’m not against getting creative in post-processing. I do a lot of it myself. Although I was never a huge fan of producing that particular type of image, I enjoyed looking at them when they were done well by others.
But that’s not what we’re talking about today.
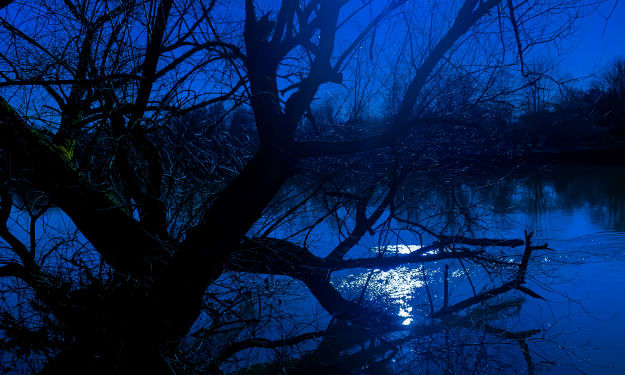
So, first, for the beginner, we need to define HDR and dynamic range. Dynamic range is the difference between the lightest and darkest parts of a scene. You may have a view of a green meadow, a well-lit mountain range behind it, and a sky in the early morning or late afternoon. This would give you a very low dynamic range. Or you could have a scene that varies from totally black shadows to completely white clouds. This is a high dynamic range scene, or HDR for short. HDR properly refers to the amount of dynamic range in a scene and has nothing to do with how it is processed later.
The problem with shooting HDR scenes is the difference between what the eye sees and what the camera sees. It’s hard to exceed the dynamic range that the human eye and brain can process. Our mind takes in all the information, handles it, adjusts for the shadows and highlights, and gives us a view where everything can be seen. The exceptions would be total darkness or extremely bright light.
On the other hand, the camera has a limit on what it can see, process, and record. Digital cameras are getting better at this every year, but it is still limited. In a scene with a dark foreground and deep shadows with a bright sky and white clouds, something will get lost. Either the shadows will fall to total blackness, the clouds will be blown out, or both.
This article is not about how to take multiple exposures and do HDR processing in post. It’s about how to determine the dynamic range of the scene, make decisions about how to capture the scene, and then adjust accordingly.
The first thing you need to do at any scene is to just look at it. Actually, spend a minute taking it in and deciding what it is you want to capture. In terms of dynamic range, how deep are the shadows, and how bright are the highlights? Do you need detail in either or both? I used to try hard never to lose detail in either, if possible, but I’ve come to change my thinking.
My new Fuji XT3 really likes dark shadows, and after trying to fight it for a week or so, I gave in to it, and like the results. It’s okay if the shadows are completely black if there’s nothing you need to see. This adds contrast to the scene that was missing before.
I’ve also shifted my thinking on highlights, but for a different reason. I encourage you to read up and learn how to use the histogram on your camera. This, more than anything else, will help you nail the proper exposure. But for expediency, I have come to rely on my blinkies. If you don’t know what that is, check your camera manual for highlight warning or something similar.
What this does is cause any part of the image that is completely blown out to blink on your LCD, hence the common name, blinkies. Since, in many cases, I like to expose to the right; in other words, get as bright an exposure as I can, I use blinkies a lot. What I do is, take the shot using the recommended exposure and look for the blinkies. I then adjust using exposure compensation until the blinkies barely appear or just disappear, depending on the scene. An image with white puffy clouds, for instance, I don’t mind a tiny bit of blinking in the whitest portion of the clouds.
But let’s back up and start from the beginning. You have arrived at the scene and spent a minute looking at it. Look into the dark areas and determine the details you need to recover and do the same for the highlights. Now set the aperture on your camera to get the depth of field you want. For this purpose, it doesn’t matter if you shoot in aperture priority or fully manual; the results will be identical.
With your aperture set, using spot metering, check the suggested shutter speed at various points in the image. First, check someplace neutral. Anything grey is perfect. Failing that, green grass or blue sky is a good substitute. This will give you the overall exposure. Now check the darkest and lightest areas. How different are those spots from your neutral exposure? That difference is your dynamic range. If it’s only a stop or two, you’re probably okay. More than that, and you need to think about the desired results and adjust the exposure.
With experience, you will be able to look at that information and automatically adjust to the ideal exposure. But for now, let’s step through it. First, take a shot at the neutral exposure. Check the LCD for blinkies and also look at your histogram. What does the overall exposure look like? Are there any areas wholly black or white? Are there pixels in the histogram pushed all the way to the right or left?
With that information, you have a decision to make. Leave the exposure where it is or adust for shadows or highlights. If the overall scene looks good, leave it alone. I would tend to push the exposure to the right just a bit to avoid noise and give me more latitude in processing, but that is totally subjective.
Until you get more experienced and comfortable with this process, bracket your shots. That is, take a shot at the neutral exposure and then one each over and underexposed. By how much? That depends. Start with one stop and take more as needed. Over time, you will train your eyes to work through this process automatically and come away with the perfect exposure.
Learn to look at and evaluate the scene, adjust for the dynamic range, and start nailing correctly exposed images every time.

About the Creator
Darryl Brooks
I am a writer with over 16 years of experience and hundreds of articles. I write about photography, productivity, life skills, money management and much more.
Keep reading
More stories from Darryl Brooks and writers in Photography and other communities.
The Secret Camera Stores Don’t Want You To Know
Every hobby, sport, and profession has stores or other distribution channels that sell the equipment and supplies specific to that genre. And whether a camera store, a music store, a craft store, a motorcycle shop, a video game store or any other, to the aficionado, they are all candy stores.
By Darryl Brooks3 years ago in Photography
Capturing Magic
In the world of photography, timing is the key to everything. While skilled compositions and technical proficiency are undoubtedly crucial, the perfect lighting can create the perfect photo. Nowadays, we can determine any light ourselves and are no longer dependent on any natural light source, thanks to the developed technology. We can turn every day into a night by using the right filters. And we can illuminate every night to be seen as a day. A typical process, especially in the film industry.
By Krishan Mubashar9 days ago in Photography
The Secret of Lighting
“Light is not just an element, but the essence that breathes life into images.” Whether it is capturing the delicate contours of a portrait, the vibrant hues of a landscape or the intricate details of still life, lighting plays a tremendous role in shaping the mood and visual impact of a photo. Understanding the nuances of lighting is crucial for us to elevate our craft from snapshots to interesting works of art. It is not just about having the right equipment, it is about harnessing the light creatively to transport emotions, tell stories and evoke reactions from our viewers.
By Krishan Mubashar5 days ago in Photography


Comments
There are no comments for this story
Be the first to respond and start the conversation.