
Editing a Minnesota Sunrise
Photo processing using Camera Raw and Photoshop

"To take beautiful landscapes you need to go to beautiful locations"
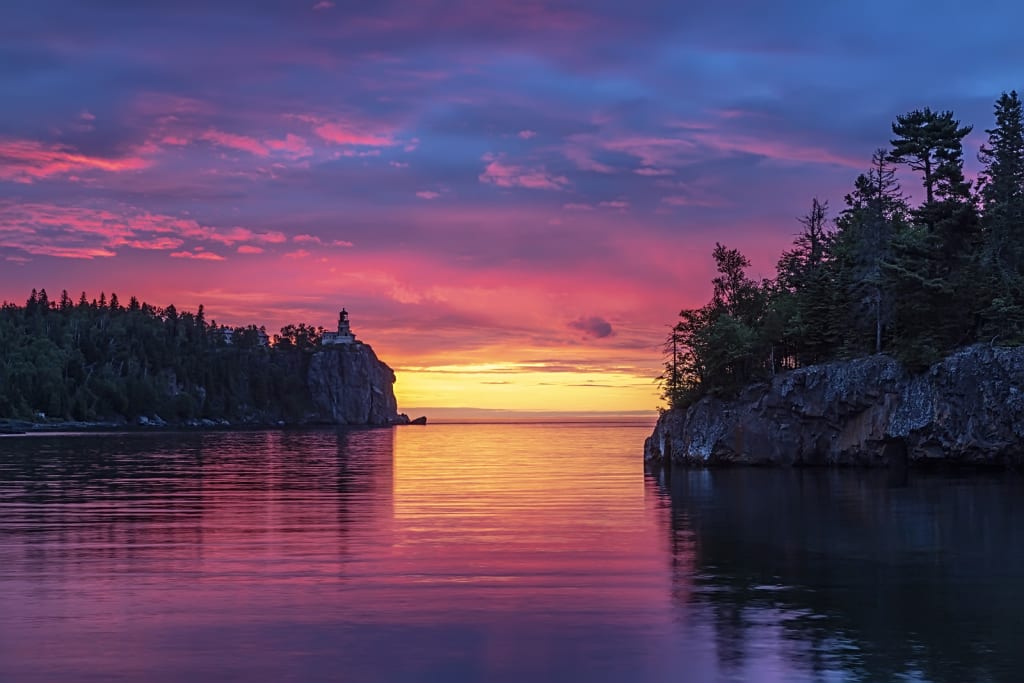
LOCATION- Split Rock Lighthouse on the shore of Lake Superior, Northern Minnesota.
GEAR- Canon 5Ds, 24-105mm L series lens, Manfrotto tripod, Cable release.
SETTINGS- f16, 0.8 sec, iso 100, shot at 67mm.
THE STORY- I've been enjoying photography for the last 15 years. Thirteen years ago I fell in love with an independent sassy woman named Kelley. To me, her humor is the best quality a person could have. To live each day and go to bed each night laughing is the only way to go through life.
After a couple of years Kelley decided she wanted to take up photography too. She bought an entry level camera and every year upgraded to better equipment. Kelley caught on quick and to my surprise, she had the "Eye". The artistic eye that's hard to teach. The eye that knows how to compose a shot naturally and not consciously trying to put things into the rule of thirds.
Over the years she told me she wanted to take an epic photo of the iconic Split Rock Lighthouse. Not a middle of the day shot, but a sunrise shot where the sky is painted by God. Where there's an opening at the horizon that allows colored light to burst out painting the underside of the clouds bright red. Yea, yea, yea, I would say. When I first started photography I spent many mornings on that beach waiting for that shot. I would wake up at 3 am and travel 3 hours hoping the sun and clouds would cooperate. I've gotten many nice images over the years and even though I knew that each sunrise is totally different I was now in search of new locations and new images.
One weekend we rented a motel room on the North Shore of Lake Superior and enjoyed photographing the rugged shore line and waterfalls. "Tomorrow morning I want to go to Split Rock" she stated. I agreed hoping she would get her iconic shot and cross it off her want list. I didn't have too much confidence in our success knowing how many disappointing mornings I've had in this hobby.
The next morning we drove through the darkness and set up on the beach. I kept checking the time and wondering where all the other photogs were? In my early years of photography the beach would have at least 8-10 other photographers all jockeying for the perfect composition. This morning there was no one but us. Self doubt crept in and I asked myself "Do they know something we don't"? Is it the wrong time of year?
First light started to appear. The water was calm in the bay and that opening on the horizon looked promising. Things were looking good.
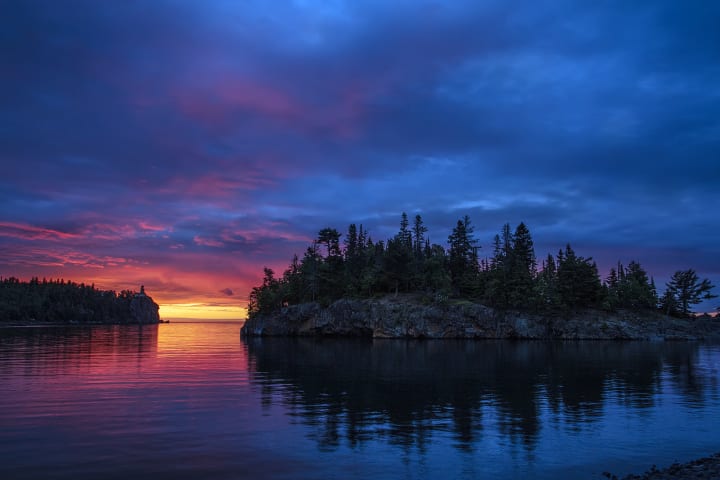
We worked the beach up and down composing shots one after another. The sky just kept increasing in color. I was in awe.
20 minutes into the sunrise 2 young photographers had woken up late from their tent. They rode their bikes through the woods yelling with excitement "Look at all that color, I LOVE IT!" There voices carrying through the pines. It had to be one of the longest sunrises ever, lasting at least 45 minutes.
We finally packed up our gear and made the walk back to the car still euphoric of what we witnessed. I realized that maybe I should listen to Kelley a little more.
PROCESSING
OPENING IMAGE- Find the photo you want in Adobe Bridge and double click on it. It will automatically open in Adobe Camera Raw on it's way to Photoshop. Here we can make major global edits to the photo.
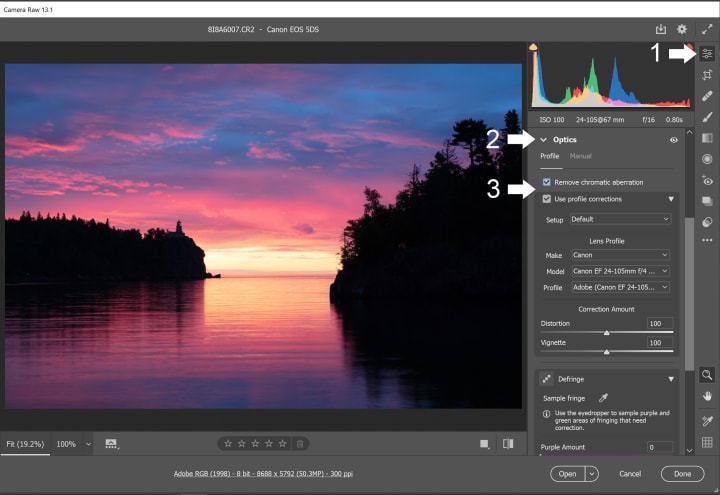
STEP 1- Make sure EDIT is highlighted
STEP 2- Click on Optic
STEP 3- Check the boxes on "Remove chromatic aberration" and "Use profile corrections"
This is going to remove any purple/red/blue/cyan/green fringes alongside high contrast edges. It will also fix any lens distortion.
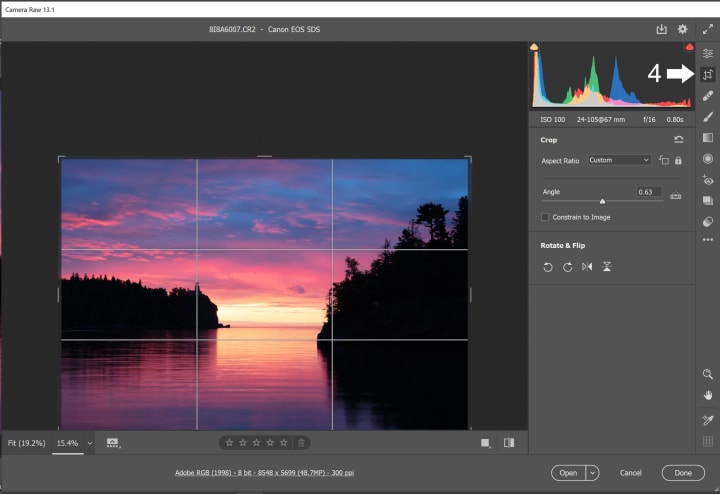
Next we'll fix the horizon and crop the image if necessary.
STEP 4- Hold down the ALT key and double click the Crop icon. This automatically straighten the horizon. I'll leave the crop the way it is.
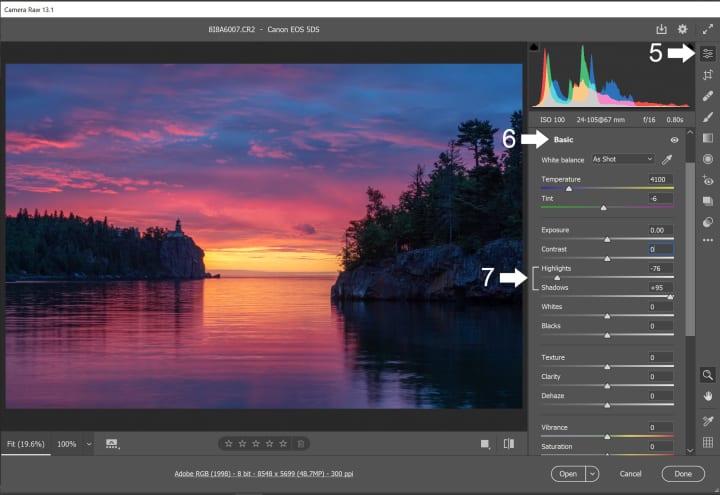
STEP 5-6 Lets go into the EDIT and BASIC section.
STEP 7- Using the HIGHLIGHT and SHADOWS sliders we'll adjust to bring in some detail into the shadows and tone down the highlights.
The image seems colorful enough so we won't adjust the WHITE BALANCE or add any VIBRANCE or SATURATION to this image. Your image will be different, so play with with the sliders.
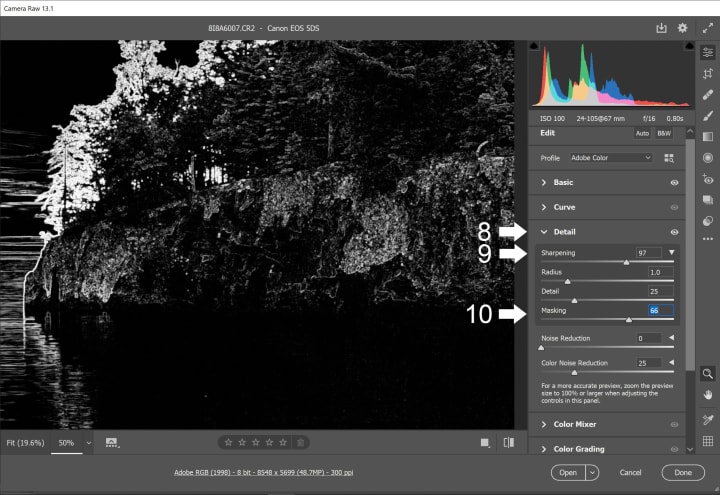
STEP 8- Click on DETAIL
STEP 9- This is a large file so I can put a lot of sharpening on it. I'm looking at the tree tops and the lighthouse.
STEP 10- Holding down the ALT key and moving the MASK slider, the image turns black & white showing in white where the sharpening will be seen. When we opened up the shadows we introduced noise and we don't want to sharpen that. I'll take out the noise in another program in Photoshop.
Click on "OPEN" in the bottom right hand corner. The image will open in Photoshop.
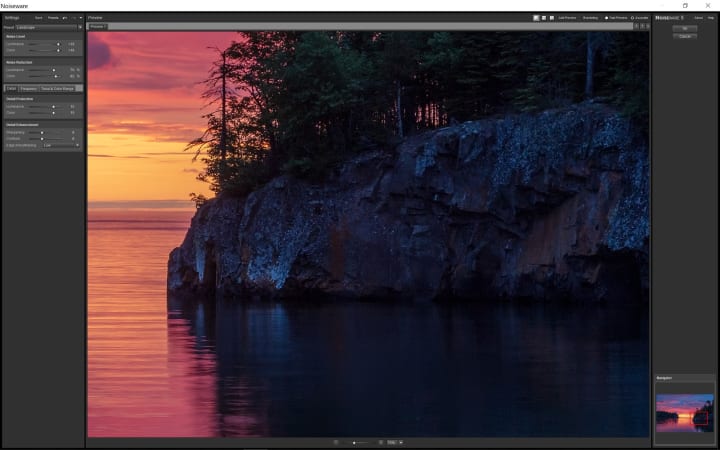
STEP 11- Once in Photoshop, I go into FILTERS and open "Imagenomic Noiseware" a powerful tool for getting rid of noise but also sharpening. I'm concentrating mostly on the noise in the shadow areas.
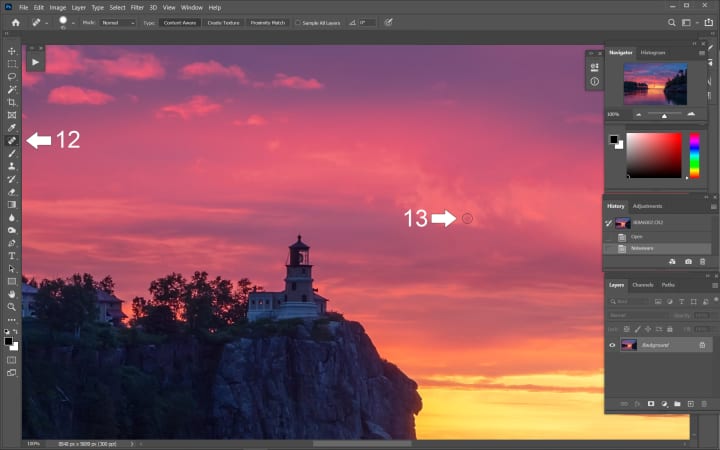
STEP 12- I like to zoom into at least 100% and look for dust spots. Click on the SPOT HEALING BRUSH TOOL.
STEP 13- Center the tool (circle) over a dust spot and left click the mouse. It will automatically heal using the surrounding area as reference.
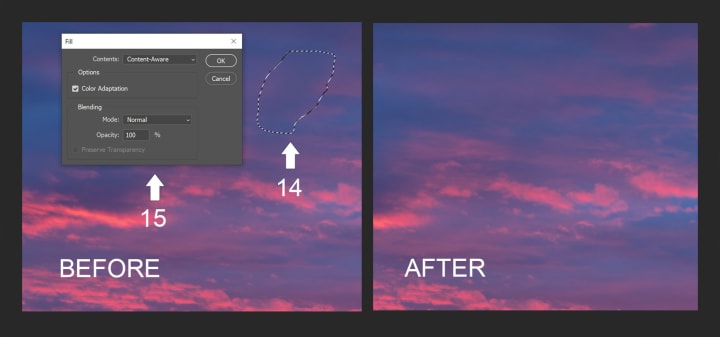
STEP 14- I noticed a part of the sky that I didn't like, so we'll use content aware to fix it. Take the LASSO tool and roughly draw a circle around the area.
STEP 15- Press SHIFT/ BACKSPACE together and the FILL box shows up. Have CONTENT AWARE option chosen, and hit OK. Most of the time it does a pretty good job of filling in, if not you can use CLONE STAMP or the SPOT HEALING BRUSH to touch up.
STEP 16- Finally check your borders. Look for things that will distract the viewer's attention. Light areas can be cloned or darkened.
I hope you enjoyed this tutorial and that it helps get your images to look their best. The main thing in life is to keep trying, keep making mistakes and keep learning.
Capture life, and share with friends!
Jeff Henningsgaard
About the Creator
Keep reading
More stories from Jeff Henningsgaard and writers in Photography and other communities.
Anna's Little Black Book
Anna Wilson received her first little black book at the age of eleven. It was a gift from her Grandfather. It seemed an odd present in this electronic age, but an important one Anna would later learn. She, was a studious young girl, tall and willowy and he, a white haired man from the old country with a glint in his eyes when he spoke. Anna looked displeased as she opened the gift but quickly caught herself and smiled. “Thank You Grandpa” she said. Her words slightly disingenuous. Nothing could get by the old man, his eyes and ears may have lessened but his attention to the moment was unsurpassed. “May I tell you why I gave you that notebook Anna?” Grandpa asked, “Sure” Anna responded. “That notebook is an important tool for you to use in your life. It needs no batteries, no cords and no updates. Its pages are blank for a reason, to make room for your potential, yes, your potential. When you get a good idea, write it down. For ideas are peculiar things, they travel through the world looking for just the right person to bring it to life. If it’s not written down or acted on their memory quickly fades as they seek out another who will act upon it. Good ideas are worth capturing and writing down just as a person’s life is worth documenting. Do you understand?” Grandpa asked. “I think I do” Anna replied. “One more important thing, you must always keep it nearby at all times. Ideas are tricksters that like to pounce when you’re least prepared.” Grandpa laughed.
By Jeff Henningsgaard3 years ago in Families
Aerial Photography
Aerial Photography: The Revolution Brought by Drones Drones have dramatically transformed the field of photography, offering perspectives and opportunities that were previously unimaginable. These unmanned aerial vehicles (UAVs) provide photographers with the ability to capture stunning aerial shots, opening up new creative possibilities and revolutionizing industries such as real estate, filmmaking, and tourism.
By Michael Trotter4 days ago in Photography
Through the Lens
In the heart of the bustling city, where the streets pulsed with life and the buildings reached towards the sky like giants of glass and steel, there lived a young woman named Emily. Emily was a dreamer a seeker of beauty and truth in a world that often seemed dark and uncertain. And though she walked among the crowds with a smile upon her lips, her heart yearned for something more a glimpse of the magic that lay hidden just beyond the edges of reality.
By Michael smith2 days ago in Photography


Comments
There are no comments for this story
Be the first to respond and start the conversation.