
Bringing Artistry to Photography
Bridging the Traditional & Digital Skillset

As a professional photographer of 35 years, I have spent plenty of time in a darkroom watching the magic of seeing an image come up as I would take a sheet of photo sensitive paper, expose it to light in an enlarger, then move that sheet through various chemical steps in the developing process. As always, things change. Mid-career, thousands of images later, the digital age leapt forward; so I packed up my darkroom equipment for storage. Instead of hours in the darkroom, I spent my time learning some of the premiere photo programs like Photoshop and Lightroom, which I now currently use to produce my final photos. The digital age was necessary for many reasons; including eliminating the toxicity of chemicals in photo processing, making way for faster work turn-around times, and simply giving more people access to learning photography.
I am grateful for the time period in which my beginning career in photography took place. It laid the groundwork for pre-visualizing what I wanted my photos to look and feel like in their most raw form without having quick access to digital programs for editing or enhancement. This made me see and bring out what was actually in front of me in a concrete way, especially in my own personal work. After all, if my end result would be only what I was seeing and adjusting for through my lens in the moment of taking that photo, I would need to be very present and awake to all the different elements that were in the mix…light, camera settings, emotion, poses, type of film, etc. I’ve always strived to have my imagery reflect beauty, and to be emotionally compelling. To that end, if I am intending for my compositions to be strong and evocative, I want to see and capture that as concretely as I can in their raw stages before ever getting to the place of adding or editing elements, digitally or otherwise. Working-for-hire takes in a whole other set of intentions, but capturing the true narrative reflected in a raw image is still my goal. All in all, what that early training meant for me is as relevant today... to always strive and shoot for the very best photo; for that image is the starting place for editing and enhancement.
While the digital age in photography has its own rewards, I enjoy the older, hands-on processes as well. Sometimes the desired effect I am looking for is a combination of using both traditional and digital approaches. For instance, I appreciate the look of hand-tinted photos. I also enjoy the actual tactile pleasure of creating one with oils on a rich, textured paper complete with the nuances of color that digital steps added later can enhance if desired.
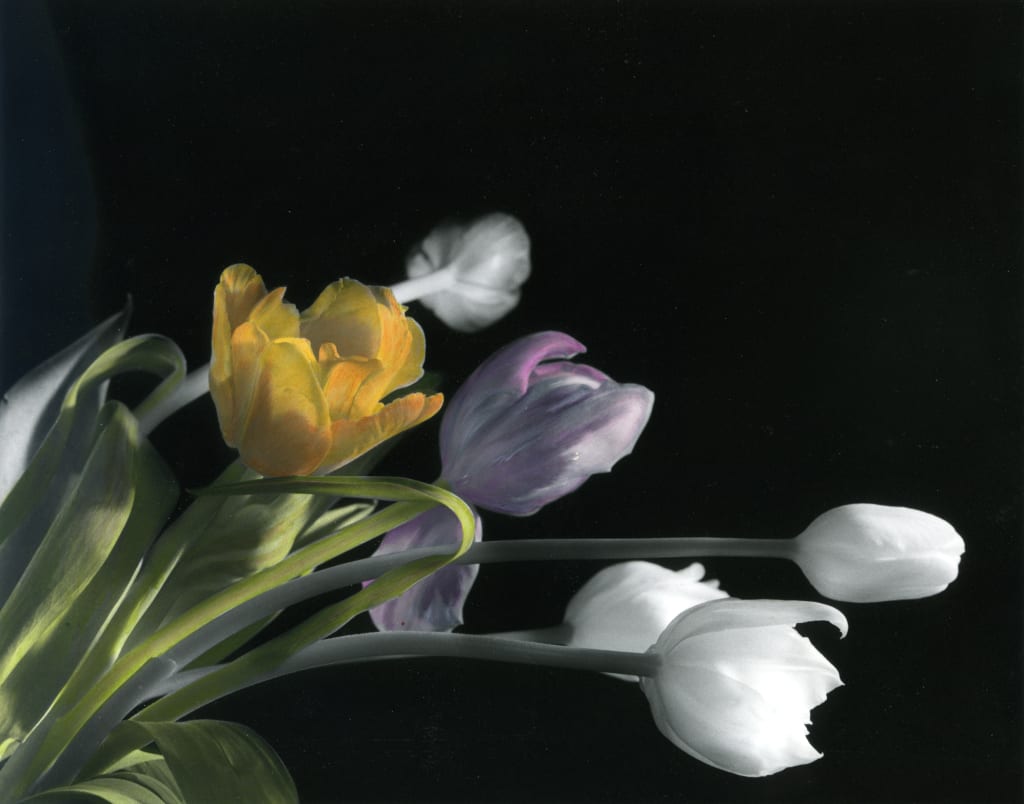
Black-and white photography was invented around 1820. From the 1850’s to the early 1900’s, hand-tinting photographs became popular and was predominantly employed in portraiture. Even though Kodachrome film became commercially available in 1935, it was not affordable until the 1970’s, so hand-colored prints were popular throughout that time period. I was in my late 20’s when I started to experiment with Marshall’s Oils (which is still commercially available). I would print up a black & white photo in the darkroom on a paper that had a little bit of a tooth to it so that it would take the colored oils. I would then lay down a white sheet of paper and put a piece of acetate on top of it and then take the tubes of paint and put daubs of color on top of the acetate so that I could mix my colors before applying them to the actual photo for hand-tinting. I predominantly used Q-tips to apply the paint to the photo. When applying if you go out of the lines of your image, you can clean up the edges with Marshall’s marlene solution, also included in the kit you can buy. Since I no longer have a darkroom, if I hand-color an image today, I would take my photo file or negative to a local commercial photo printer and have them put the image on a matt finish paper vs. a glossy paper. A glossy photo paper will not hold the oil paints well. A matt photo paper will do well if using a home printer, but for me taking it to a store for printing has proved more cost-saving than frequently replenishing inks. If I am wanting to hand-color a portrait, I will enhance the contrast needed digitally first, and I will ask my local printer to lighten the contrast on skin tones, so that the colored oils once applied will appear brighter. The painting itself may take an hour or two depending upon the size of the print and what parts of the photo are being addressed. Once the painting and cleanup are finished, the print needs to dry for at least 24 hours.
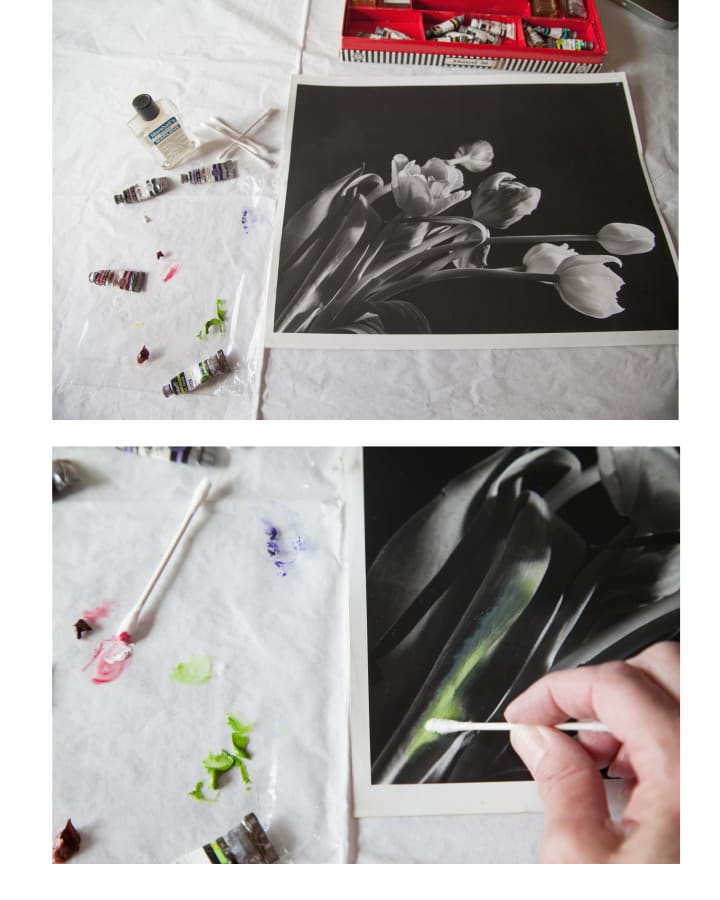
More of my black & white before and after photos that have been hand-colored appear below.


In these next examples of editing and enhancing a print, I am using a photo I took of my cousin Lauren a few years back. I used both digital forms of enhancing and highlighting the photo as well as having it printed on a watercolor type paper when I wanted to use pastels, colored pencils, and markers, by hand. I will indicate the steps in order as you view the differences between the same shot.

To tweak the color hue of the shot, I did the following steps in Photoshop; First go to image and then scroll down to "adjustments." Follow the arrow over to where it says "levels," then scroll down to "color balance." Click on "color balance." The chart for "color balance" will appear and allow you to make changes in the color tones of your photo. See photo below for an overview.
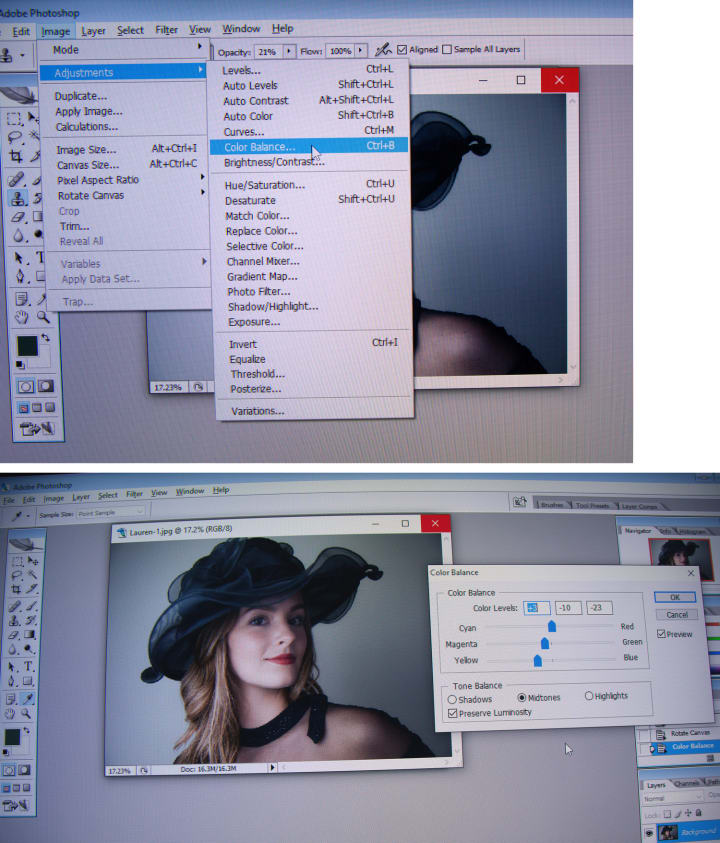

For special digital art effects I took the color-balanced version of the photo of Lauren in photoshop and clicked on "filter," than scrolled down to "artistic," and followed the arrow to the column on the right which listed different art effects. I scrolled down that list and clicked on "rough pastels," which brought up another screen showing the different effects. I clicked on "rough pastels" and adjusted the levels on the right for how predominant I wanted the pastel brush strokes to appear on the portrait. See below for visuals of what the steps are and what the screens look like.


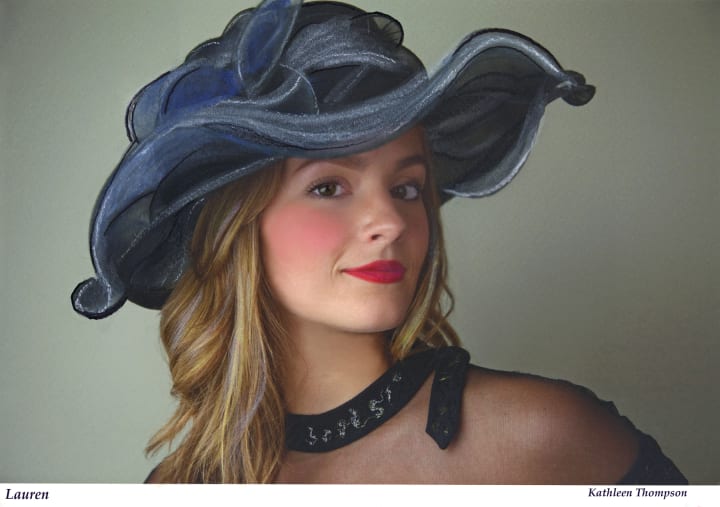
This last photo of Lauren (below) was printed from the initial raw image on a watercolor paper and then I added colored pencil, watercolor, and markers by hand for artistic styling.
To see more of my work or purchase check out https://fineartamerica.com/art/kathleen+anne+thompson
<a href="https://fineartamerica.com/art/featuring">featuring art</a>
About the Creator
Keep reading
More stories from Kathleen Thompson and writers in Photography and other communities.
EXIT DATE
As a child, Hartley was born with imperfect teeth, a dental condition called Dentinogenesis imperfecta which resulted in a lack of enamel and was reflected in a smile of yellowed, chipped teeth. Hartley rarely smiled because when she did, she felt the judging glare of her classmates. Sometimes kids would yell out “Hartley, why are your teeth so yellow? Don’t you brush them?!” At first, it hurt her feelings to hear those comments, so she would shy away on the playground and become a recluse. But then she learned better. She became accustomed to pulling away from her classmates at recess. She sat on a swing, went quietly inside her own skin, and became still, resulting in a beautiful gift that allowed her immunity from ridicule as a child and served her all the days of her life. The gift? She became an astute observer.
By Kathleen Thompson3 years ago in Humans
Capturing Magic
In the world of photography, timing is the key to everything. While skilled compositions and technical proficiency are undoubtedly crucial, the perfect lighting can create the perfect photo. Nowadays, we can determine any light ourselves and are no longer dependent on any natural light source, thanks to the developed technology. We can turn every day into a night by using the right filters. And we can illuminate every night to be seen as a day. A typical process, especially in the film industry.
By Krishan Mubashar8 days ago in Photography
Cristiano Ronaldo, often hailed as one of the greatest footballers of all time
Cristiano Ronaldo, often hailed as one of the greatest footballers of all time, has had a storied career marked by unparalleled success and remarkable achievements. From his humble beginnings in Madeira, Portugal, to becoming a global icon, Ronaldo's journey is nothing short of extraordinary.
By Mithun Gainabout 22 hours ago in Photography


Comments
There are no comments for this story
Be the first to respond and start the conversation.