
5 DIY details to do yourself for your wedding!
Give free rein to your imagination and emotions by creating yourself 5 totally irresistible wedding decoration elements!

How would you describe DIY? For Isabelle from Lady Nanny Mariages, it's “when you get to work, and you can say to yourself: “ I did it! ". You create yourself, with your imagination, your emotions and essentially your heart.” It is, therefore, an enticing program that we offer you with these 5 DIY details to make yourself for your wedding, especially recommended by our decorators Isabelle from Lady Nanny Weddings and the P'tites Fées team.
- Why do “Do It Yourself”?
- Great vases or soliflores for your centerpieces
- Worldwide unique guest name badges and table numbers
- A table plan worthy of a royal wedding
- Original garlands and pennants for the chairs of the bride and groom
- A competition photobooth
- Where can we get all the equipment?
Why do “Do It Yourself”?
Firstly because it is a potential financial gain if it is well thought out and organized upstream” explains Isabelle, even if the most important thing remains “the source of personal satisfaction ”. The only downside on the horizon? “DIY requires reflection but above all a lot of time. This is why the earlier you start, the more likely you will be to make your homemade as you imagined it.”
The best thing is therefore to “take the time to try our hand at our project” and to follow the instructions provided by Isabelle beforehand: “ We store well in advance and we involve everyone around us in collecting our basics: bottles and small glass jars, colored or not, high, low, typical, atypical, boxes, strings, ribbons, sequins, … everything is to be collected in quantity. ”
Well, it's true, we don't all have a MacGyver sleeping deep inside us. But nothing is lost and the solution lies in 1 word: simplicity. “We don't launch into the beautiful-very-complicated which would perhaps lead us to abandon everything along the way for lack of the necessary “technical” knowledge. To make it simple and beautiful is within everyone's reach, provided that we have thought about it before embarking on it .” Here we go.
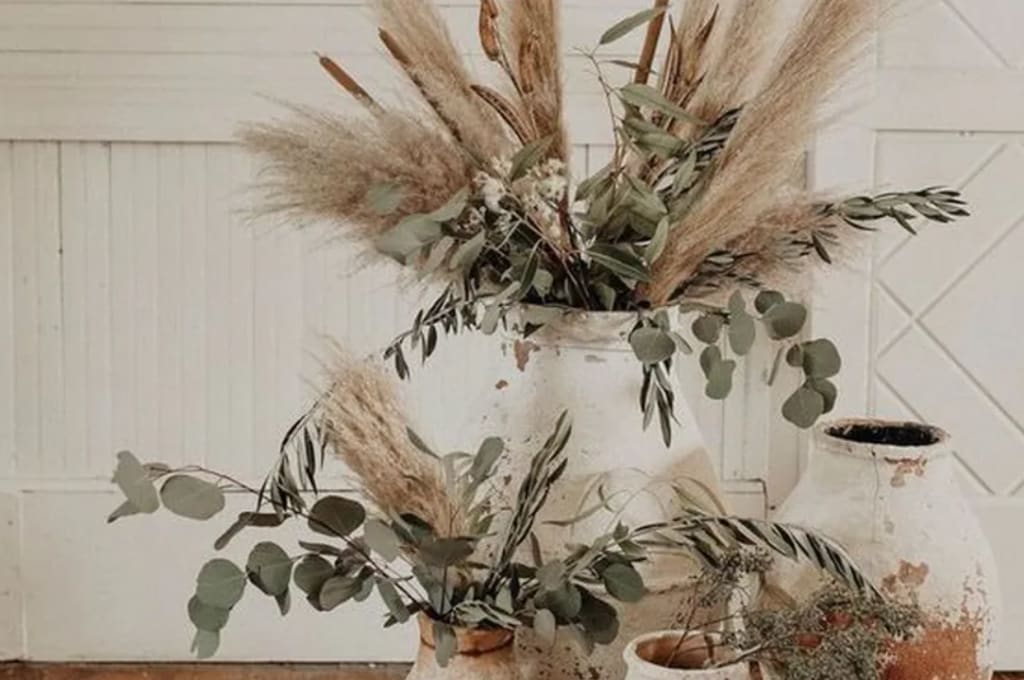
1 – Great vases or soliflores for your centerpieces.
You will need :
– glass bottles of different shapes and sizes;
- acrylic paint
– gold, silver, or multicolored sequins
Attention, concentration, and time for Isabelle's explanations: “Color the inside with acrylic paint in a different color for each bottle. Leave to dry upside down for 48 hours and if you want to go a little further, glue the bottom outer surface over 10 cm and apply gold, silver, or multicolored glitter. A nice inside-out effect for cheerful and colorful tables. We forget the rental or purchase of vases and we skip the bulky and expensive bouquets specific to these supports.” That's it!
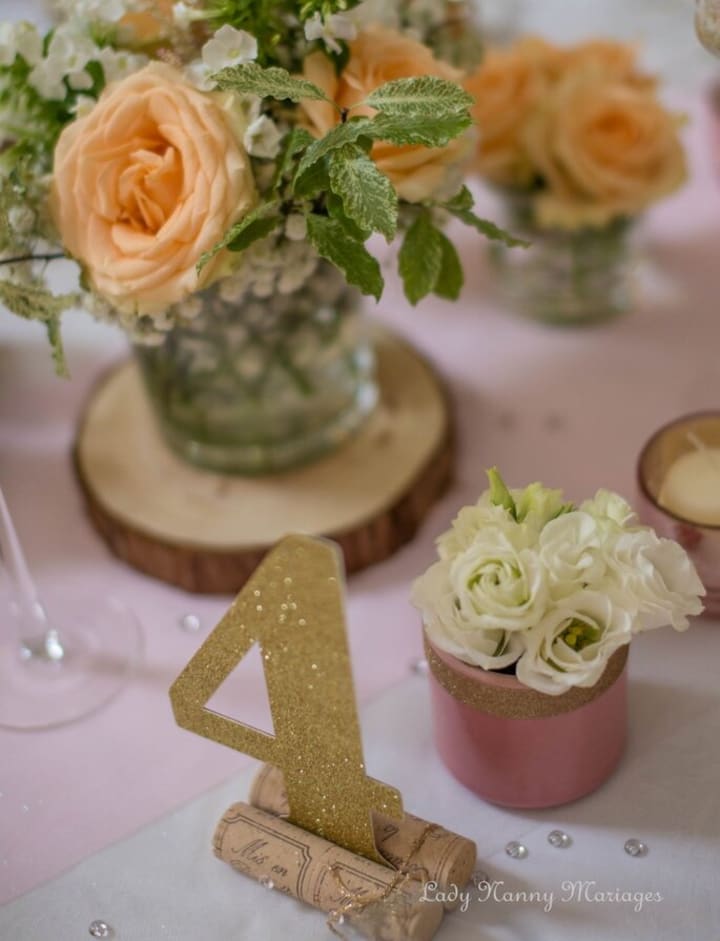
2 – Unique guest name badges and table numbers
Isabelle has more than one trick up her sleeve and suggests that you kill two birds with one stone with the corks taken from these same bottles. “They will serve as an ideal support for your guest name badges or even for your table numbers. You will need 4 corks glued and tied together with a soft satin ribbon or raffia, for your guest name tags. And 6 caps are always glued, tied, and decorated in the same way, for your table numbers.
Already finished? Alright, so let's move on!
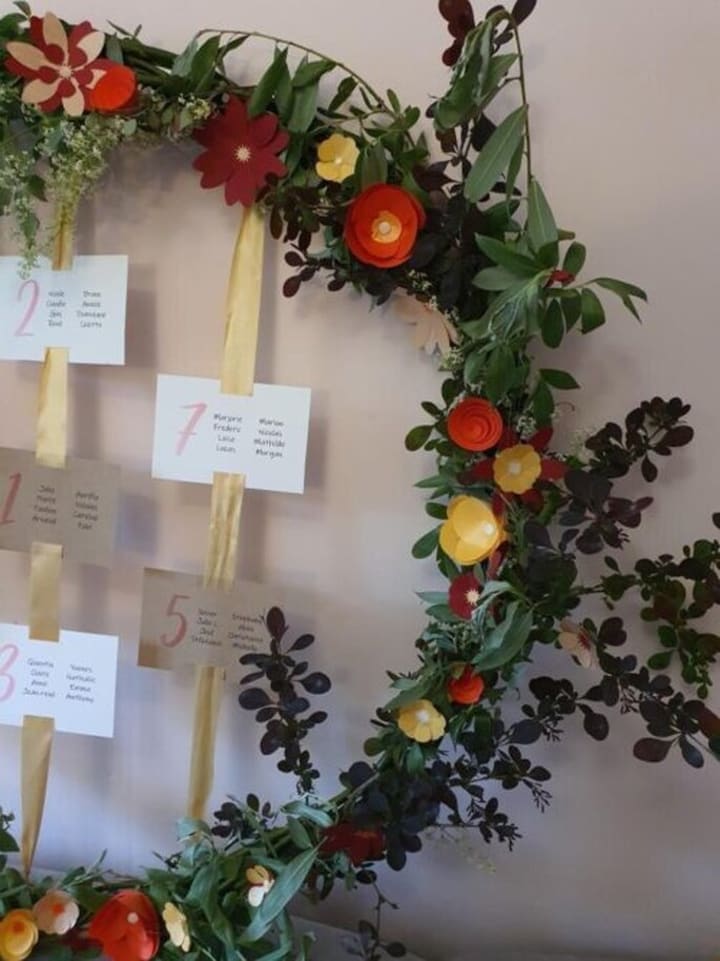
3 – A table plan worthy of a royal wedding
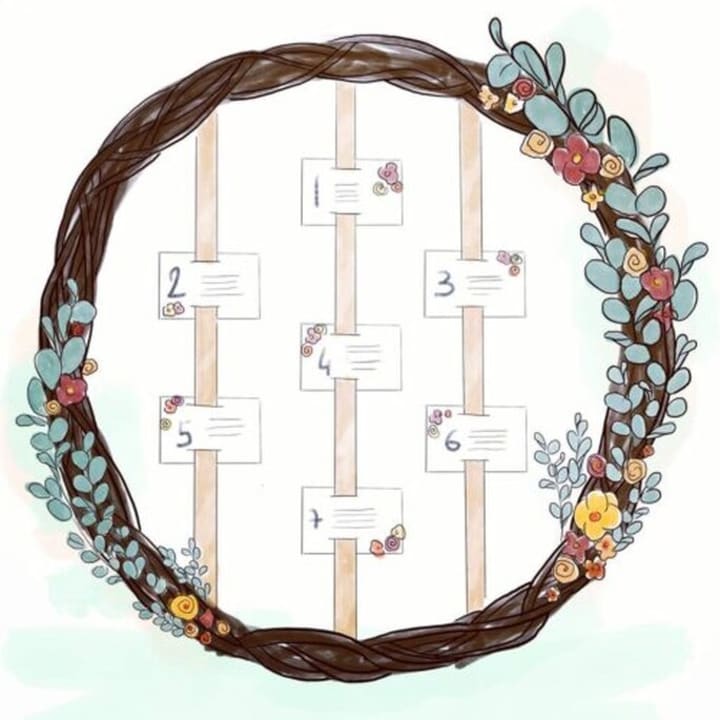
This idea comes to us from Caroline of Sublimes Moments . His Do It Yourself requires more material but the creation process is just as simple . First, wrap around the metal circle the long thin and flexible wooden branches . Only the first branch requires a point of attachment, this can be achieved with pretty string. Once finished, cut off the excess with the shears. Then add the flowers and foliage. Just wedge them in the branches which intertwine and which now form an arc of a circle. At this point, the metal circle should no longer be visible, it should be hidden by all those branches, foliage and flowers. The flowers can be fresh or made from colored card stock. If you opt for paper flowers, you will need scissors to cut a small piece of paper in the shape of a spiral. Roll up the spiral to form pretty petals and glue together with a glue gun. Then, prepare your seating plan cards and make two holes in them with secateurs (at the top and bottom of the card) to be able to pass the ribbon . Once your cards are aligned and tied with the ribbon, tie a knotup and down at the level of the branches. That's it !
You will need :
– a metal circle
– fine and flexible wood (about 50 branches of 40 cm minimum)
– a pruner
– colored sheets
– a round hole punch or scissors
– optional: punches in the shape of flowers of different sizes
– scissors
– a glue gun
– foliage (eucalyptus or wild foliage)
- string
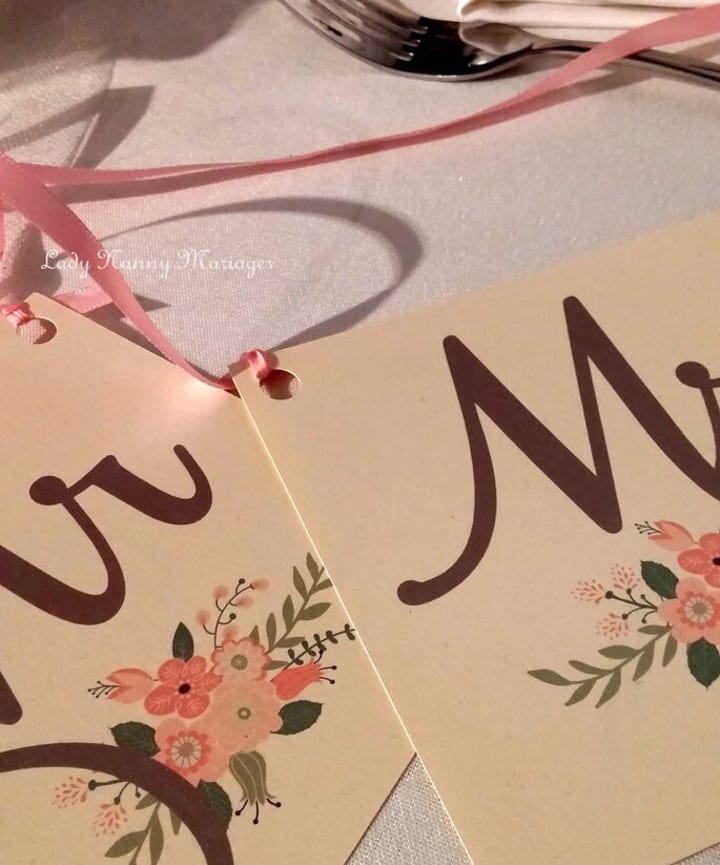
4 – Original garlands and pennants for the chairs of the bride and groom
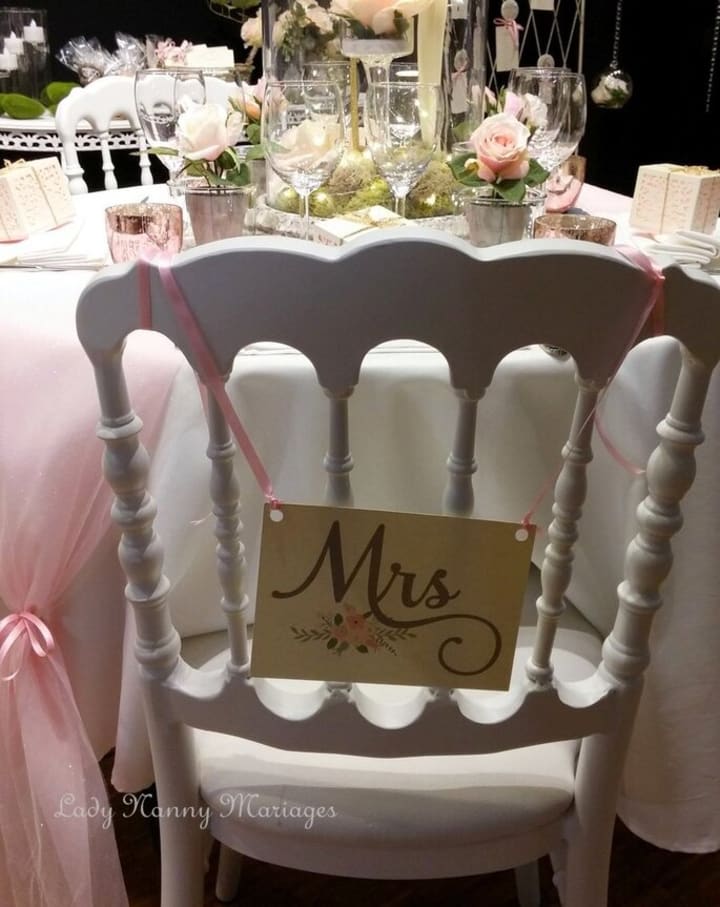
You will need :
– Hemp twine or satin ribbon.
- A hole punch
– A small rectangular cardboard sign.
“A hemp string or a satin ribbon will serve as ties on the back of the chair. Two small holes made with a puncher to thread your string on a small rectangular cardboard sign. An inscription: your initials for each one or the famous American "Mrs & Mr", it's up to you! The sign is simply placed on the back of the chair or over a pretty sequined pleated tulle ribbon .” Tadaaaaaaam.
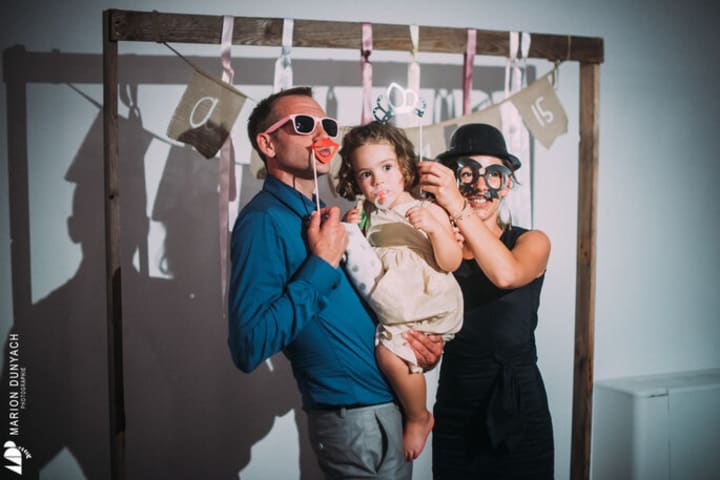
5 – A competition photobooth

Our latest DIY creation was suggested to us by the amazing family team of P'tites Fées, Amandine, and Ludivine.
You will need :
– Wooden planks and nails
– A curtain or sheet
– A tablet with the photobooth application downloaded
- Accessories
– A printer directly connected to the tablet
- A lamp
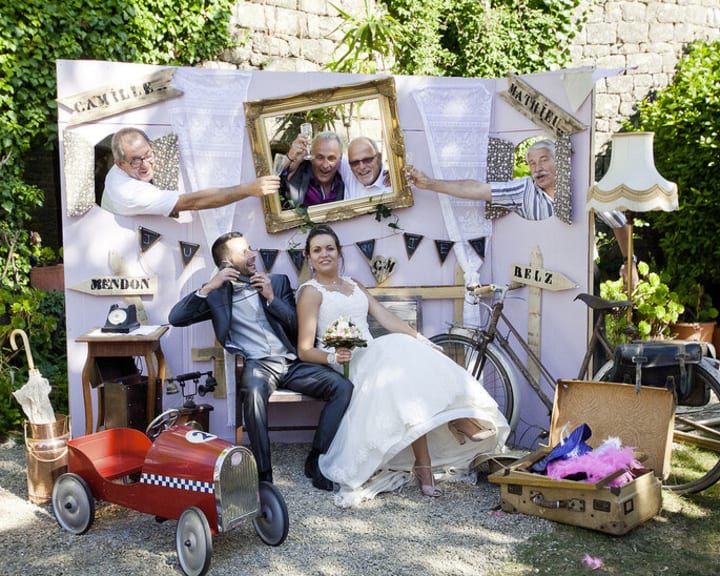
Create a background using a few wooden planks, and place a sheet or a curtain as a backdrop. Have the accessories with which your guests will pose (hat, glasses, false mustache, etc.). Fix the tablet at mid-height and connect it to the printer so that your guests leave with their souvenir photos. Arrange a small bench, an armchair, or a small sofa as well as a lamp to enlighten your guests. For the less DIY enthusiasts, don't panic, the photobooth is available in a simplified version of the photobooth, as below.
Where can we get all the equipment?
Of course, the goal of DO IT YOURSELF is to recover as much material as possible from nature or from the back of cupboards. However, for quality creations, it is necessary to invest in small objects which often make all the difference. Zankyou's online store offers hundreds of useful and aesthetic objects to make your own wedding decoration. From small braided fans to confetti, to boxes for dragees, everything is there! It is up to you to make your choice. Know that the quality and resistance of the products have been carefully thought out. If you are in a hurry, do not panic, the delivery is fast. So do not hesitate any longer and take a look, you may find a lot of inspiration!
About the Creator
Keep reading
More stories from Maria Botuli and writers in Marriage and other communities.
Our best ideas to organize a country wedding!
The “country” wedding theme has been absolutely trendy for a few years, which is why we have looked at the best decoration ideas to reveal to you! Whether it is to personalize your reception room, your cold buffet, decorate your secular ceremony, or even your wedding outfit, find our gallery of inspiration to make your beautiful day in the heart of nature an unforgettable event! Also count on the advice of our expert and wedding planner Jennifer Chevrier, founder of the CJ Events agency, for the organization of a successful country wedding!
By Maria Botuliabout a year ago in Marriage
Shadows of the Night: A Tale of Love and Rescue
In the bustling city of Riverdale, where the lights of downtown mingled with the shadows of hidden alleys, lived a man named Alex. He was an ordinary guy with an extraordinary love—Anna. Their story was one of laughter, of shared dreams, of promises whispered under starlit skies. But like all tales, theirs had its storms.
By David Lacuz6 days ago in Marriage
The Top 10 Classic Script Fonts for Stylish Wedding Invites
The unknown component of the ideal wedding invitation Consider this: Your wedding invitation is mailed to your guests. When they open it, they discover a stunning work of art that perfectly captures the essence of your big day rather than just an invitation. They are in awe of the exquisite script and can immediately sense the refinement and romanticism of your impending nuptials. It sounds ideal. The problem is that choosing the perfect typeface can take time and effort. How can one choose a script font that is classy and timeless when there are so many options?
By artstrokestylist4 days ago in Marriage


Comments
There are no comments for this story
Be the first to respond and start the conversation.