
How to Make Round Cushions
A step-by-step guide on how to make round cushions. Thee of the most common round cushions will be discussed in this article


(Please ignore the bad lighting/editing or white cut-offs done on the images in this article, as the images were taken from a very old and classical book from my library)
(Links to certain terms and methods are highlighted in a different colour. Click the link and it will take you the article accordingly)
Round Cushions
Round cushions are perhaps more of decorative accessory than their square counterparts, and their circular shaped lend themselves to all manner of fanciful and creative edgings.
Small, round cushions, perhaps with frills and flanges around their edges, mix well among groups of other cushion shapes, especially on a large sofa or at the head of a bed.
These round cushions and inner pads are easy to make and you can use a circular paper pattern as a guide to help you cut out the front and back panels of fabric;
suitable commercially made inner pads of diameters and thickness are also readily available.

Simple Round Cushions
To make a circular pattern for a round cushion, you will need either a plate of the appropriate size, or a simple compass made from a length of string, a pencil, and a drawing pin, as used here.
For the cushion, you will need fabric, an inner pad, and the basic sewing kit. Because a side-mounted zip is difficult to hide and can distort the cover fabric, either slip stitch an opening at the side of the cover or fix fastenings into the center of the back panel.
1. Making Pattern: Fold a piece of paper larger than the cushion size, into quarters. Knot one end of a piece of string and cut it half the cushion diameter in length.
Hold or pin the knotted end at the inner corner of the folded paper and tie a pencil to the other end. Draw an arc across the paper.
Carefully cut along this curve, then unfold the paper pattern.

2. Cutting Fabric: Pin the paper on the fabric, and check that any patterns are correctly aligned.
Cut out the front and the back panels of the cushion and place the pieces of fabric right sides together, being careful to match the weave and any pattern.
Pin, and tack the two panels together, 1.5 cm (5/8 in) from the edge. Leave the gap in the seam large enough to allow the inner pad to be inserted.

3. Joining Panels: Machine sew along the tacking on the seam line. Take care not sew across the opening. Remove the tacking stitches.

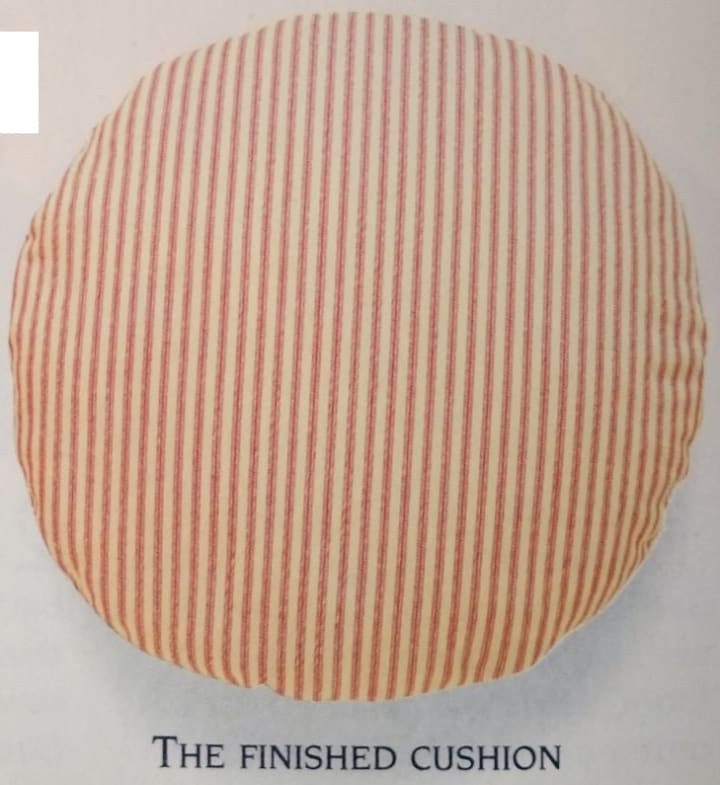
4. Notching: Cut notches around the seam allowance. Pull the cover right sides out and press it. Insert the inner pad through the gap, distributing its bulk around the rim.

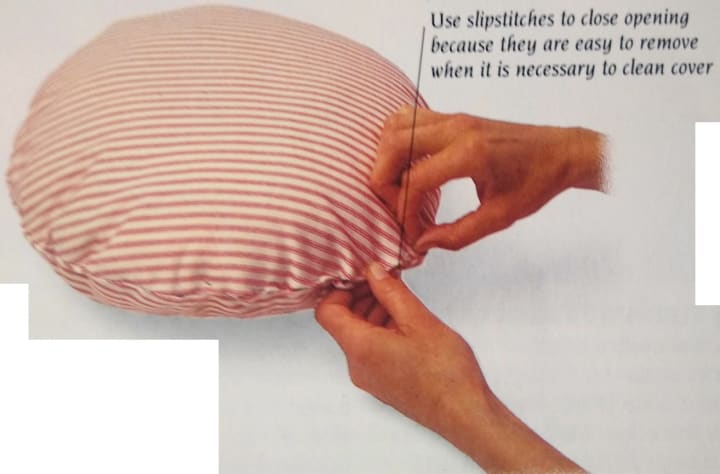
5. Stitching Closed: Slip stitch the opening closed.
When it becomes necessary to clean the cushion, carefully remove the slip stitches, using an unpicker or a pair of small sharp scissors, and take out the inner pad.
After washing the cover, reinsert the pad and slip stitch the opening closed again.
Zip at Center Back
Zip cannot be used in the side seams of round cushions, because they are too inflexible, and would spoil the line.
They can, however, be used in an opening running across the back of a round cushion, where they provide a strong and flat fastening.
The zip should be 13 cm (5 in) shorter than the diameter of the cushion, and suited to the weight of the fabric.

1. Marking Up: Using a paper patter (see above), cut out the front cushion panel. Remove the patter and cut it in half to make the back panel template.
Pin this to a square piece of fabric, aligning the straight edge of the pattern with the straight grain of the fabric.
Mark a cutting line 1.5 cm (5/8 in) from the edge of the pattern for the seam allowance.

2. Cutting Backs: Cut out two back panels. Pin, tack, and sew the straight edges and the zip to make a central seam with a zipped opening.
Open the zip, and lay the front and the completed back right sides together.

3. Joining Panels: Pin, tack, and sew the fabric pieces 1.5 cm (5/8 in) from the edge. Remove the tacking stitches and cut notches around the seam allowance (see above).
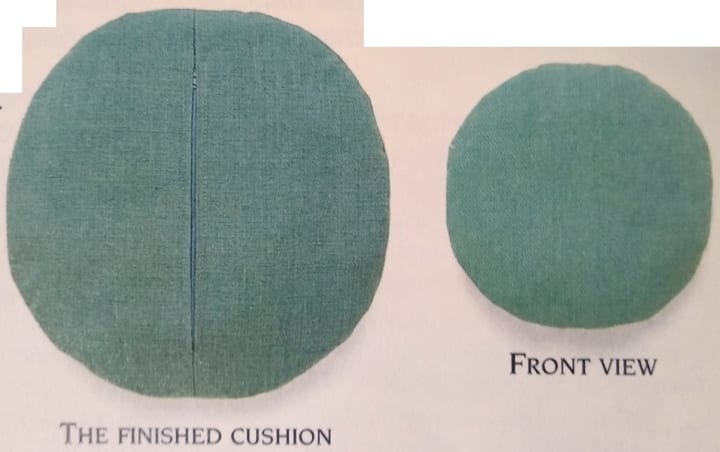
Pull the cover right sides out through the zip opening. Press, and insert the pad.

Velcro Spots at Center Back
Velcro is ideal for center-back openings, although it should not be used on lightweight fabrics. Spots will give a more flexible closure than a strip would.
This technique can also be used for buttons and press studs.

1. Marking Up: Cut out the two back panel halves (see above), but allow 5 cm (2 in) for the turnings on the straight edges.
Remove the paper pattern, and turn under the straight edges of both panels once by 1 cm (3/4 in), and then by 2.5 cm (1 cm), pressing each time.

2. Stitching Turnings: Pin the turning in place. Secure it by machine sewing or slip stitching along the inner edge.
If using buttons, make appropriately sized button holes in one of the turnings at this point.
Lay the pieces right sides up and overlap the turnings by 2.5 cm (1 in). If you have made button holes, place the edge with the holes in it on top.

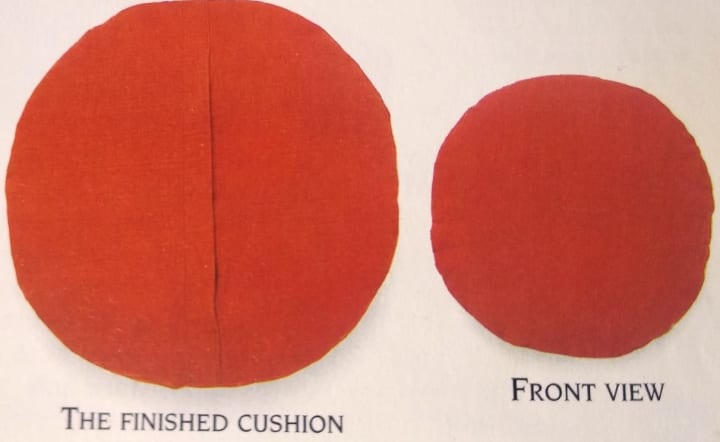
3. Sewing the Center: Pin, tack, and sew the back panel pieces together along the overlapping straight edges. Sew inwards from each end, leaving an opening for the pad.

4. Spots and Seams: Attach the spots, buttons, or press studs.
Lay the front and back right sides together. Pin, tack, and sew 1.5 cm (5/8 in) from the edge: notch this allowance. Remove the tacking stitches. Pull right sides out and press.

About the Creator
Temoor Dar
💡Topic: Entrepreneur and Writer💡
♟️Hobbies: Traveling, Poems, Playing Chess and Solving Puzzles♟️
🎂Born: July 7, 1991🎂
📍Born in Stockholm, Sweden, and now a Londoner since 1996📍
📚Lifelong Learner📚
🌟Wisdom from Mentors🌟
Keep reading
More stories from Temoor Dar and writers in Lifehack and other communities.
How to leave behind a meaningful inheritance
Let's embark on a profound exploration of the significance and essence of life letters – those intimate narratives that encapsulate the very fabric of our existence, weaving together the threads of our past, present, and future into a tapestry of meaning and purpose. At the heart of this journey lies the recognition of life's fragility and the poignant realization of its fleeting nature, epitomized by the stories of individuals like Bill and myself.
By Ugochukwu victor6 days ago in Lifehack
Sarah's Journey
Once upon a time, there was a girl named Sarah who used to dislike boredom. She always felt like she needed to be doing something exciting or productive to feel satisfied. Whether it was scrolling through her phone, watching TV, or chatting with friends, Sarah avoided moments of stillness like the plague. But little did she know, those seemingly dull moments held the key to unlocking her creativity, reducing stress, and finding inner peace.
By Rafayet Rabbi 2 days ago in Lifehack


Comments
There are no comments for this story
Be the first to respond and start the conversation.