
How to Draw a Realistic Eye
A Step by Step Guide


Have you ever wanted to draw a nice pair of realistic looking eyes? Well, if so, this detailed tutorial is just for you! All you need is a few pencils, a sheet of paper and a little patience!
1- Building the Shape
First and foremost, you will need to establish a shape. Because everyone’s eyes are unique, there is a lot of variety in what shape you can choose. Also, looking up pictures of different types of eye shapes can help guide you in the right direction; it can even be your own! References are important: they will help you attain the realism you are looking for!
(Tip: Make your reference picture black and white! This will help with the shading later on in the process.)
To get the shape you want just right, it helps to isolate familiar shapes. Observe the roundness of certain parts and pay close attention to proportions and the distance between different elements. Take the time to pin-point references to help you organize your general shape.
For this step, your outlines should be very light. There’s nothing worse than trying to erase a stubborn line on your paper. The harder you press with your pencil, the more you will leave a dent in the fibres of your paper.
(Tip: Keep your pencil at an angle and lightly brush your paper. Avoid pressing hard; instead, layer light lines and strokes until you get the desired shape.)
For this drawing, I have chosen a typically caucasian eye, but these methods still apply for any eye shape! There will only be differences in the shape of the eye and the variety of the shading.

2- My favourite part: lashes!
My absolute favourite part of drawing eyes is adding on the lashes. This part leaves room for a lot of creativity: your lashes can be short, long, sparse, full, thick or on the thinner side. The choice is yours!
For the most natural look, relax your hand. Most of the movement should come from your wrist. Place the tip of your pencil where you want your lash to start and make a quick, sharp movement in the direction you want your lash to go. For a more natural look, don’t aim for precision. Change their direction, make them overlap and cross over each other, make some shorter and others longer; have fun with it! If you’re nervous about starting directly on your drawing, practice on a separate paper.
It’s important to remember that lashes don’t usually stick out straight. To give the appearance that they are curled, make the bottom dip down below the lid (refer to image).

3- Details
A lot is riding on this step. It’s what is going to make or break your drawing. But, never fear, it isn’t as daunting as it sounds!
The first step is drawing the outline of your iris. To create an eye that seems more open and round, your iris will be a bit larger than a half-circle, or, in other words, the top of the iris won’t be as covered by the eyelid. To create an eye that looks more relaxed or narrower, the shape of your iris will be approximately a half-circle. If you’re using a reference image, observe the shape carefully.
Next, we add the details in the iris. One of the most important parts is to add a reflected shape. This shape can be big or small, more rounded or square (as I have done in my drawing). Again, if you are using a picture, locate where the light hits the eye. This will give the illusion of glossiness on the surface.
For the pupil, simply draw a black circle; you can play with the size accordingly. Next, add the little details inside the iris. I’ve always liked to observe my eyes up-close, I find it fascinating how intricate they are. For your drawing, the realism will depend on the quality and quantity of these details. Finally, colour in a shadow line across the top of the iris, bellow the lid.

4- Shading
This is by far the most crucial part: the dreaded shading. Shading is what will turn your mediocre sketch into a drawing with much more depth. Shading will give your drawing volume and texture.
The key to nailing your shading is to create a flawless finish. To achieve this, it’s important to colour in your desired areas lightly. Remember, you can always add more graphite, but it’s harder to take it away! To smooth out the area, use your finger (make sure it’s dry!) or a Q-Tip.
(Tip: Take a loose sheet of paper and place it under your hand to avoid unwanted smudging and to keep your hand clean.)
Add shading where it feels natural, especially in the corners of the eye and in the crease of the lid. It’s also important to remember that the white of our eye isn’t completely white. It often has a slight blue hue to it depending on the lighting, which translates to gray when drawing with pencil.

5- Last but Not Least: The Brows
Ah, we love a good brow. Nice, thick brows have definitely been on the rise in the last few years, but the way they’ll look is entirely up to you. Today, I’ve opted for a relatively full look.
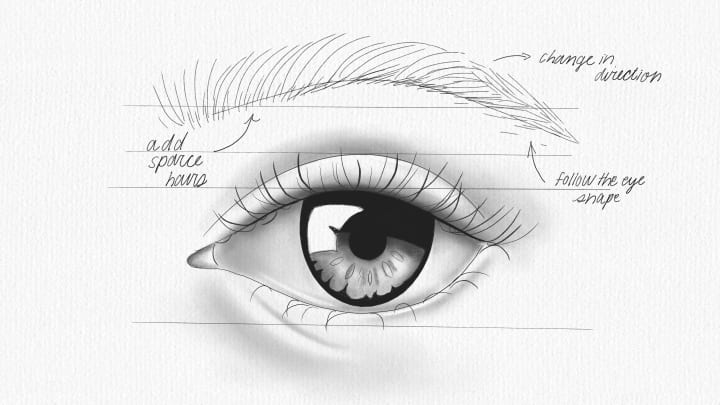
Firstly, you’ll want to draw a single line for the bottom of the brow. However, I like to leave a small gap at the beginning of the brow where I’ll add a few sparse hairs. You can erase this line at the end, or blend it in to the hairs. Focus on the length and shape of your brow: some people have straighter brows while other’s have brows that follow the same shape as the eye.
Next, start adding the hairs! Just like the eyelashes, you want to create natural movement. The first few hairs are often pointing up and as you move further down, they’ll start to take the shape of the eyebrow. If you’re using a reference image, look at the way the hairs come together. Which direction are they coming from? Are there areas where they seem longer or more curved? These are the things you have to pay attention to. The devil is in the details.
Often, the colour in our brows isn’t naturally even; there are sparser areas in the hairs. Colour in the darker spots and blend them out. Then, you can add more definition by adding some darker hairs. If you have a very thin point eraser (or an eraser pen), you can add little highlights.
All that’s left is to sign your work of art! I’d love to see how you did, so if you’re willing, you can send me your completed drawin on Instagram at blairdesignsco and tell me how it went!
About the Creator
Gabrielle Blair
22 year old literature student with a passion for the arts
Keep reading
More stories from Gabrielle Blair and writers in Lifehack and other communities.
It's Written in The Stars
Even my birth was planned... sort of. Not wanting to be called in on Christmas morning, my mother’s doctor suggested he induce labour to avoid an unwanted gift. So, four days before Christmas, on the Winter Solstice, at 2:05 in the afternoon, Gabrielle Blair was born.
By Gabrielle Blair3 years ago in Futurism
How I Beefed up my Attic the Right Way
Alright DIY-er, you want to hear my story about me tackling my attic because you are savvy enough to know that if you wear a tuque on your head in winter, you can get away without wearing a jacket - but the reverse is not true. Hot air rises, like a bad boss' ego, so here's how I keep it contained (in my house at least). For you bean counters out there, I will show you what happened to us with the results of my calculations.
By Richard Soullierea day ago in Lifehack
How to make Money!
Making money is a fundamental aspect of modern life, essential for fulfilling needs, achieving goals, and securing a comfortable future. While the idea of making money may seem daunting or overwhelming, there are various strategies and principles that can guide individuals toward financial success. In this essay, we will explore some effective ways to make money and build wealth.
By Willow Peddy5 days ago in Lifehack


Comments
There are no comments for this story
Be the first to respond and start the conversation.