
Weaving a Life’s Story
Finding Joy in Craftsmanship


Beginnings
I was eight years old. A Swedish couple living across the street from our Connecticut home made a living hand weaving. The attic of their historic house was packed with floor looms threaded with bright colors in various stages of fabric production. They used mohair and other expensive yarns for scarves and blankets, but also less expensive materials such as durable plastic strips and strong cotton yarn for some of the rugs they made. They were very kind, showing me how to make butterfly skeins of mohair on my fingers to save the small, leftover scraps of yarn they had cut off their looms with scissors. Skeins saved in this way could be pulled out and used without tangling the colorful yarn.

That year, when my parents presented me with a tiny, fully threaded “toy” loom for my birthday, the couple gifted me a colorful pile of the skeins I had helped make, and showed me how to weave, trapping each weft pass in the open shed space, changing sheds, beating the thread toward me, repeating the process, advancing the warp forward and winding the fabric around the front beam. Before I finished weaving the entire warp on my little loom they had moved away, so by the time I used my scissors to cut off the child sized scarf, there was no one to show me how to thread it again for the next piece. The loom stayed with me, or was stored, through all of my own family’s many moves. It was never really used again but I believe the early exposure to weaving influenced the direction of my adult life.
After that initial experience I was always aware of weaving, examining it in historic pioneer life villages and later at the home of a friend whose mother wove. I went on to learn to cut and sew from a pattern in school, how to crochet and tat lace from the patterns shown me by my grandmother and how to embroider from a kit my mother gave me, but I never wove again until an opportunity presented itself in college.
I began studying architecture as a major, then applied to and was given the opportunity to take a focused six-week full time weaving class. In those six weeks I learned the basics of how to design and draft a pattern of my own, make a sample of my intended piece, wind a warp to dress and thread on a loom, calculate the quantity of yarn utilized in each color to make my piece in both length and width, weave a straight selvage at the edges, cut and tuck the ends in on a color change in the weft and different ways to finish the fringe edges when I cut everything off the loom.
Eventually, responding to the immediate hands-on aspect of textile design and hand weaving, I switched majors. I enjoy making useful objects that require a relatively short time to design and complete. I love color and texture and their varying combinations as much as I love the organized structure of weaving. I love the way something made in a grid can be visually removed from the confines of a grid, and even when the grid is celebrated, I am amazed at the infinite variety of variations that can be produced. There is always another way to learn, explore and develop as an artist and as an individual.
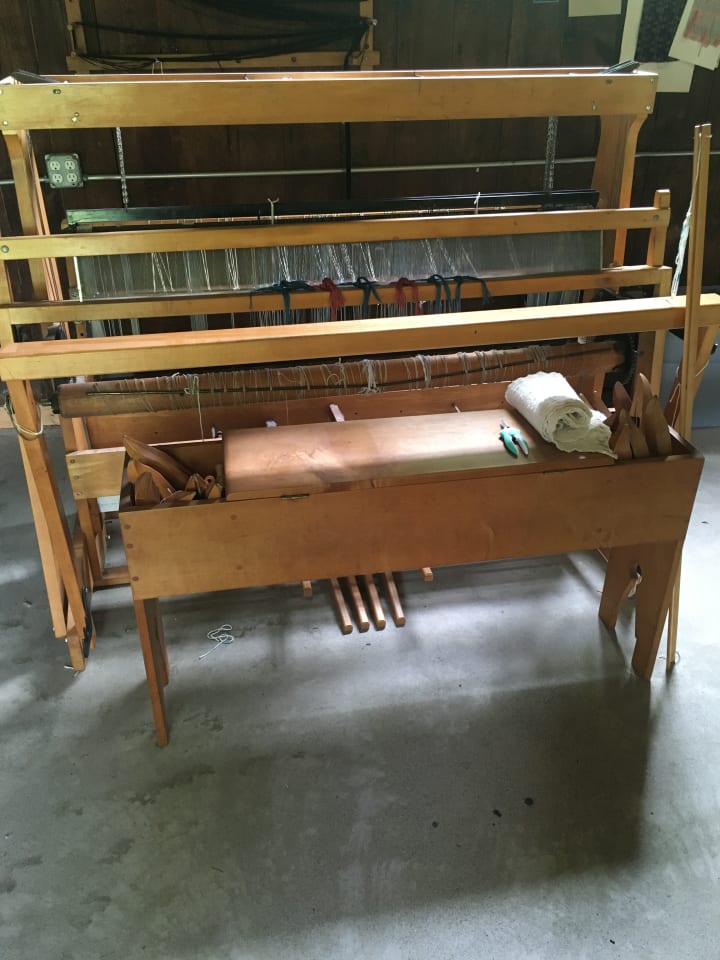
After completing the textile design program, my weaving and color selection skills were used at various times; sample weaving for a women’s suiting company, stints doing production hand weaving for two independent craftswomen, designing for printed fabrics and for an architecture firm and teaching weaving in the summers at two different children’s arts camps. There was also a lot of moving, and my Macomber floor loom purchased with my last student loan and designated as “school supplies” came every step of the way, taken apart and reassembled, in and out of apartments, up and down three story walk ups, in bedrooms, attics, living-rooms, covered porches and a garage.

About ten years ago, finally with a studio area of my own, I began making scarves and selling them at juried craft fairs around my region. After a year of weaving and applying, I was accepted to several shows.
Process
The way I approach designing for weaving varies. Honestly, budget plays a large part in the equation when a hand weaver sells work directly. Show fees can range from hundreds to several thousand dollars for a weekend show, with some shows also taking a percentage of the profits. The artist is usually required to be present at the show for the entire time, as well as setting up the booth so there is an additional time commitment after production. Selling wholesale means earning one half of what a shop can sell your work for since your clients can’t be undercut, so time and price need to be set accordingly. Designing the pattern takes time, and the yarns are very expensive. Financially successful weavers seem to my observation to be people who can find joy in continually exploring and developing one recognizable style, somewhat in the way it is possible to always recognize a Matisse or a Michelangelo in painting. I prefer to follow my interests wherever they lead me, whether it is a color combination or a weave structure inspiring me. I do most of my work with the intention to sell it, but I always put aside a small percentage of time to explore ideas I want to try. Some of these one-of-a-kind pieces can take up to a week to weave, so they are priced accordingly. Occasionally one of these pieces leads to ideas for more easily completed saleable items.

The design part of the process is the most fun for me. Many of my color combinations and weave structures come from interpreting photos I see on Pinterest or Instagram. I save inspiration in various categories labeled “Color”, “Pattern”, “Texture”, and so on. A beautiful sunset, a forest road, a rusty boat in a harbor, or a bouquet of flowers might yield a combination of color or texture I wouldn’t think of with a blank sheet of paper in front of me.


The next step is a sketch, usually very basic, of the piece or pattern I want to create. When this is ready, if a multicolored warp will be threaded on the loom, I cut a piece of card stock to about 1 1/2” by the width of the finished piece and gather all of the colors I am using. I wind bands of yarn around it in the amounts and density I believe my design requires. This can be simple in the case of a plaid or stripe, and time consuming for a subtle color shift across the entire piece. I usually use commercially dyed yarns because dying adds another level of cost to the finished product. At this stage of the project, I also calculate any shrinkage that might happen during weaving and finishing. When I am satisfied with the look and color selection, I cut the wrapped yarn from each cone and secure the windings with a piece of tape as a record of my idea.

Next, I record the entire pattern in written form with numbers of yarns and colors in the notebook I keep at my loom bench. I decide how many items I want to weave in the same design. There is about eighteen inches of waste at the end of the warp that can’t be woven, so the more pieces I can weave in one warp design at a time, the less waste per piece there will be. For new designs that are strictly sales pieces, I have to either take a chance on selling 6-8 pieces, or only make 2 and take the risk of losing sales on the more popular ones. I also get bored easily so each year I create new colors in popular patterns I’ve designed in order to help keep the cost of the finished pieces reasonable.When I have decided how many pieces to produce in a warp, I calculate the number of yards I will need to complete the project and begin winding out the design one yarn end at a time on my warping board. I designed the board to measure one yard length between each peg. My longest warps are usually about 12 yards, although for a popular pattern I can add several more yards.

The completed warp on the warping board has an “x” pattern between the pegs at one end. Before removing the warp from the board, each individual branch of the x is tied together with a short piece of yarn. I also tie all the threads together in the center of each yard. This process keeps all of the threads organized in the way they were laid out. As the warp is taken off the loom, it is daisy chained from bottom to top so it can be stored until time to weave, or moved directly to the loom to threading.
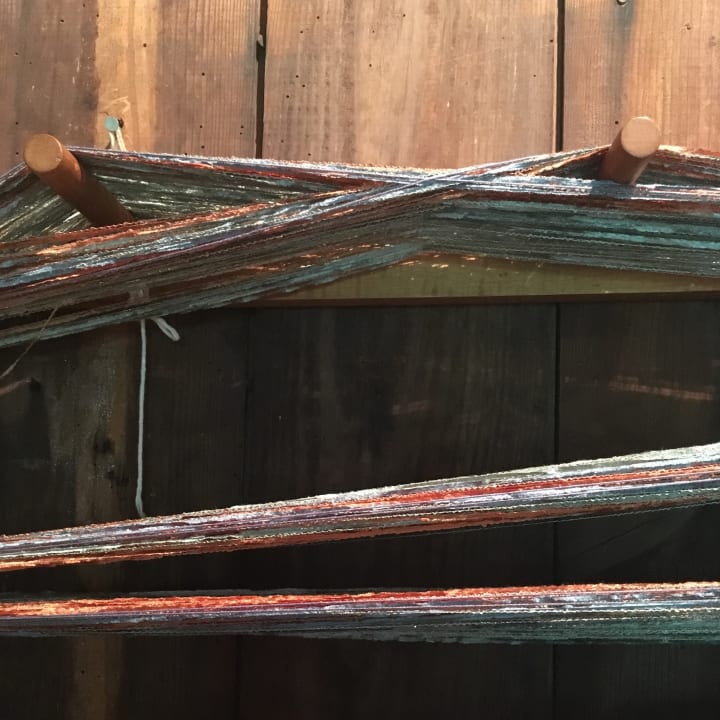
The next step is to transfer the warp to the loom. There are several ways to complete this, and they depend on the design I am using, and whether it has any relationship to the pattern that has gone before. Every method ends up with the warp wound up onto the back beam, each separate end threaded through a harness that lifts, and then through a reed with equally spaced teeth called dents. For beginners, this part can be a little daunting in terms of time, but the more often it is done, the faster it can be accomplished.

After the loose ends of the warp are tied on, and any mistakes identified and resolved, the project is ready to weave! To spread out the threads evenly at the leading edge of the weaving, inexpensive waste yarn which will be taken out later is woven in loosely. If fringes are desired at the two ends of the piece, waste yarn is also woven in a little longer than the desired length of the finished fringe. When beginning to weave on a new warp I usually weave my initial design idea first, then experiment with the weft on the next two scarves in the project. Even when they are all in the same color family, I like to make the pieces look as different from each other as possible, unless I am weaving for a shop that requires multiples of the same scarf.
As I weave, I make the color changes by wrapping the weft yarn around the end warp thread at the beginning and end of each color until it lands about two inches in. I carefully cut off any excess as close to the finished fabric as possible. With certain two to four ply yarns, I need to stagger the ply ends in the yarn for a smoother, seamless look, so I do this at the same time, using the scissors to separate the end into parts and cutting them off at different lengths. It’s important not to cut your warp by accident while doing all this cutting near it! There are ways of fixing an accidental cut, but they are time consuming and tedious. I watch and feel the tension of the shuttle as I throw and beat down the yarn with the beater as evenly as possible (see video demonstration above). If the edges are not as perfectly straight as I would like, I often go back. Likewise, if I measure, and weft ‘picks’ in an inch are too spread out or if there are too many for the effect I want to achieve, I unweave that section and redo it. All of this measuring is established by doing samples in advance if the yarn or weave structure is unfamiliar. If I am familiar with the layout, I generally don’t do samples in advance.
When the entire warp is woven, and all of the pieces wrapped up on the front beam of the loom, it is time to cut the warp off the loom! I cut the warp ends carefully in sections with my scissors, knotting them at the front so as not to lose the threading for the next warp I plan to do, if it will be similar to the project I have just completed. I unroll the entire warp, making an initial check that I haven’t omitted any pattern elements as I go, and then I cut the warp off the front beam.
Finishing
Finishing includes checking the size of each piece, checking the edges, checking for skips in the weaving, checking for yarn faults I may have missed, then carefully washing and hanging the entire length outside on the line to dry. After drying I trim any small ends of yarn that emerged during the washing process with a sharp pair of scissors. I take finishing a bit further for my wool pieces and felt the woven piece, so washing and drying is a lengthy step that requires care.

When dry, some pieces require knotting of the fringe. Some pieces, such as the wool ones, have already been finished on the loom with an embroidery detail at the edge.I carefully cut each piece off one at a time. Then I start knitting the fringes. When the final knot has been made, I stretch out all of the fringes fully and cut them all to the same length. At this point, I always remember my professor saying, “The only knots in weaving are at the ends”.

Before I put a finished piece away, I cut a short length of yarn from a cone of cotton for the hang tag, write out fiber and care information on the back of the tag and carefully attach it to the finished piece. Now it is ready to sell! I store each piece carefully until it is ready to go to a craft fair, to a shop or ready to be posted online and then I can begin working on the next idea in line.
If you are interested in finding out more about my work or what I’m up to in general, you can find me at:
Instagram :
@maisonette_textiles
Pinterest:
pinterest @maisonettetex
Etsy:
https://www.etsy.com/shop/MaisonetteTextiles
Facebook :
Maisonette Textile Design
And of course, here on Vocal!
About the Creator
Natalie Wilkinson
Writing. Woven and Printed Textile Design. Architectural Drafting. Learning Japanese. Gardening. Not necessarily in that order.
IG: @maisonette _textiles
Keep reading
More stories from Natalie Wilkinson and writers in Humans and other communities.
Night Out in New York City
Just so you know from the beginning, I’m a little white girl wasp; that’s with a capital WASP. I’m married to a white guy, same letters. Raised in a shorthaired, clean-shaven, no drinking, no smoking, no dancing, cards or movies Baptist church, that’s me. When I was a kid, my piano teacher, who was the organist of our church at the time, got kicked out for being gay. My favorite great uncle was gay too, and certain family members still whisper that label when they talk about him. We did move a lot, I was in eight different schools, three were high schools in two states and another country. Friends were few and far between. I ended up at art school because I liked to draw. The kids at this school had the world on me. They all came from Sophistication, USA, or at least New York City. I came from Sheltered, and somehow I skated through all the stuff that goes on in an art school total innocence intact. It never touched me, and I was probably, no, definitely according to my classmates, annoyingly self-righteous to boot. But people accepted me anyway, because all artists are outcasts of some sort, even the goody-two-shoes sort, join the club. “Not Fitting In” is my middle name. I graduated, got married right away, and after a couple false starts moved to Brooklyn and took a job in the Midtown Manhattan Garment District.
By Natalie Wilkinson3 years ago in Humans
Where do We Go When We Die?
Passing, the extraordinary secret that has intrigued and frequented humankind since time immemorial, has impelled incalculable philosophical, devout, and logical request. It's a subject that triggers profound thought, blending a large number of feelings and convictions. Whereas the certainty of passing is widespread, the goal of our awareness, our pith, remains one of the foremost significant enigmas.
By Elorm Peter Gbadago7 days ago in Humans


Comments
There are no comments for this story
Be the first to respond and start the conversation.