
HOW TO SETUP CONVERSION TRACKING USING VOLUUM
VOLUUM THE BEST TRACKING SOFT WARE

Step 1: Make Note of Your Custom Conversions
Conversions are grouped depending on the value of a parameter called et in the postback URL or conversion tracking pixel. For certain conversion types and events, some affiliate networks allow you to enter a specific postback URL. However, others only allow you to enter a single specified URL with a dynamic token that returns the event type name. For this reason, you can define several et values in Voluum that will be regarded as belonging to the same conversion type.
If you are unable to track conversions using postback URLs, you may alternatively add the et parameter to your tracking pixel by following the same steps. In the FAQ, you may find an example of how the tracking URL should appear.
section underneath.
Only the owner of the Voluum account has the authority to define the conversion kinds. Users who were granted access to the Voluum platform through an invitation from the account holder are unable to add conversion types to the Voluum platform.
I. Add a Custom Conversion Event
To add a new type of the custom conversion, called in Voluum custom conversion event, perform the following step:
2. Click the icon (top right corner of the screen). Your account data view will show up.
3. Go to the Custom conversions tab.
4.Click the Add button. The Custom conversion event pop-up window will show up.
5. Provide a unique name of your custom conversion event. While providing the custom conversion name, you need to take into account that the name will be displayed as a column header in reports, therefore it is recommended to have a consistent naming convention for all the names.
6. Provide accepted values for the et parameter added to the postback URL in Voluum. You need to take those values from your affiliate networks based on parameters the affiliate networks enable you to use in the postback URL.
7. If required, you can configure extra options for the custom conversion types you are going to add:
Include in ‘Conversions’ column defines whether the custom conversion is counted towards the general Conversions count. If your custom event is, for example, uninstall, or some other internal metric, you might want not to add it to general conversions count.
Include in ‘Revenue’ column lets you choose whether revenue from a given custom conversion type is added to campaigns’ overall revenue. The column Revenue will only include conversions that have this box checked while the Total revenue column will show revenue also from conversions that have this box unchecked.
Send postback to traffic source lets you choose if an outbound postback to the traffic source is fired when a given custom conversion is registered in Voluum.
Include in ‘Cost’ column is applicable to the CPA and Revshare cost models. When selected, even though the postback URL to the traffic source will be fired, still it will be counted only as an informational one, and not the one that incurs the CPA cost.
Click the Save button. The Custom conversion event pop-up window will close.
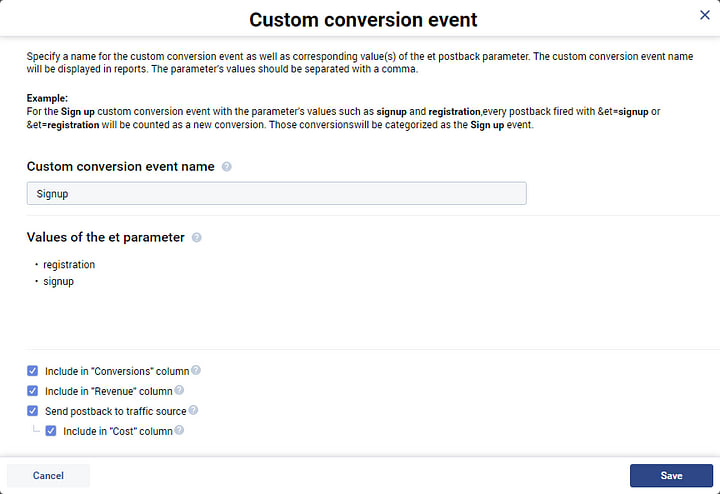
You have added the custom conversion event to Voluum.
Step 2: Make Note Of Your Conversion Tracking — You Will Be Using Postback URL
Track Conversions Using S2S Postback URL
If you want to track conversions using a redirect method of tracking with a postback URL, then it is necessary to pass a click ID value to an affiliate network.

In Voluum, where the conversions are registered, a unique click ID value is generated for the click. This unique click ID will be sent to your affiliate network platform and then, the affiliate network captures and passes this click ID back to Voluum after the conversion is recorded on their end.
How Does Postback URL Work
An outline of how a click ID is passed from and to Voluum
Click here to expand a video tutorial section:
Sign up and get a 40% Discount when your upgrade
Voluum Note: Parameters used in the offer URL such as s2 and placeholders used in the postback URL such as #s2# or #price# need to be in compliance to those ones which are supported by your network.
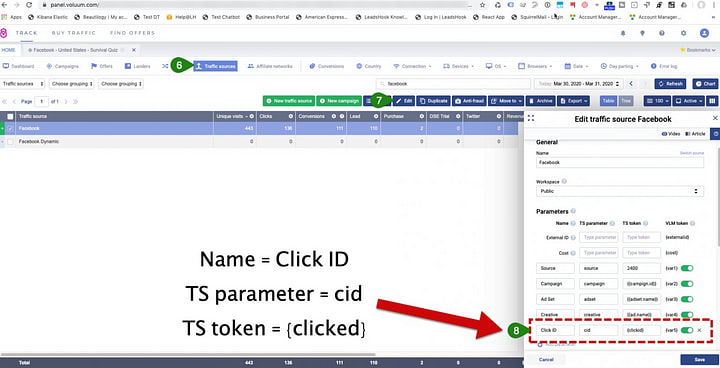
Step 3: Traffic Sources: Add Click ID Parameter
LEADSHOOK
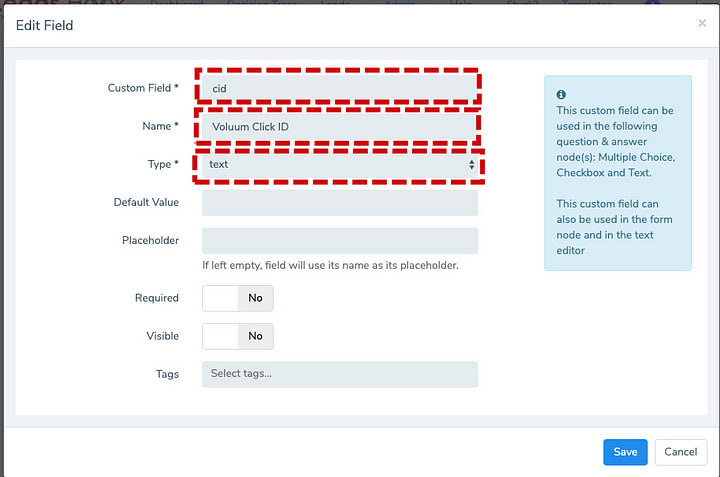
Step 4: Inside LeadsHook, Create an answer text field called ‘cid’ as shown below…
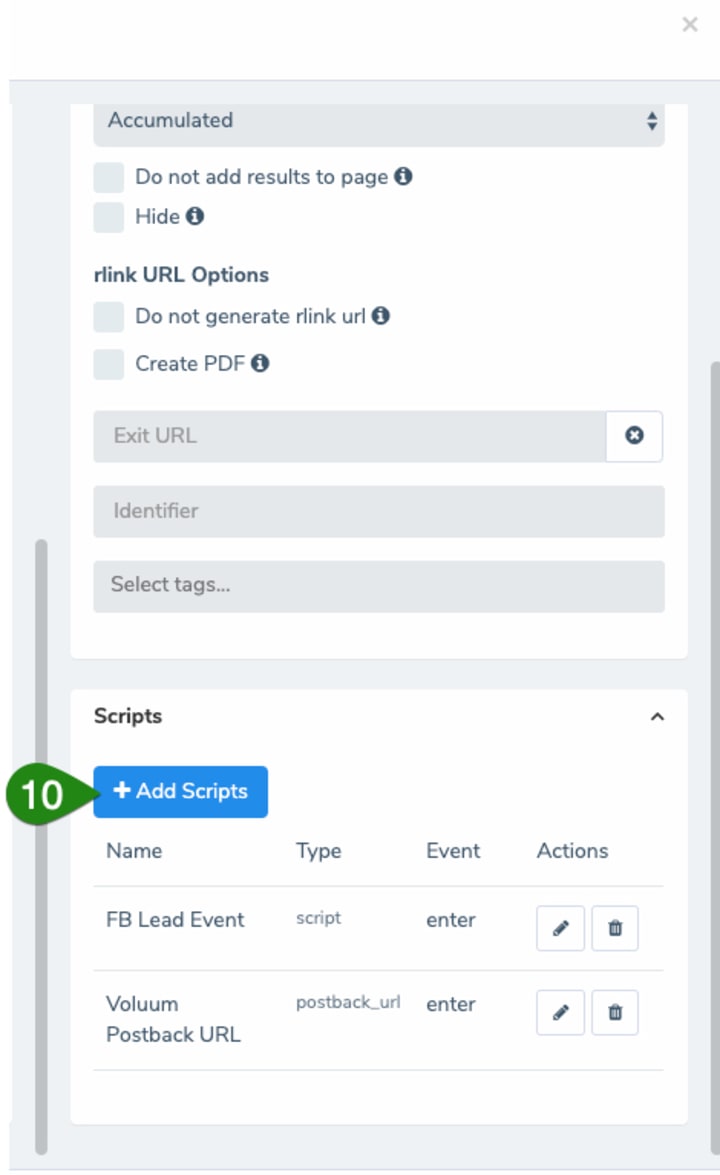
Step 5: Go to Decision Tree and click the node where you want to trigger a conversion… (usually the results page but can be any other node too

Step 6: Add the Postback URL from Step 2 as shown below…
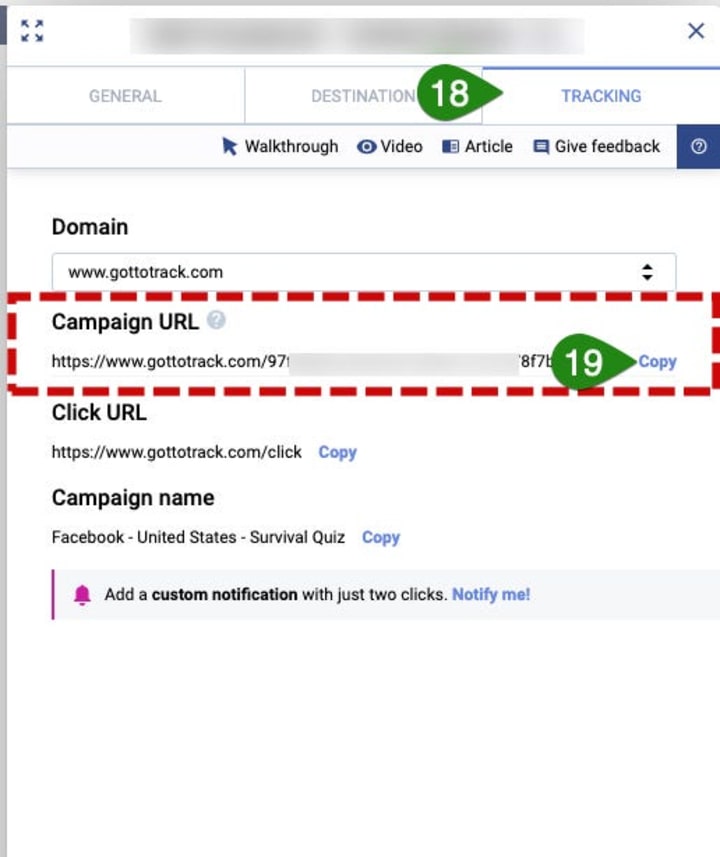
Step 7: Voluum: Grab the campaign URL and test
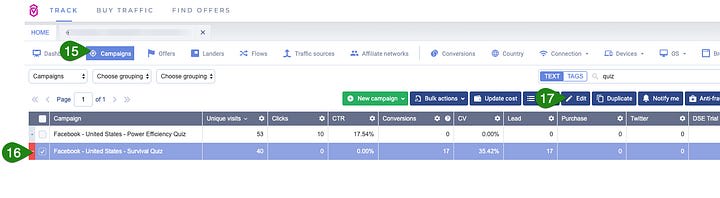
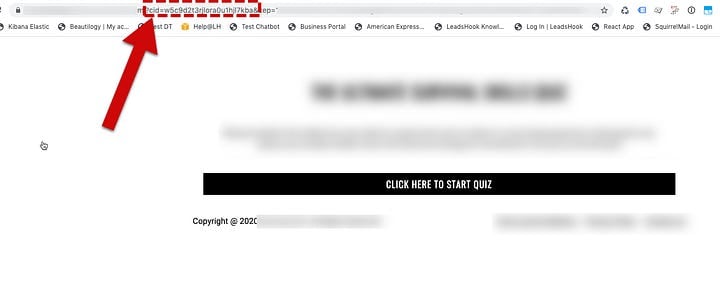
Your should end up at your landing with cid variable as shown below…
Your lead inside LeadsHook will show this cid field as well…

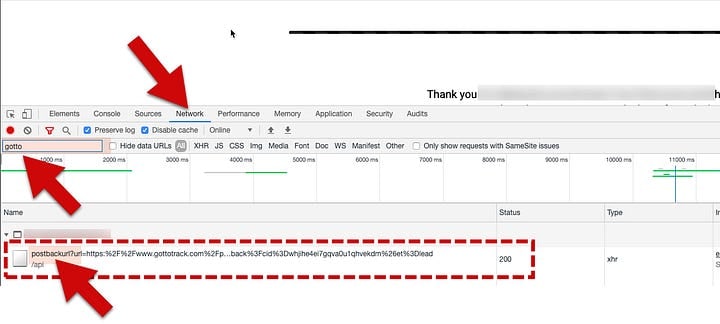
And finally in the NETWORK tab in your browsr, you’ll see the postback URL firing. Also please confirm an increase in conversions inside Voluum. It can take about 2–3 mins for data to update…
Congratulations… you have setup conversions tracking inside Voluum
About the Creator
Iga Godfrey
I'm a software enthusiast, dedicated to exploring the latest trends, developments, and innovations in the tech world. I write about software development, Reviews, web design, app development, and more. .
Keep reading
More stories from Iga Godfrey and writers in Humans and other communities.
In fact, we remember everything that is meant to be forgotten
There was also a time When, Whenyou needed only one. it seemed as if my world had ended for you and yours for me, then a long time passed, your curiosity vanished, the relationship between us became attractive, we became strangers, the tie passed, but the tremendous earthquakes in the world of the heart did not allow any thing to remain in its place.
By WAQAS AHMADabout 18 hours ago in Humans
Fangs of Light
This story is a continuation of the Tales of Ezok that began in "The Precipice." Reading this story and its companion "Whispers and Whisps" is not required to enjoy this story, but they will each add layers to the character we see here and I would be remiss to not mention them at the very least.
By Stephen A. Roddewig6 days ago in Fiction


Comments
There are no comments for this story
Be the first to respond and start the conversation.