
SPEAKEASY.NET Email Settings IMAP and SMTP
SPEAKEASY.NET 1(888)-715-9141 Email Settings IMAP and SMTP
In this article below, we will tell you how to set up your SPEAKEASY.NET email account based on the correct SPEAKEASY.NET email settings. The required IMAP, POP and SMTP server settings are given below in the tables. It is impossible to set up any SPEAKEASY.NET email account without applying the server settings as outlined in this article. You can use the same server setup below to set up your SPEAKEASY.NET email account on any device or email client in a matter of minutes.
Let’s not waste too much time and move on to the correct configuration of the SPEAKEASY.NET IMAP, POP and SMTP server.
SPEAKEASY.NET IMAP (incoming mail server) configuration
The following table highlights all of the required SPEAKEASY.NET IMAP server settings that you must apply to activate incoming mail services for your SPEAKEASY.NET email account.
SPEAKEASY.NET IMAP (incoming mail server) configuration
When you apply the correct SPEAKEASY.NET IMAP server settings as mentioned above, you can enjoy the service of incoming emails to your SPEAKEASY.NET email account without any problem.
SPEAKEASY.NET POP configuration (incoming mail server)
One can choose IMAP or POP server for incoming mails according to their requirements. Therefore, the server configuration for the POP server election is given below. Just go in and apply the SPEAKEASY.NET POP server settings mentioned below.
SPEAKEASY.NET POP Settings
Anyone can set up their SPEAKEASY.NET email account as a POP account through the simple server setup mentioned above. In addition, the incoming mail services of your account will be activated based on the above-mentioned correct configuration of the SPEAKEASY.NET POP server.
SPEAKEASY.NET SMTP configuration (outgoing mail server)
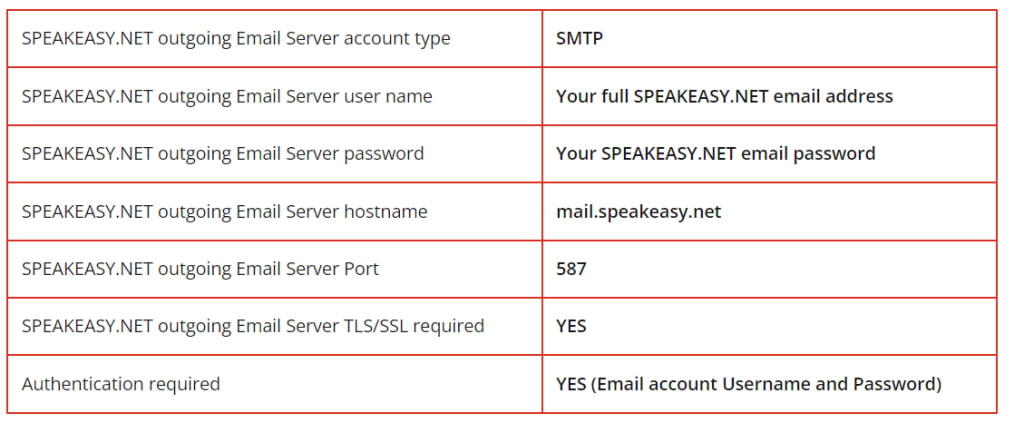
Now comes the turn of the outgoing mail server. Applying the correct SPEAKEASY.NET SMTP server settings is really important because no user can send emails without it. Therefore, the following table shows the correct SMTP server settings to apply to your SPEAKEASY.NET email account.
SPEAKEASY.NET SMTP configuration
You can enjoy SPEAKEASY.NET outgoing mail services after applying the above-mentioned SMTP server settings to your SPEAKEASY.NET email account. Always send a test email to verify the activation of the outgoing mail service.
We hope that after applying the SPEAKEASY.NET email settings as mentioned earlier in this article, you will be able to set up your SPEAKEASY.NET email account without any problem. But if the server settings provided here did not help you then you should talk to our technical experts who are capable of fixing all email related issues with ease. We are at your service 24 hours a day, 7 days a week, since our only motive is to obtain greater customer satisfaction and trust.
Apart from the above mentioned article covering SPEAKEASY.NET email setup, we have also posted more articles that will help you to know about complete SNET.NET and Ruraltel.Net email setup through which anyone can configure your email SNET.NET or Ruraltel.Net. account without any problem.
How can you get your email server settings?
You can ask your IT guys to provide it for you.
You can find this yourself by going to Account Settings within your email program, in case you are using Microsoft Outlook you can find these details by following the instructions below.
Open Control Panel --> Click Mail --> Email Accounts --> Select your email account and click Change --> here you will find "SMTP OUTGOING MAIL SERVER", this is the server address you need.
Now click More Settings -> Advanced -> here you will find the port number in the box next to "SMTP OUTGOING MAIL SERVER". This is the port number you need
These are some of the most used SMTP servers or you can see more SMTP server addresses at the bottom of this article.
Provider / ISP
- SMTP server address
- port numbers
- office 365
- smtp.office365.com
- EITHER
- outlook.office365.com
- 587 gmail smtp.gmail.com
- smtp.mail.yahoo.com
You'll need an Intuit ID to be able to send email from QuickBooks. During the setup process, you will be asked for your Intuit ID; If you don't have one, you can create one.
For Office 365, you'll also need the "app consent" capability enabled or you may receive an error at Step 4. You may need to check with your IT about this setting Manage user consent for apps in Microsoft 365 - Microsoft Admin 365 | Microsoft documents
- Select your email provider and enter your email in the "Email Id" field.
- Sign in to your Intuit account when prompted. If you're already signed in to your Intuit account, you won't be prompted.
- Sign in to your email account. (Office 365 shown below, Google will ask you to sign in if you use a Gmail or Google Workspaces email account)
Click "OK" when prompted to give QuickBooks access to your email. (Office 365 shown below, Google will ask you to allow access if you use a Gmail or Google Workspaces email account)
QuickBooks prior to 2023
Please review the following article Basic Authentication and Email Sending from Hosted Applications (gotomyerp.com)
Set up email for Sage 100
Wise 100 2021.4 or newer
Sage 100 versions after 2021.4 (PU4) already support modern authentication. The following Sage article describes how to configure Office 365 and Sage to use OAuth. This will require administrator permissions on your Office 365 and must be completed by your IT.
How to configure Sage 100 OAuth email settings for use with a Microsoft 365 Apps registration
For the "Redirect URI", use http://localhost instead of the documented https://localhost. In our tests we have found that https://localhost does not work.
In Office365:
In sage:
- If you are using Office 365 and want to set up Paperless Office, Electronic Delivery on Sage 100, click HERE
Sage 100 2021.3 or earlier
Please review the following article Basic Authentication and Email Sending from Hosted Applications (gotomyerp.com)
- Configure email from Misys
- To configure sending emails from Misys, do the following
- Login to Misys, make sure no other user is logged in
- Click Administration, if other users are logged in you will get a window with all users logged in, ask them to log out
In Administration --> Company Options --> Email
Enter all the necessary details, most of these details will be provided to you by your IT server administrator or email
About the Creator
Keep reading
More stories from printerhelpline and writers in Geeks and other communities.
Surewest Email Server Settings Setup (iPhone, Android) Updates
Surewest Email Server Settings Setup (iPhone, Android) We will tell you in this detailed guide how you can set up your SUREWEST.NET email account on any device or email client platform based on the correct SUREWEST.NET email server configuration. The required SUREWST.NET email IMAP, POP, and SMTP server settings are provided in the tables below. Without applying the server settings listed in this article, you cannot set up any SUREWEST.NET email account on any device or email client.
By printerhelpline11 months ago in Geeks
Go Tell it on the Mountain by James Baldwin
Published on the 18th of May, 1953, ‘Go Tell it on the Mountain’ became the book that James Baldwin is probably most famous for. Including the very real impacts of violence upon the African American community during a time of turbulence for Civil Rights, James Baldwin became an absolute superstar not just of his race, but of the oppressed in every situation, in every country, all over the world. From Palestine to the Civil Rights Movement, from the LGBTQA+ to Muslim Migrants from war-torn countries, James Baldwin is the voice of the oppressed not just through the way he presents the division, but the way he presents a reality that the oppressors could not possibly be aware of. A reality in which every day is a fight to survive. What makes this even more real is that this is a semi-autobiographical novel. In my personal opinion, James Baldwin was the most articulate man in history.
By Annie Kapur2 days ago in Geeks
Panchayat Season 2 Ending Explained: Does Abhishek Remain in Phulera?
Panchayat Season 3 is almost here; I can't wait at all. But before that, a quick recap of the previous season is made for you all. In case any of you are not yet aware of the Panchayat web series, let me tell you that this is a web series released on Amazon Prime which has left its mark on almost everyone, especially in India. After all, they made people aware of what web shows are.
By Ayush Vermaabout 7 hours ago in Geeks


Comments
There are no comments for this story
Be the first to respond and start the conversation.