
Better than 1,000 Words
How to: Take food and beverage photos with your phone

"People who love to eat are always the best people."— Julia Child
We live in a world with delicious food around every corner and all of us, and whether self-proclaimed or professionally qualified, we are in fact foodies!
“Taking pictures is like tiptoeing into the kitchen late at night and stealing Oreo cookies.”— Diane Arbus
We’ve all heard a million times, “cell phones these days have AMAZING cameras on them!” It’s true, our cell phones do come with very advanced software and hardware, but looking at an amazing photograph and saying to the photographer "you must have a good camera!" is exactly the same as tasting the first bite of a dish out of a three Michelin-starred chef’s kitchen and telling them, "You must have an amazing oven"
“The picture that you took with your camera is the imagination you want to create with reality.”— Scott Lorenzo
It’s not the camera that makes the photograph, it’s you—it’s your story, your “Oreo cookie” version of reality that you want to share with the world. It’s the rules you choose to follow or break and the emotion that you evoke from the viewer of the photograph that makes it great.
I tell anyone starting out in food and beverage photography, if you don’t want to eat the photograph, a.k.a. "want to lick the screen," then you haven’t nailed it yet.
This article is a starting point for you to start to learn some basic photography principles to take better photographs of your food and beverage. This is an intro to the full-length course to be released October, 2019 at www.thechefshots.com
The key learnings of this article:
Composition:
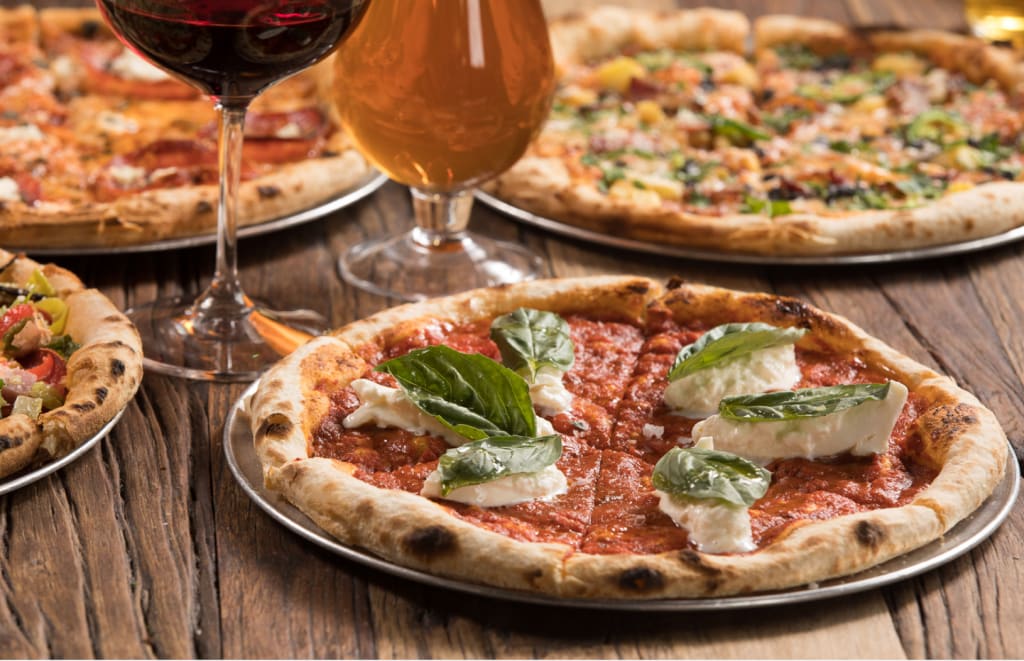
The biggest mistake I see on a regular basis is people pulling their camera out and taking food photos directly at or overhead of the dishes that come out, simply documenting it, but not paying any attention to how the food or drink appears in the frame. Sometimes you get lucky and it’s an awesome photo, but more often than not, that angle isn’t doing justice to the dish or cocktail that’s just arrived.
Here are a series of questions to help you get started, ask yourself these before you take your photos:
- What story am I trying to tell?
- What type of food is this? It is a sandwich, burger or cocktail. i.e. something tall? Would it be best for me to try to capture this at more of a 90-degree angle to the subject? Or, is it a salad, pasta, pizza i.e. something flat—more conducive to shooting overhead?
- What’s in the frame and why is it there?
- Is everything that is in my frame there because I want it there?
- Is it contributing to the story?
- Is it easy for me to move either the camera, the subject and or the items I don’t like in the frame?
(Sometimes while dining at a restaurant you may not be able to help some of what’s in your frame because you will not want to bother those around you, but more often than not you can move enough to be very specific about what you have in your frame and why it’s there.)
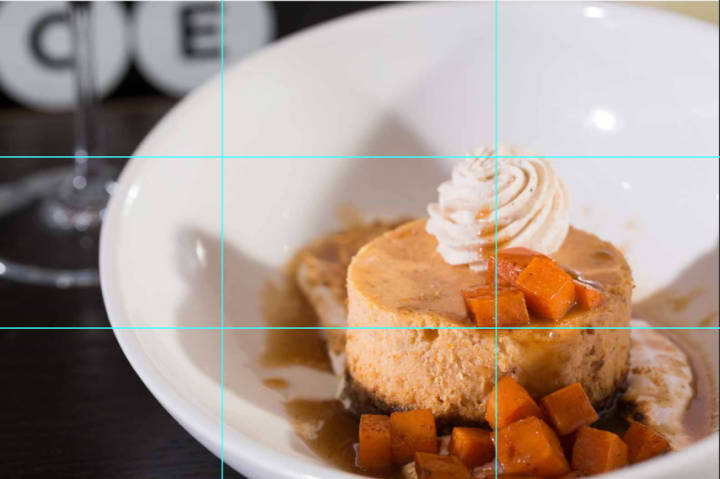
The Rule of Thirds:
There are many composition principles in photography and like any rule in life they are guidelines to help you, they may not apply to every shot all of the time, but I want to share the basics of the rule of thirds so that you can start applying it today to make your photos stronger and more appealing to your viewers.
If you don’t have your grid turned on, stop reading and head into your camera settings to turn that on. Images below for both iPhone and Android


The rule of thirds suggests that aligning a subject with these points creates more tension, energy and interest in the composition than simply centering the subject.
Think about how the main course, dish or cocktail is sitting in the frame of your shot. Can you use these grid-lines to make the image more interesting?
Take a look at the samples to see how I use the rule of thirds in my compositions to tell a compelling story of the food and drink I am shooting.


Also, keep in mind that occasionally the food and drink will be so perfect for a centered shot that this rule does not apply, perfect symmetry is nice when the time is right.

Exposure + Focus:
Now that you’re thinking about how to frame your perfect shot let’s talk about setting the exposure and the focus. We’re all familiar with the little yellow box that automatically appears, as well as automatically moves around, when we’re working to take our photos.
That’s our cell phone’s version of auto exposure and auto focus. When you open the camera app and point it at your subject, the software in our phone is trying to determine where you are shooting, as well as the best exposure for the image based on all of the information it’s pointed at. Sometimes it does a stellar job and other times you end up with images that are way too dark, way too bright or totally out of focus.
Most everyone I talk to doesn’t realize that you can set the exposure and the focus using this square.
Open up your camera where you are, pick a subject; it doesn’t have to be beautiful, this is just for the sake of learning the tool for the first time.
Press and hold the yellow box exactly where you want your focal point to be in the image until you see the yellow rectangle at the top of the photo turn on that says AE/AF Lock; this stands for Auto Exposure/Auto Focus Lock:
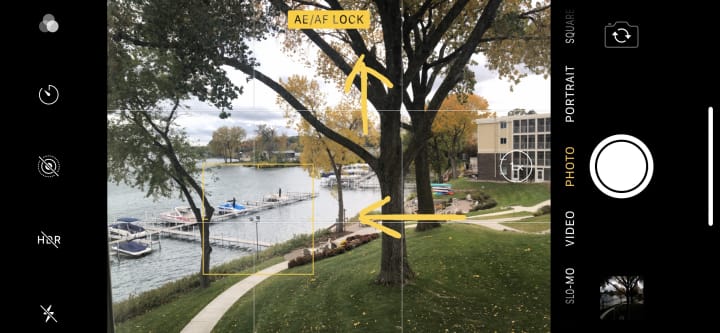
After you have set the focal point you see the little sun next to the box. Take your finger and drag it up and down. This allows you to determine the best exposure for your image:

The reason using AE/AF lock is valuable is because you are telling the camera exactly where you want the focus and the exposure to be—you are in the driver seat, not the software in the device itself. The more you start to use this tool, the more control you will have over any lighting situation you are in. You now know how to adjust the focal point and exposure to capture the exact photo you want.
“The camera is an instrument that teaches people how to see without a camera.”— Dorothea Lange
You now have three new tools to use in creating better photographs of your food and beverages, composition using the Rule of Thirds, setting Focus and adjusting Exposure. Like anything in life, you get better with practice. I encourage you to practice using these three tools every time you pick up your phone to take a photograph, until one day you will start to see the photographs before you even take out your camera!
Assignment:
Obviously this is up to you to try and no one will knock at your door if you don’t do it, but we learn by practicing and by repetition.
- Take at least 10 photos using the rule of thirds paired with setting the Exposure and Focus
- Pick your favorite and upload it to our Facebook community
- Use the photo description to explain how you approached framing the shot the way you did and where you set the exposure and focus
- Use the hashtag #ChefShotsFocus in the description
The 1-2-3 Rule
You can upload as many photos as you want, as long as you follow the 1-2-3 rule. This rule means that for every photo you upload, you should comment on at least two other photos and like at least three other photos.
Please comment and like other photos that were submitted to the same assignment. That way you can learn from the submissions of others (and they can learn from your feedback).
To find other photos submitted to the same assignment, simply click on the hashtag or search for that hashtag using the search functionality at the top of the Facebook Group.
How To Join Our Facebook Community
Simply click this link and press "Join Group."
The Password is: Chef Shots
Thank you for reading this article, we can't wait to see some of the awesome shots you take and if you'd like to learn more about the full course, visit our site at www.thechefshots.com
-Leigh Loftus
About the Creator
Leigh Loftus
An 11 year professional food and beverage photographer, launching a smartphone photography course, The Chef Shots - dedicated to teaching chefs and the culinary world how to take "Drool-Worhty" photos, using only their smartphone!!
Keep reading
More stories from Leigh Loftus and writers in Feast and other communities.
Rock Your Cocktail Photos
Be honest with me for a second… have you ever used your phone to take a picture of your food, with your soul intention being to make your friends jealous #ShotOniPhone… Only to look at that photo and admit to yourself that it looks nothing at all like what’s in front of you, in fact it looks like a total piece of CRAP?!🤷🏼♀️
By Leigh Loftus4 years ago in Photography
Viral Food Trends
Viral Food Trends: Exploring the Hottest Dishes of 2024 Food trends come and go, but some dishes capture our collective imagination and take the world by storm. In 2024, we're seeing a mix of innovative recipes, global flavors, and health-conscious choices that have everyone talking—and eating! So, grab your forks and knives as we delve into the hottest viral food trends of the year that are not only Instagram-worthy but also incredibly delicious and nutritious.
By Arshad Mecci2 days ago in Feast


Comments
There are no comments for this story
Be the first to respond and start the conversation.