

Chemical attacks are a major focus for Homeland Security. This is because it requires the least amount of technology to detonate, and the least amount of expertise to create. Nerve gases, such as Sarin and VX, are the deadliest kinds of chemicals used in attacks, and most likely chosen for a bomb. Mustard gas comes in third place because it’s the easiest to produce and is more widely available. But it doesn’t pack the same punch as a nerve gas would. The best way to survive such an attack would be to shelter in place by making a seal-in room. Though proven to be sufficient in a chemical attack, these rooms will not protect you against nuclear attacks, but they do help with fallout from one.
To start, you’ll need to have a designated room in your home for this. The room should provide 10 square feet of air per person. This provides up to five hours of oxygen. If you are single, this equates to any five by two-foot room. Remember, the bigger the room, the harder it is to contain, but if it’s too small, you won’t have enough air to wait out the chemical. Select a room on the highest floor because most fumes are heavier than oxygen, so they sink to the lowest point. You’ll want a room with the least amount of doors and windows to save time. You want to make sure the room has bathroom access and two ways to enter and exit in case of an emergency.
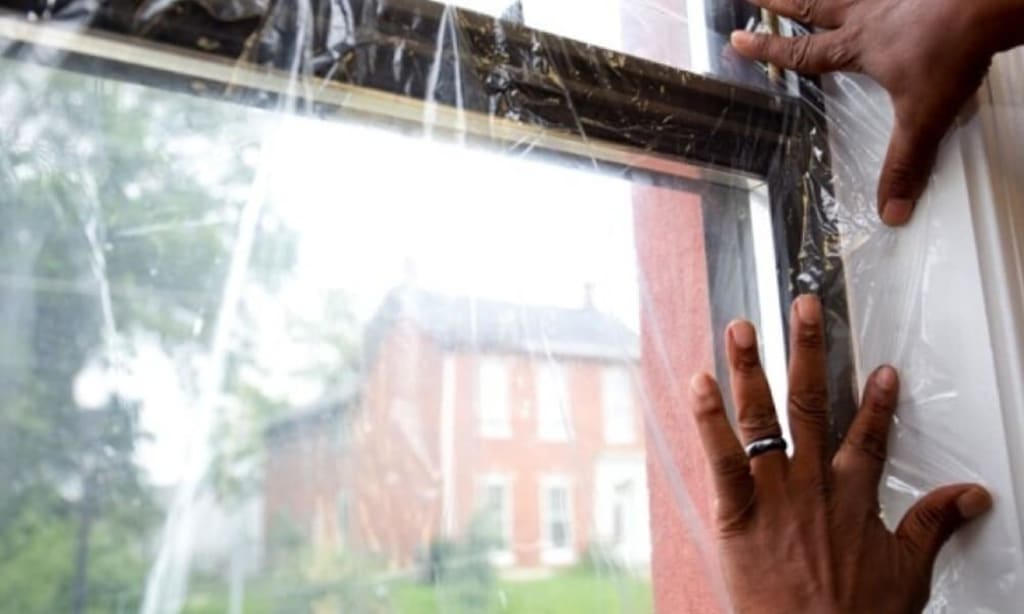
When there is an alert, you want to act as quickly as possible. This is because you have fifteen minutes to seal the room before it’s too late. The first thing you want to do after securing everyone in the room is cover the windows and entry points with plastic sheeting 6mil thick with pressure-sensitive tape. Vapor barrier plastic is ideal, but any plastic sheeting will do. For the tape, studies have shown that duct tape is the best choice because it is resistant to chemical agents. To help speed up the process, you should have the sheets pre-cut and labeled so you know where it goes. When measuring the sheeting, don’t forget to include the frames and decorative molding in your measurement to ensure a tighter seal. You don’t need to seal an entire wall, as this is only a waste of time. You should seal up any cracks, outside exposed vents and pipes, keyholes, and wall outlets. Stuff up gaps with wet rags to form a barrier prior to taping it up. If you have any window air units, remove them before sealing up the window. Shut off your heating system and water heater to prevent carbon monoxide built up in your seal-in room. You will not get the room 100% air-tight despite your best efforts, but you want to get as close as possible. Keep your plastic sheeting and a lot of rolls of duct tape in a specialty kit design for being in the seal-in room. Other supplies you should include in it are:
- ABC Gas Mask (for each person)
- Waterproof outfit (for each person)
- Rain boots
- Chemical resistant latex/rubber gloves
- One day of food
- Two gals of water (for each person)
- Wind up radio
- Puzzle books
- Wet Wipes
- Tissues
- Basic cleaning supplies
- General survival supplies
Most situations that require you to seal a room will only be short term lasting between one to five hours. Despite following my instructions to a T, there is no guarantee you won’t get sick from exposure. The seal-in room technique is only guaranteeing your survival rate to be 90% in the red zone and it gets lower every hour.
When the threat is gone, the authorities will publicly announce it. Stay in that room until then. Once everything is good, you’ll turn your seal-in room into a clean zone. You’ll want to open up every window to ventilate the home and wipe porous surfaces with a wet cloth, throwing it away as you go. If there is a large spill of questionable liquid inside the home, go outside and call the HAZMAT team. If you were outside at the time of detonation, you’ll most likely go to a decontamination zone called Decon Stations. In the Decon Stations, HAZMAT team members will cut the clothes off your body. This is because they want your body to have as little contact with the chemical in question as possible. Jewelry will need to be removed the same way. Once naked, you’ll go to a special shower design to remove the impurities from your skin. The shower is high pressured and hot, so you won’t be comfortable. If, on the extremely rare chance, you are told to evacuate an area in the red zone; apply the proper Personal Protection Equipment (PPE). Wear long sleeves and pants so your skin has almost no contact with the environment. Duct tape around your wrists and ankles to make sure contaminants don’t creep under your clothing. You’ll want to avoid walking in grassy and heavily planted areas as these hold toxins better than smooth concrete or asphalt. You’ll want to avoid highly flammable situations and smoke because most chemicals are combustible and their fumes can spread in the smoke. If you wish to prepare more in-depth for a chemical attack, click on the links below for more information.
About the Creator
M.L. Lewis
Welcome to my little slice of pie. This blog will primarily focus on prepping and homesteading skills with a sprinkle of fiction every now and then.
Enjoyed the story? Support the Creator.
Subscribe for free to receive all their stories in your feed. You could also pledge your support or give them a one-off tip, letting them know you appreciate their work.
Keep reading
More stories from M.L. Lewis and writers in Education and other communities.
Words Do Hurt
Today is anti-bullying week. 20% of students will be bullied by the time they turn eighteen. Bullying is defined as any unwanted behavior by another person or group that creates a power imbalance and is repeated multiple times. It is seen as youth violence and is an adverse childhood experience. Bullying comes in many forms; there is physical bullying that involves tripping or kicking. Verbal bullying involves name-calling. Spreading rumors is considered relational/social bullying. Cyberbullying is harassing someone over technology and lastly damaging someone else’s property. Here are some ways to survive a bully if you end up having one.
By M.L. Lewis9 months ago in Education
Effective Strategies to Change Your Body at Any Age
Many of us believe that our greatest days of physical health are behind us as we approach each age milestone. Let's face it, around 40, it's very usual to feel like we're hurtling down a steep hill, maybe with a dumpster fire called "50" raging at the bottom. At 30, we might still feel almost unstoppable.
By yassmina fleurabout 11 hours ago in Education


Comments
There are no comments for this story
Be the first to respond and start the conversation.