

Today I want to teach you a simple technique with which you can "copy" almost a millimeter what you see in a photo on a piece of paper.
To be clear from the beginning, it doesn't solve all the problems on its own, it doesn't turn you into a human xerox overnight, but it can make a huge difference in the results you get when it comes to drawing.
I will answer another question that will surely arise; no, it's not antitrust. It's a technique I've seen in very good artists, in the case of those drawings that are so close to reality that they look like photos.
The first time I heard about this technique was somewhere in high school, at school if I remember correctly. I used it only once and then forgot about it. This is until recently when I was asked if anyone can draw very well without learning everything that teachers are struggling to teach.
Ironically or not, you realize at some point that even a field based on creativity, which seems easy at first glance, has a lot of rules to follow, lessons to learn, techniques to discover and use (things that I have chosen to call them tools).
You might think that a workshop in an art school looks like a kindergarten class, with canvases on easels, piles of scribbled paper, pencils, charcoal and colors scattered everywhere (part on paper, part on the floor, part on small artists). Well, that's how it looks, but that doesn't mean there aren't rules in this mess. ⁇
My conclusion after learning these lessons is that no, you can't go over them, but depending on what you want to achieve, you can find techniques like the one I present today to help you.
The advantage of this technique is that you can have a small photo (or a drawing if you want) and you can copy it in much larger sizes, a wall for example. Size does not matter, but proportions and shape matter.
Let's get started! ⁇
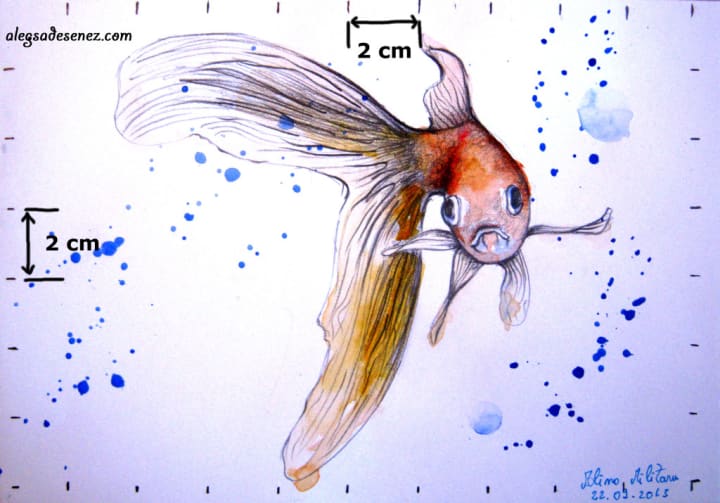
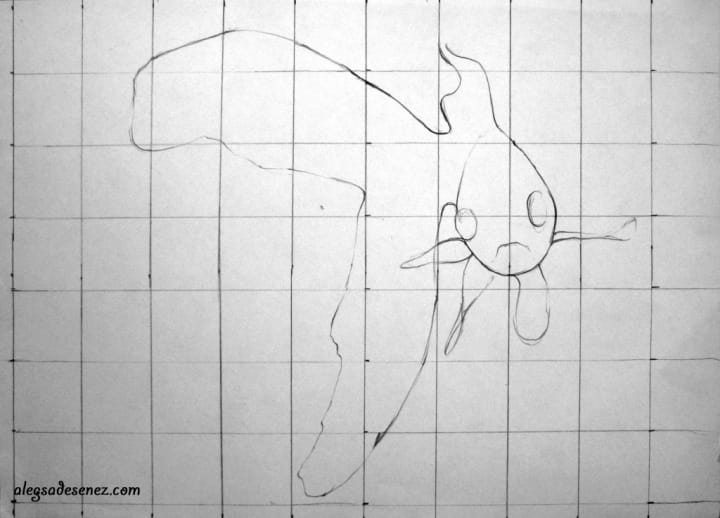
1. For today's article I sacrificed my drawing with the fish. The format of this drawing is an A5. I copied it onto a larger sheet of paper, an A4.
I start by dividing the drawing into squares. No matter the size of the side of a square, it must be square, not rectangle, not rhombus, not trapezoidal.
In the case of my drawing, the side of a square is 2 centimeters. I drew dashes on the edge to see them.
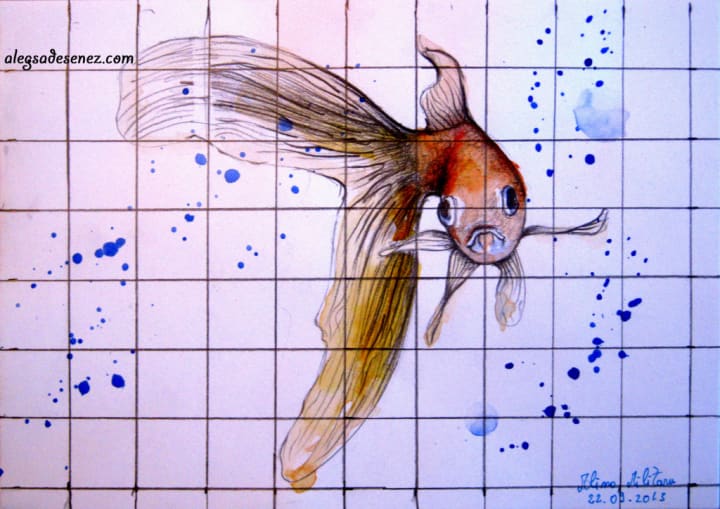
2. This is what my drawing looks like with the lines drawn. On two of the edges the squares are not whole, but as my drawing stops before reaching these squares this detail is not very important.
I got 10 full squares horizontally and 7 squares vertically.
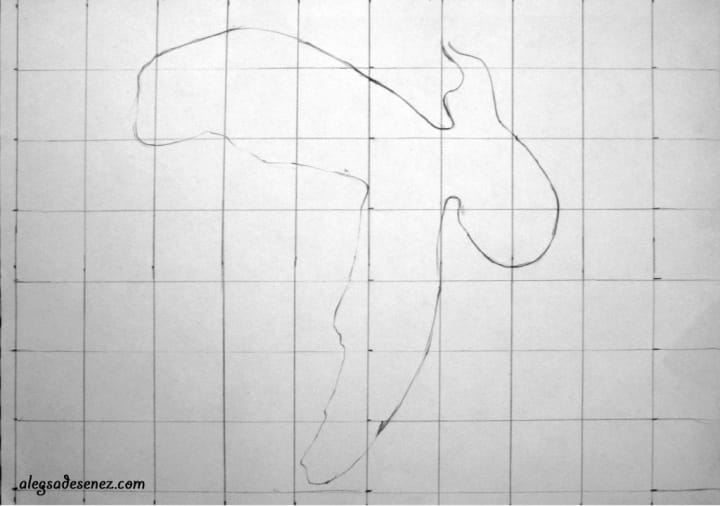
3. I'm done drawing. I go to the sheet of paper on which I want to copy the fish and divide it into exactly the same number of squares as the drawing above.
It doesn't matter the size of the side of a square, but it must be exactly the same number both horizontally and vertically . On an A4, the side of a square was 2.9 centimeters.
TIP: Use a mechanical pencil to draw the lines. When you finish drawing they should not be noticed. A mechanical pencil will restrict you enough so that you do not press on the paper more than necessary.

4. From here things go pretty simple; in each square you draw exactly what you see in the photo / drawing, in that square. It's like splitting a drawing into dozens, hundreds of other smaller drawings.
You can take each square separately and draw inside it down to the smallest detail. Then move on to the next, and next, and next…
Or you can draw the outline to begin with and advance with the whole drawing at the same time.

5. The technique is very good as long as you have a very good quality photo in front of you.
Besides, you need to know something about hatching in order for a hyper-realistic drawing to come out.

6. Even if you don't know anything about drawing, only with this technique can you choose an exact outline of the fish or anything else you want to copy.
7. I stop here with the demonstration.
I hope this technique helps you.
I had another article in mind but I realized that you need hatching and textures only after you manage to get a good construction if not very good.
If you aspire to be able to make a drawing with the same quality as a photo, this technique can bring you very close to realism.
On the other hand, all this can help you draw on the walls if you have already done the drawing on a sheet and you can't keep the proportions when it comes to very large surfaces.
Use it as and when you think it can help.
If you have any questions, I look forward to your comment below this article.
If you have ideas for the following articles, I can't wait to read them in your posts.
I also draw a lot of inspiration.
About the Creator
Rebecca Maria
Hi! My name is Rebecca and I'm good at black and white drawing. On this site I will write interesting things and things that some of you do not know. I hope you enjoy You can write me in the comments what would interest you.Thank you .
Reader insights
Outstanding
Excellent work. Looking forward to reading more!
Top insights
Compelling and original writing
Creative use of language & vocab
Easy to read and follow
Well-structured & engaging content
Excellent storytelling
Original narrative & well developed characters
Expert insights and opinions
Arguments were carefully researched and presented
Keep reading
More stories from Rebecca Maria and writers in Education and other communities.
Childhood bullying affects our children for life
We already know that domestic violence has a long-term impact on our children. According to researchers at King's College London, the negative effects of bullying can be seen after the age of 40 in a person who has been the victim of such behavior. Although the results of the study were published in 2014, they remain valid today. Researchers are questioning the long-term health problems of these adults, the increasing number of those affected by various behavioral and mental health problems, and the socio-economic implications of these conditions.
By Rebecca Maria2 years ago in Education
The Finnish cooperative movement's century of solidarity.
In the heart of the Nordic region lies Finland, a country renowned for its stunning natural landscapes, innovative design, and strong social welfare system. But among its many attributes, one aspect that often goes unnoticed is its rich tradition of cooperative enterprises. From humble beginnings to a cornerstone of the Finnish economy, the cooperative movement in Finland has a story worth telling.Our tale begins in the late 19th century, a time of great social and economic upheaval in Europe. Finland, then a Grand Duchy of the Russian Empire, was grappling with rapid industrialization and widening economic disparities. In the midst of these changes, a group of visionary individuals saw an opportunity to empower workers and communities through cooperation.One such visionary was Martti Takala, a passionate advocate for social reform and workers' rights. Inspired by the cooperative movements in other parts of Europe, Takala believed that cooperative enterprises could offer a viable alternative to traditional capitalist structures. In 1899, he founded the Finnish Cooperative Union (FCU), laying the foundation for a cooperative revolution in Finland.Takala and his allies embarked on a mission to spread the principles of cooperation across the country. They organized meetings, published pamphlets, and established cooperative societies in towns and villages throughout Finland. Their message resonated with many Finns, especially those who felt marginalized by the rapid industrialization and urbanization of the time.One of the earliest and most successful cooperative ventures was the SOK Corporation, founded in 1904 as a cooperative wholesaler for consumer goods. SOK, short for Suomen Osuuskauppojen Keskuskunta, soon grew to become one of the largest retail chains in Finland, with thousands of member-owned cooperative stores across the country. Through SOK and other cooperative enterprises, Finns gained access to affordable goods and services while retaining ownership and control over their economic destinies.But the cooperative movement in Finland was not limited to retail. It spread to other sectors of the economy, including agriculture, finance, housing, and healthcare. Farmers formed agricultural cooperatives to collectively market their products and purchase supplies at lower costs. Housing cooperatives emerged to provide affordable and sustainable housing for working-class families. And credit unions offered accessible financial services to communities underserved by traditional banks.As the cooperative sector expanded, so did its influence on Finnish society. Cooperative principles of democracy, solidarity, and social responsibility became deeply ingrained in the national consciousness. Cooperatives played a vital role in shaping Finland's welfare state, contributing to policies that promoted equality, education, and healthcare for all citizens.The cooperative movement also fostered a sense of community and belonging among Finns, bridging divides of geography, class, and ideology. Members of cooperative societies worked together for the collective good, pooling their resources and expertise to address common challenges and pursue shared goals. In doing so, they built trust, mutual respect, and a sense of solidarity that transcended individual interests.Throughout the 20th century, Finland faced its share of trials and tribulations, including wars, economic recessions, and geopolitical tensions. But through it all, the cooperative movement remained resilient, adapting to changing circumstances and emerging stronger than ever.In the 21st century, Finland continues to embrace the cooperative ethos, with cooperative enterprises playing a vital role in the national economy. From small-scale startups to multinational corporations, cooperatives contribute significantly to Finland's GDP, employment, and social cohesion.But perhaps the most enduring legacy of the cooperative movement in Finland is its spirit of cooperation and collaboration. In a world increasingly characterized by division and discord, Finland stands as a shining example of what can be achieved when people come together in pursuit of a common purpose. And though the challenges ahead may be daunting, the cooperative spirit that has guided Finland for over a century offers hope for a brighter future for all.
By Eric anexis 5 days ago in Education
The Bird Nest
Downy tufts puff out, Warmth inside a house of hair, Drowsiness abounds. A/N: I sometimes imagine what it would be like to sleep in a bird nest, provided I can be bird-sized in the fantasy of course. I think it would be cosy! More longer stories to come! -TWW
By ThatWriterWoman4 days ago in Poets


Comments
There are no comments for this story
Be the first to respond and start the conversation.