
Field Trip Planning
Get Students Out of the Box and Into Nature


[Note: This article is based on more than 17 years of leading 4-day overnight student field trips of groups up to 30 participants. In all that time there were only two incidents: 1 involving a mechanical breakdown and 1 careless driver skidding into a ditch after hitting a patch of gravel (no injuries).]
A review of Search and Rescue cases involving vacationers and family outings reveals lack of geo-hazard awareness and lack of preparedness requiring rescue. Many of these people were just out for an afternoon hike. Anytime people spontaneously decide to take a hike without preparing or take an unfamiliar fork in a trail, they are inviting disaster. Use this information to plan a weekend outing, outdoor family vacation or a school field trip. Life is short enough. Don’t do anything to shorten it faster?
Poor Planning on Your Part Should Not Create an Emergency for Others
The Geographic Systems Model can be a systematic template for field trip planning. A top priority is being aware of the geo-hazards for your travel route and destination. Do your homework BEFORE you pack and leave for any trip.

Use the Geographic Systems model to identify potential geo-hazards along your travel route and at the destination.
Location: Every place on Earth is a unique combination of air, land, water, and living things. Geo-hazards can be readily categorized under these four headings. Check with local officials for any information they can provide about safety advisories.
Scale: This involves the level of detail. For example, your trip destination at the local scale can be a campsite. The campsite fits into the greater scheme of things, a region, county, state, country. A campsite could be located miles away from a dam. It makes a difference if the campsite is downstream from the dam. You may not be aware of a hazard if you are looking at the campsite and not the surrounding area. Start at the local scale, but be aware of the surrounding areas, too.
Time: Start with the season for your trip. Then consider day/night as it pertains to potential hazards. Know the hours of sunrise, sunset, and civil twilight for the days of your trip.
Once you have done this for your travel routes, change scale and focus on a more detailed assessment of your destination. Use the same approach of Location, Scale and Time. Here’s a suggested selected geo-hazards check list for your travel routes.

Use the check list below for geo-hazards at your destination. This list is not comprehensive. Consult local authorities and research site specific geo-hazards.

[Notes:
1) Our staffing policy is to have 1 leader and assistant leader for every 10 people. This conforms to Sun Tzu’s 1:5 ratio leadership guideline. (Note: Incidentally, in 1844, this ratio was used to organize US Army dragoons, later to become the US Cavalry. Ironically, public school teacher to student ratios range from 1:11 to 1:34.). We find the 1:5 ratio ideal for on the outdoor learning. This is wholly consistent with our buddy system and collaborative learning methods.
2) The 1:5 staffing ratio may not be compatible with some school policies. If that is the case, try to get parents / guardians to volunteer as assistant group leaders to achieve the 1:5 ratio.]
Basic Health & Safety: Be aware cell phone service may not be available or reliable in some destinations. Some points to consider:
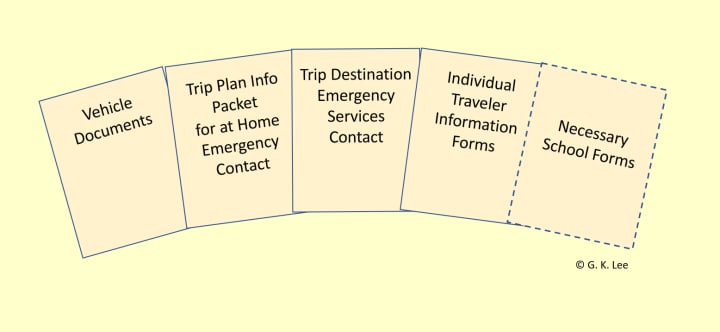
• At home emergency contact: Leave a complete trip information packet with at least two emergency contact persons at home. They should know how to contact each other. You make trip progress reports to them. We make it a point to update them at each gas stop, when we depart the main paved road, and when we arrive at the campsite. We do the same for the return trip. Notify them of any emergencies during the trip. They notify authorities if you don’t return as planned.
• Destination emergency contact numbers. These include the police/sheriff, fire, ambulance, clinic/hospital, auto road service closest to the destination. Know the physical addresses for these contacts.
• Individual Traveler Information Forms: Your group participants should provide you with some basic information: emergency contacts, special medical conditions / needs. If driving, the year, make, model (body style, color), license plate of the vehicle, and list of drivers. If not caravanning to the site, each driver should give you a map of their intended travel route and estimated time of arrival.
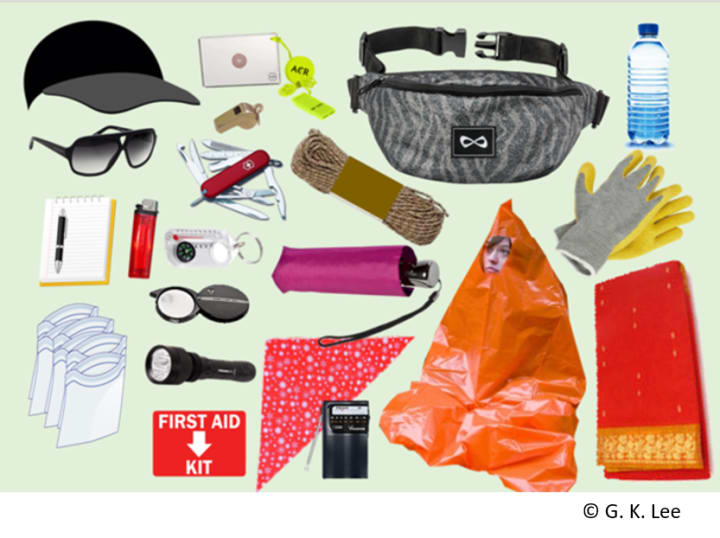
• First Aid Kit: Each participant should have a small personal first aid kit. A larger, more complete kit should be in each vehicle (with a fire extinguisher).
• Personal Emergency Pack: Each person should have a small personal emergency kit: whistle, signal mirror, emergency poncho, compass, pocket knife, magnifying glass, fire starter kit, 10-20 ft length of paracord or rope, bandana or face mask, wide brimmed hat, water bottle and small spray bottle (if in hot arid climate).
• Trip Buddy: Everyone should have a buddy. No one (especially minors) leaves the vehicle, campground, or hiking group alone. Be sure to tell the group leaders any time you leave the group: 1) where you are going, 2) who is going with you, 3) travel route, 4) when you expect to be back. If you change plans on the hike, leave trail markers indicating your travel direction. This will help anyone looking for you.
• Weather Planning: Common weather forecasts are usually 2-3 days in advance. Common long-range forecasts are 10-14 days in advance. A 30-day long-range forecast is less reliable than the previously mentioned forecasts but can help in planning.

• Travel Route Planning: Check with state highway department and Auto Club about road/traffic conditions for your travel route. Consider alternative routes depending on weather conditions. It’s better to have alternative routes in and out of the destination site. Try to avoid trip destinations with only one access road. If unavoidable, be sure to have contingency plans for emergency situations if the access road is blocked.
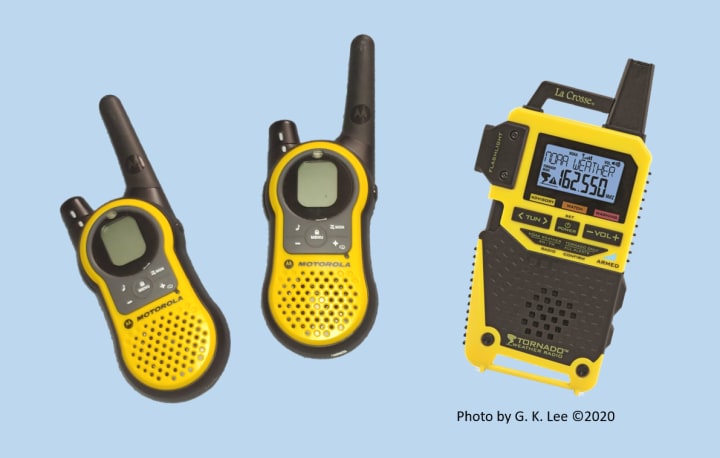
• Radio Communications: Have 2-way radio communication between trip vehicles. This facilitates caravan coordination in areas with poor cell phone coverage. It also allows for natural history narratives en route. Be sure to have necessary charging cords and / or spare batteries.
Set a primary and at least 2 back up channels. Use privacy codes if available. Know how to change channels and privacy codes. Test radios before the trip. Carry spare batteries. Perform a radio check before getting on the road after any stops.
When hiking, do a radio check at the trailhead before starting the hike. It is best to start the hike with fully charged batteries. On the trail, there should be at least one radio at the front and at the end of the line of hikers.
Consider getting a NOAA weather radio to monitor the weather en route. NOAA has a network of stations broadcasting national, regional, and local weather information. Better NOAA weather radios have severe weather warning signals.
Trail Safety: Stay on established trails to prevent increase environmental damage to plants and cryptobiotic soils. Do not make short cuts in switchbacks. These become erosion paths that damage the trail. Watch your footing on sandy/gravely surfaces (especially on slopes). When moving through brush, do not let branches swing back into anyone following behind you. As you see trip hazards and dangerous trail conditions, call them out to those behind you. On night hikes, do not use flashlights unnecessarily. Flashlights reduce your night vision. Do not shine flashlights in people’s faces. If taking flash photos at night, avoid blinding people.
• If you decide to change your route during the hike, notify your emergency contacts, if possible. If not, leave a marker or indicator of your new direction of travel. In an emergency, searchers will follow your planned travel route and come across the marker. This makes it easier for them to find you faster.
• Camp and Trail Sanitation: The general principle is to leave the campsite and trail facilities cleaner than you found them. Whatever you pack in, you pack out. Do all washing 50 ft. from camp and down slope (never up slope) from water sources. Make no human wastes within 200 ft. from camp, trails, and down slope (never upslope) from water sources. Use your trowel to dig a cat hole for human wastes. It should be 8-10 in. deep. Bury what comes out of your body; pack out what comes out of your pocket or pack. DO NOT BURY PAPER OR MANUFACTURED MATERIALS. When you are done, cover up and camouflage your cat hole.
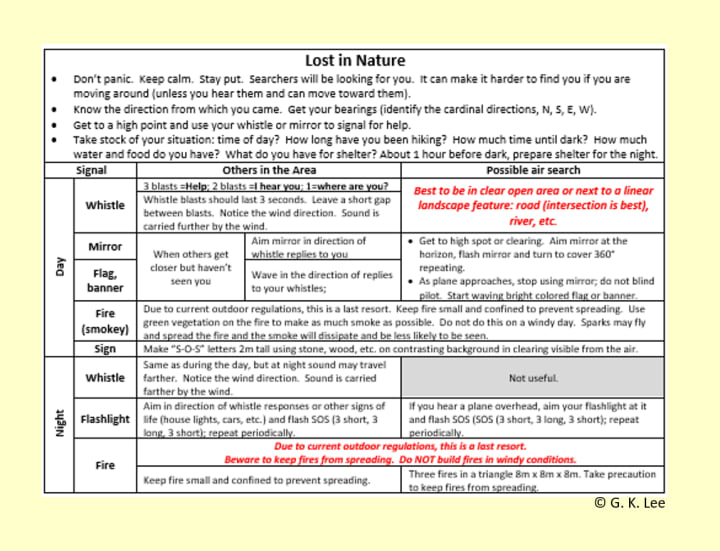
If Lost in Nature: Don’t panic. Keep calm. Stay put. Searchers will be moving looking for you. You will be harder to find if both you and the searchers are moving.
• Know the direction from which you last came. Get your bearings. Use your compass to find the main directions (N, S, E, W).
• Take stock of your situation: Time of day? How long have you been hiking? How much time until sunset? How much water and food do you have? What do you have for shelter? About 1 hour before sunset, prepare shelter for the night.
• Get to a high point and use your whistle or mirror to signal for help.
General Trip Logistics
Travel Distance/Time: Use online sources to estimate travel distances and travel times to plan your trip. Combine this information with the fuel consumption of your vehicle to estimate trip fuel costs. This will also give you intervals for meal and restroom stops during the trip. Whenever possible, plan to arrive at your destination 1 hour before sunset. This is especially critical for camping trips. This will give you an hour of daylight to scope out the campsite and set up camp.
• Check Your Vehicle: Do a comprehensive vehicle safety check. Check all fluid levels, lights, signals, windshield wipers, tires (e.g. inflation and tread wear; don’t forget to check the spare tire air pressure), tire changing tools, air pump (able to inflate tires not just sports equipment), etc. before loading.
• Know your vehicles gas mileage / fuel consumption.
• Make sure all required documents are up to date: (registration, insurance, driver license, and roadside assistance plans).
• Carry spare items. Be sure you have spare fuses, extra oil, etc.
• Once fully loaded: As you start off, test your brakes on a quiet side street away from traffic. You need to get the feel of the fully loaded vehicle before getting into traffic. Notice any effect on the braking system. For safety, allow extra time/distance to stop.
• Plan to stop to gas up when your tank is half empty. As you get closer to remote destinations, the gas stations may be few and far between. It is less of a problem to have too much fuel in your tank than to not have enough. Keep track of gas prices along the way for your return trip planning.
Travel Route: Map your travel routes (primary and backup). Consider the season and other factors which may impair the use of your primary route (e.g. traffic accidents, road construction, etc.). Use your vehicle fuel consumption and driving speed to estimate fuel and rest stops. A general guideline is to stop every 2 hours to reduce driving fatigue. Route planning might reveal there may be long stretches of driving due to sparse rest stop / refueling opportunities. Know about these and prepare accordingly. Use a NOAA weather radio to monitor the weather en route.
• Identify travelers prone to motion sickness: Use the link to read the paper on motion sickness. Use the information to arrange seating and prepare a motion sickness kit and orientation for all travelers. We avoid common drug store motion sickness medications as they tend to dull the mind. We want travelers to be fully conscious and alert during travel. They are better able to enjoy the trip and can learn more.
• Keep a trip route log: Note driving time/distance at hourly intervals, cell phone signal strength along the route, as well as gas prices. These may help in planning your return trip along this route and for future trips. [Note: Don’t assume returning on the same route is “boring” with nothing new to see. Sometimes you will notice different things by literally seeing them from a different angle or time of day.]
• Fuel/Restroom breaks: Always start with a full tank. All refueling stops are times to use the restroom or get food. Get into the habit of filling up the tank when it is down to ½ or ¼ tank. Top off the tank when departing the main road and before you stop for the night. (This makes for an easier getaway the next morning.)
• On the road activities: Think ahead and create activities for folks to do (especially youngsters) to keep them occupied during the trip. We discourage the use of electronics. We prefer to teach people how to read the landscape (noticing landforms, vegetation changes, recognizing drainage divides, changes in temperature and pressure when going up and down mountains, etc.).
Destination On-site Activities
We strive to create student centered outdoor learning activities. It is based on the students’ curiosity. The common student dilemma (especially for younger learners) is not knowing what they don’t know. The Geographic Systems Model shows people see the world through the lens or filter of their culture. The Community-based Education model draws on the students’ prior knowledge and curiosity to identify topics for lessons and activities. For field trips, we use the Trip Self-Survey Inventory (see sample form below). The trip destination is filled in before giving students the form. The second box in Column A is a general key word related to the destination that is central to the lessons / activities for the field trip. For a visit to Joshua Tree National Park, a key word might be “desert.”

Students complete Column A and submit the form. We compile the results without recording student names (other than to record they submitted the form). Their responses are tabulated under the categories of the environmental spheres of the Geographic Systems Model. The majority student responses guide the topic selection for the lessons / activities. A sample of some suggested lesson / activity topics are shown in the matrix below.
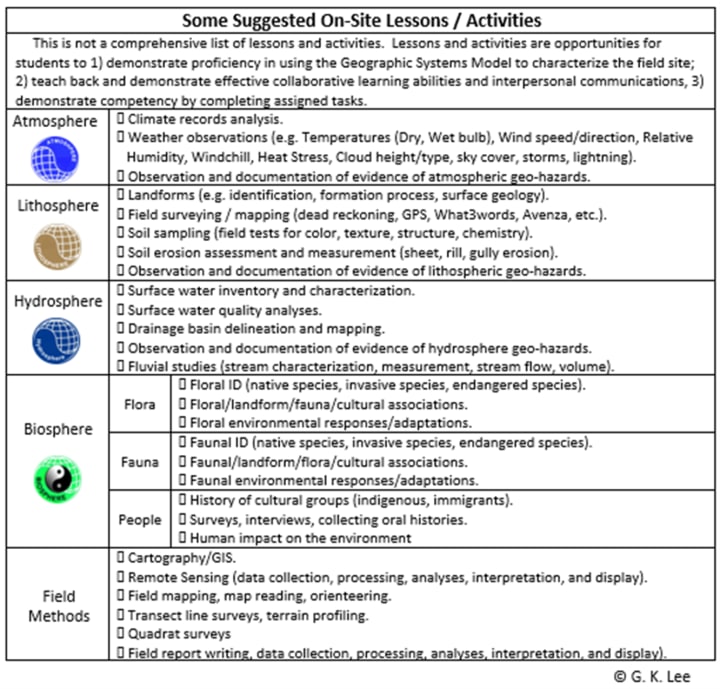
These topics are then tied to current curriculum for the students. The curriculum is aligned with the S.T.E.A.M.I.N.G. (Science, Technology, Engineering, Arts, Mathematics Integrating Nature and Geography) matrix. Specific lessons / activities are created. This may be challenging for some teachers. Rather than dealing with a single subject (e.g. Chemistry), the curriculum alignment process requires the integration of all subjects for each lesson / activity. For example, any lesson / activity will require reading, writing, measuring, calculating, drawing knowledge from life, physical, and social sciences simultaneously. The students must use tools, handle objects, assemble / disassemble equipment, work in teams, navigate and negotiate over natural terrain, while monitoring their personal physical condition and safety in a natural environment.

Community-based Education methods are used to deliver the lessons / activities in the field. The field trip is a practicum for the classroom sessions. Students apply the knowledge in the field to demonstrate their understanding. Collaborative learning lends itself to teach backs. Not everyone can know everything well enough to explain it clearly to others. Through cooperation and mutual support, students have the chance to share their knowledge with others. The goal is to create Practical Applied Lessons (P.A.L.) incorporating knowledge and skills related to workplace situations. The P.A.L. lesson /activity development schema is shown below.

During the field trip
Students should keep a trip journal and use photography / videography to chronicle the trip. This will help them develop the habit of observing. [Note: Get necessary permits if the activities require gathering and collecting geologic / biologic materials in National and State parks. Respect private property and private lands. Leave all gates as you found them.] Field observation is wholly consistent with minimal environmental impact principles.
Mid-way through the trip, return the Trip Self-Inventory forms to the students. Have them complete Column B. This gives them a chance to reflect and internalize the experience. Have them take a photo of the form for their records before you collect their forms. This will be an effective way to do a head count of the participants. Compile the Column B results. [Note: We do not record names other to note they submitted the form.] You can use the data to assess the impact of the lessons / activities. You want to be sure you achieved your objectives. And you may be surprised by some outcomes you may not have anticipated.

Before Returning Home
Pack up and prepare to depart for home. Once the vehicles are loaded, everyone must help conduct a sweep of the campground to remove all trash. Before boarding the vehicles, pass out a field lesson / activity evaluation form. [Note: We suggest making the evaluation anonymous to get honest responses. This can help improve future field trips. We leave it up to you to create your own evaluation form based on your agenda.] Collect the forms as the students board the vehicle. Be sure to document who is aboard which vehicle on your trip roster.
For the return trip, repeat the observation process made on the outbound leg of the trip.
One week after the return from the field trip, collect the student journals. This is a simple binary graded exercise: pass / fail. The journal is their personal record of the trip. The basic requirement is to have a journal with photos. We keep it simple. You may set other requirements at your discretion.

Pass out the Trip Self-Inventory form. Get the students to complete Column C. Collect the forms and compile the results without regard to student identities. The goal is to use student feedback to improve future field trips. Return the forms to the students with their trip journal.
[Note: If you are planning a trip for a school or community organization, be sure to follow their procedures and policies. They usually have trip permission forms for students and parents to complete. Be aware of the time-line requirements for filing paperwork relative to your field trip dates.]
Thanks for taking time to read this article. I hope you can use and adapt these ideas for your situation. Your positive feedback will encourage me to write a future article about similar articles (e.g. camp logistics and operations to conduct training in daily life skills during the non-lesson / activity hours of our field trips). Please feel free to contact me to discuss staff training related to this topic.
About the Creator
Enjoyed the story? Support the Creator.
Subscribe for free to receive all their stories in your feed. You could also pledge your support or give them a one-off tip, letting them know you appreciate their work.
Expert Tips for Mastering Business Statistics: Online Help for UK Students
Business statistics is a crucial subject that plays a significant role in both academia and the business world. It involves the collection, analysis, interpretation, and presentation of data, which is essential for making informed business decisions. However, mastering business statistics can be challenging for many students. This article provides expert tips and insights into the various online resources available to help UK students excel in this subject.
By roy butler4 days ago in Education
Top Online Mathematics Courses for JEE Advanced Preparation
Top Online Mathematics Courses for JEE Advanced Preparation Preparing for the JEE Advanced requires a robust understanding of mathematics, and choosing the right course can make a significant difference in your performance. With the proliferation of online learning platforms, students now have access to a variety of high-quality courses designed to help them excel in this challenging exam. Here’s a guide to some of the top online mathematics courses for JEE Advanced preparation.
By Mathematics Classes5 days ago in Education


Comments
There are no comments for this story
Be the first to respond and start the conversation.