
3 things I wish I knew earlier about using Airtable
If I had known these three things I would have finished my project in a few hours.


It took me two days to build a simple form on Airtable to collect data and match people based on certain criteria, essentially creating many-to-many relationships between two sets of people. If I had known these three things I would have finished this project in a few hours.
Airtable is Excel or Google Sheets on Steroids!
In 2013 I was excited about using Google Forms and being able to access data from the forms in a Google Sheets. But, aside the functions on Google sheets, there was nothing else I could do without having to learn how to code. Fast forward 7 years and I find a spreadsheet software that provides the same functions and dozens more! From creating forms out of tables, matching data to automating email responses from forms and even creating invoices?! That’s definitely worth looking into!
Airtable spreadsheet-database hybrid, with the features of a database but applied to a spreadsheet. ~Wikipedia
The fun part of all this is, you don’t have to know how to code to use Airtable! It’s exciting to see creatives build low or no-code tools and how people are being empowered to build solutions! But that’s a topic for another day.

We’ll use this case study for the purpose of this article today.
Case Study: I’m running a design school and I have to match students to teachers. I would have both student and teachers apply to either learn or teach in my school. I want to reduce the burden of matching both groups into classes by automating the matching process. I will be matching based on the skill sets the students desire and the skill sets the teachers have as well as the times both parties are available to learn or teach.
Now here are the three things that would have made my life easier I understood them from the beginning of my Airtable journey.
Think through the whole process
At the start of the project I was focused on building a form to collect data from these two sets of people. Then I went back to my table to figure out how to match data from both tables. In the process, I had to rework my form (and table) to make it easy to match people. To spend less time on this task, I needed to have thought the whole process through from start to finish. Yes you know what you want to achieve in the end but it’s essential, in this case, to know what the steps to take are. Defining your steps doesn’t guarantee a full proof solution, it gives you a clearer picture of what to do at each point in time in order to spend less time running around like I did.
In retrospect, a good plan for this project would have been to:
- Create two tables to house each criteria for matching; which is skillset and availability. Each of these tables should have a list of the different skillset options/ availability options in them, on the very first column.
- Build the table for the forms such that they pull the data on these criteria solely from the first two sets of tables created.
- Link criteria tables to form tables to create that many-to-many relationship that I wanted
- Match both sets of people
The Linked Records Fields
Creating relationships among database was the main goal of this project and understanding linked records is inevitable if you want to use Airtable to achieve that goal. Airtable allows you to create relationships between different sets of people and you can do this using the link to another record field option. Here’s how to use this powerful field.
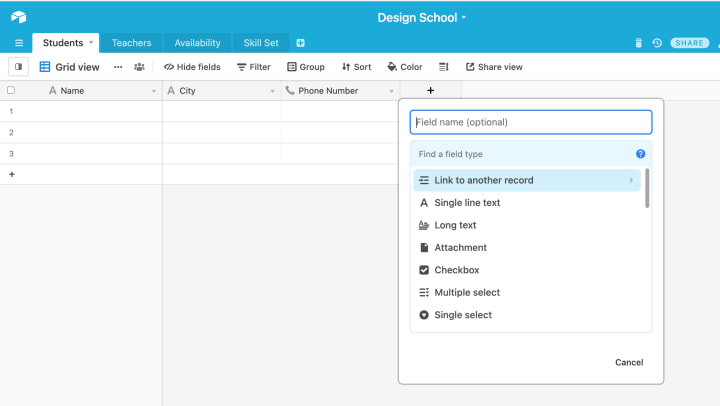
First we need to create a relationship between the forms table (the table you used to create your forms) and the criteria tables (the tales that house your criteria for matching). To do this, create a field in the form table (eg. Students table) and select the “Link to record” option. A list of tables will show next.
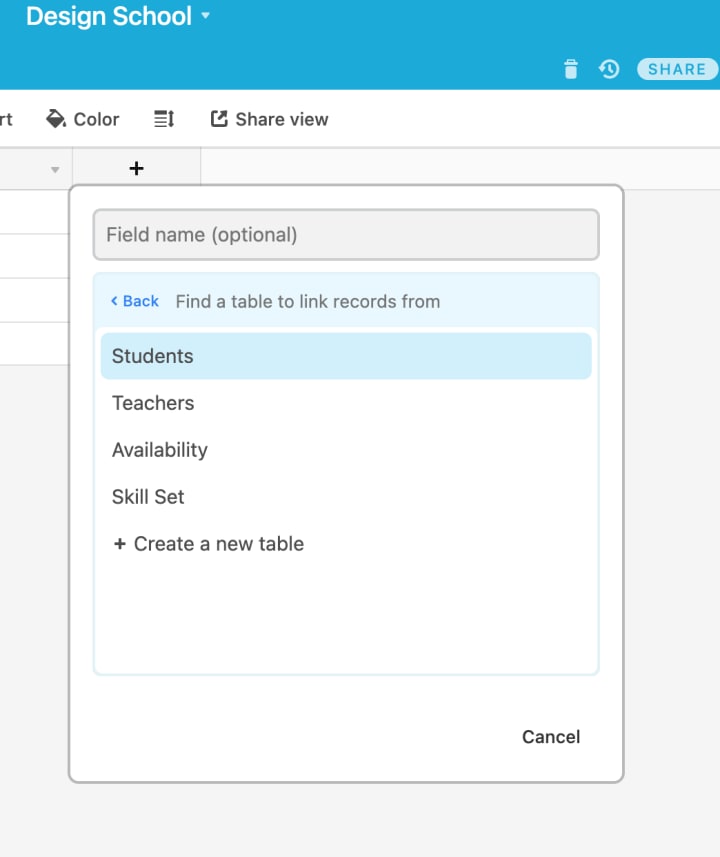
Here, you pick the table you want to pull information from. In this case, that will be any of the criteria tables(eg. Availability table).
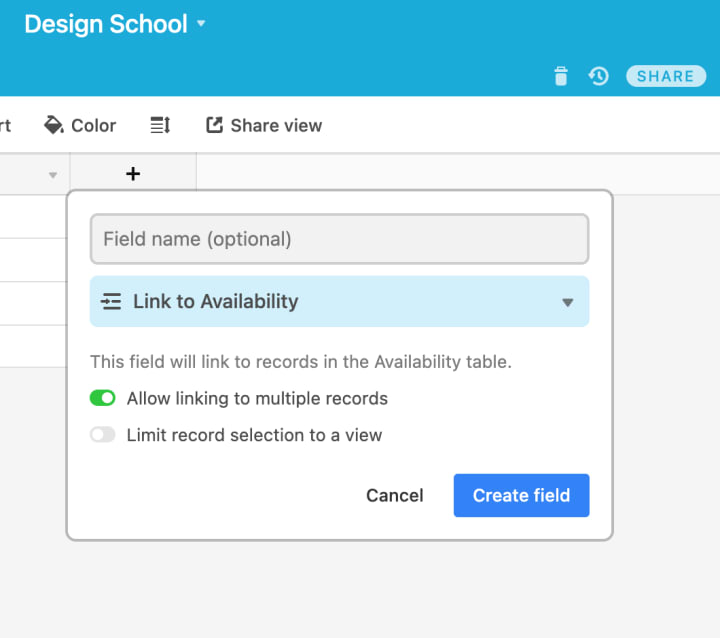
After you create the field, there will be a pop up that asks if you want to add some lookup fields. You can skip that for now (I’ll explain lookup fields in a minute). When a student is filling the form, they will get a dropdown of availability options you listed in the Availability table to choose from.
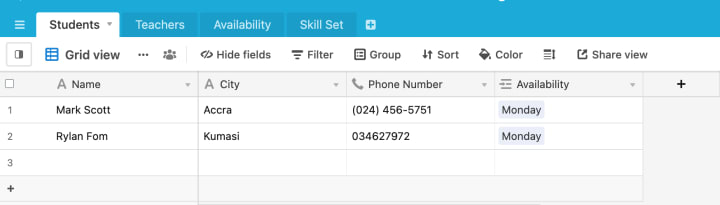
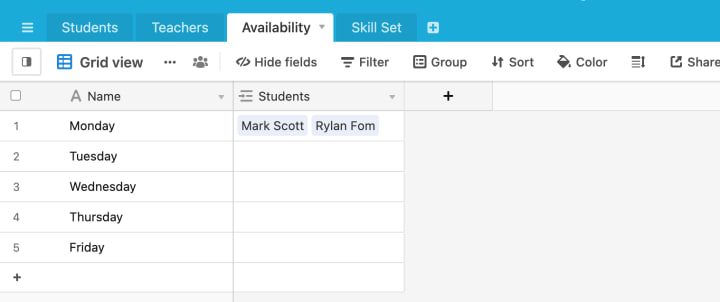
This new field you have created in the Students table will automatically create a corresponding field in the Availability table. Once a student selects an availability option and submits the form, their data will also be replicated in the Availability table, right next to the option they chose.
Lookup fields
Look up fields work just like the Lookup function in excel; this time, in just a few clicks. It scans a table to find other details about a particular record based on the selected record. An example: I want to see the cities of students who are available on Mondays. But I want to see this in the Availability table.
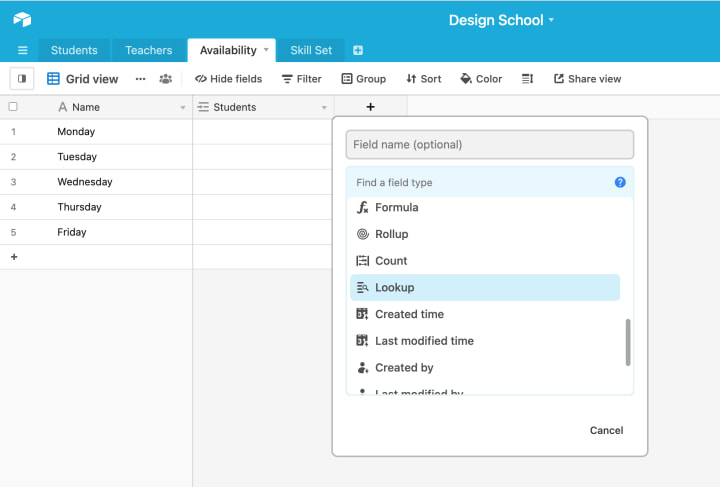
First step: Create a new field in the Availability table. Next, select the Look up field option.
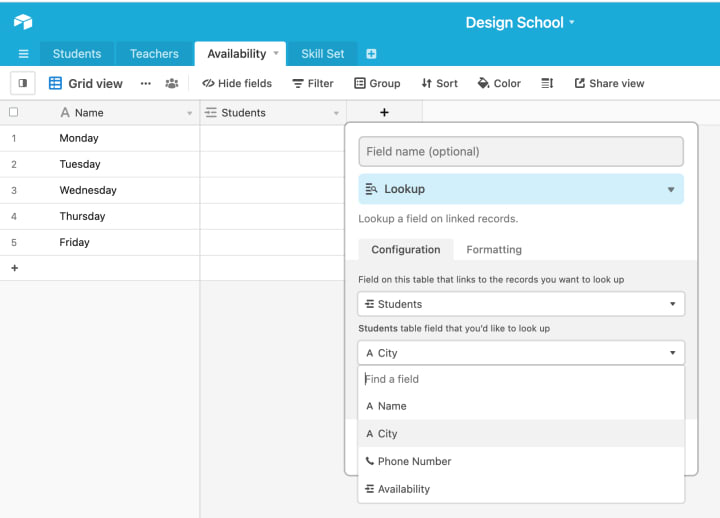
The first requirement will be to fill in the “Field on this table that links to the records you want to look up”. This is always a linked record field. It is that field that is linked to the new information you want. In our case, the Student field. That field connect s us to the table that has what we want.
The next requirement is to select the “Students table field that you’d like to look up”. This asks for the specific field you want to pull the information from in the table you selected for the first requirement. In our example, that will be the City Field in the Students table.
Note that the table name will differ based on the names you choose to use. So the second requirement will be named after the table you selected in the first requirement.
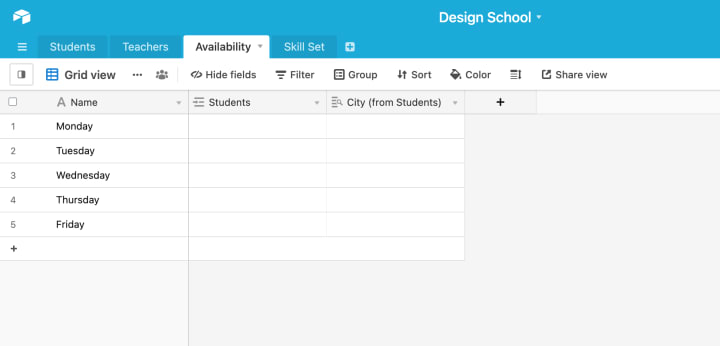
Once both requirements are filled, go ahead and create the field. Immediately, the new lookup field will be filled with information from the tables you selected.
We’re empowering people to bring their creative visions to life. ~Airtable
Airtable is simple and pretty cool! The free version has these powerful functions so you don’t need to pay anything to try Airtable today! Airtable is truly empowering people to build solutions with little to no code at all. There’s more to explore with Airtable but I hope these help as you start your journey with Airtable.
If you already use Airtable what are some of the things you wish you had known at the beginning of your journey? Share with me in the comments.
About the Creator
Ewuranna Smith-Quayson
I create stories in my head all day about major things and really simple things; from things i learn and see and from things I experience.
I'm here to share all those stories with you😄
Walk with me 😉
Enjoyed the story? Support the Creator.
Subscribe for free to receive all their stories in your feed. You could also pledge your support or give them a one-off tip, letting them know you appreciate their work.
Keep reading
More stories from Ewuranna Smith-Quayson and writers in Education and other communities.
Don’t wait for 2022…
At this time of the year, almost every year, I start thinking about all the changes I want to make in the next. You know the usual: stay fit, walk closer with God, develop myself, blah blah blah. Some days I’m a bit more specific: Read 10 books, take a vacation, save $5,000. No matter how specific I am, those dreams don’t come to pass and I come back here in December, writing new goals…again. It became tiring. I stopped planning for the new year. I’d just go with the flow you know? Take the opportunities as they come.
By Ewuranna Smith-Quayson3 years ago in Motivation
Teacher Training in Crisis? Exploring Solutions to the Staffing Shortage
Introduction In recent years, the education sector has been grappling with a severe crisis in teacher training and staffing shortages. This issue not only impacts the quality of education but also poses significant challenges to the economic and social well-being of communities. Addressing this crisis requires a multifaceted approach that integrates innovative solutions with policy reforms and community engagement.
By Adam Thomas6 days ago in Education
Fashion Design Trends
The Rise of Inclusive Sizing and Leggings in 2024 Fashion The fashion world keeps constantly evolving. What’s in vogue today might disappear in after a while. But that’s what makes the fashion business so enthralling and demanding from a creative angle! Staying abreast of the latest fashion design trends and developments is part of every fashion designer’s responsibility. Accordingly, let’s see what’s trending across India’s fashion world in 2024.
By Naresh Polekar6 days ago in Education


Comments
There are no comments for this story
Be the first to respond and start the conversation.