
Using Adobe Animations on Your Website/Web App
Tutorial

When I started using Adobe Animation to create animations for my website, I ran into a few issues.
1. There wasn’t any simple way to incorporate the animation into my web page or web app.
2. I had no way of knowing when the animation had stopped.
3. The JavaScript code generated was not ES6 compliant and I got some errors. In this tutorial, I will be going through how to take your animation from Adobe Animation insert into your website and interact with it. This tutorial will not teach you how to use Adobe Animation to create animation, as there are tons of existing tutorials on that already.
You will need to have a basic understanding of JavaScript and HTML. This tutorial does not go into WebGL.
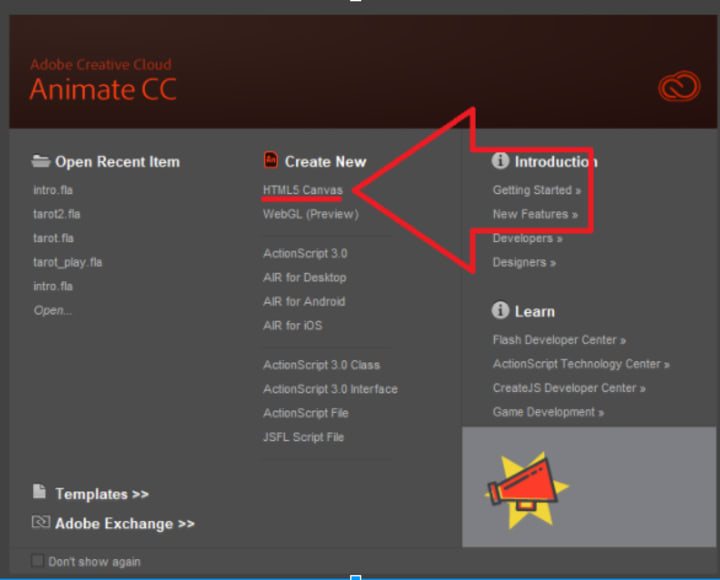
Step 1: Create a new HTML Canvas project.
Step 2: Create your animation.
Step 3: Stop the animation in the last frame. You don’t need to to do this for your animation to work but this will let you add some code to let your website/web app know when the animation has completed. If you want your animation to loop forever then you can skip this step.
Right click on the last frame and then select Actions.
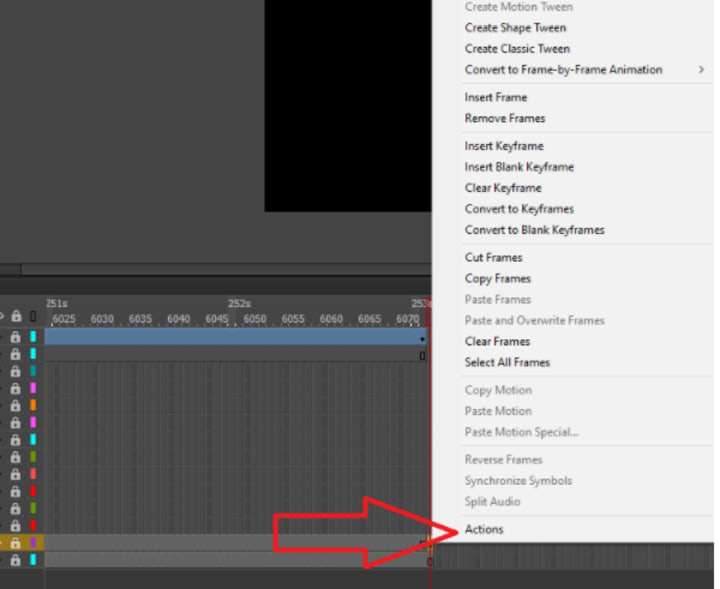
Type the following into the action box.
this.stop();
createjs.Sound.stop();
The stop command will stop the animation and the second line stops any sounds (not needed if you don’t have sounds)
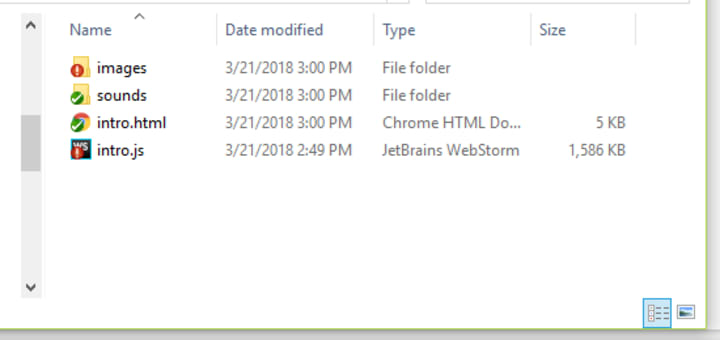
Step 4: Publish your project. You should have two files and some folders.
Step 5: Download and Include this Javascript file into your project. You right-click on this link and use the "save link as" option. You can also just right click on it to see the code.
Step 6: Include the .js file created when you published your Adobe Animation Project (step 4). Make sure it’s included after the Animation.JS from step 5.
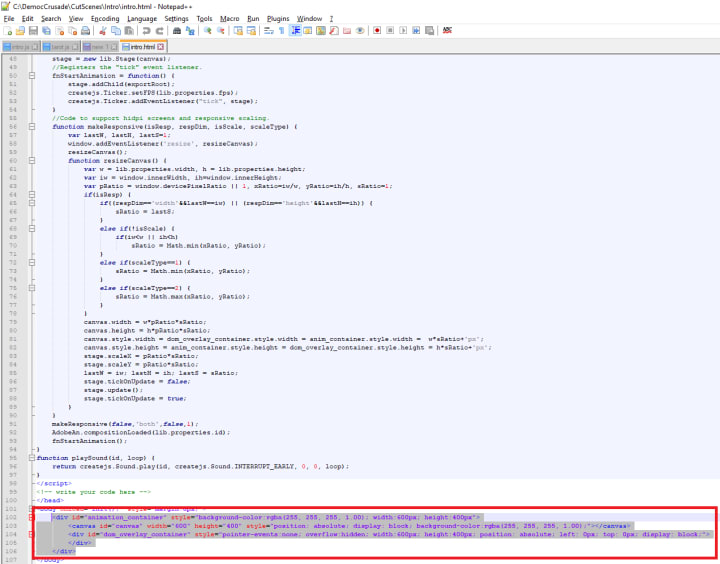
Step 7: Open up the .html file from step 4. Look for a dive with the ID “animation_container.” It should be near the bottom of the file inside the body tag. Copy the tag and everything inside into your body tag. You may need to rename of your tags in order to avoid duplicate IDs.
.HTML File
Step 8: Open up the JS file created in step 4. If you use sounds then you need to look for the "playSound" function call. Replace “playSound” with “Animations.playSound.”
Next, look for the code added in step 3: “createjs.Sound.stop();”. It will be inside of a function. That function will be called when the animation has stopped. You can add whatever code you want here to let your website/web app know the animation has finished.
Note: You can add actions to any frames in your project and then see the code in the .js file. Also, any other actions you create will be here. You can create buttons in your project add listeners and then have those listeners fire your own functions.
Step 9: Run your site/ app.
About the Creator
Enjoyed the story? Support the Creator.
Subscribe for free to receive all their stories in your feed. You could also pledge your support or give them a one-off tip, letting them know you appreciate their work.
Keep reading
More stories from writers in 01 and other communities.
The Art of Work: Valuing Time in the Age of AI
Artificial intelligence isn't going away. You might be excited about that. You might be anxious. Whatever you're feeling, though, AI has become a permanent fixture in our society. As long as there's profit to be made, advancements in AI will shape the next wave of technology.
By Addison Horner19 days ago in 01
Why Quality Engineering & Support Services Are Essential for Automotive Success
In the automotive industry, success hinges on more than just innovative design and powerful performance. Ensuring high-quality production is crucial for maintaining competitive advantage, meeting regulatory standards, and exceeding customer expectations. Quality engineering and support services provide the foundation for achieving these goals, playing a pivotal role in the automotive sector’s success.
By FCE Technologies5 days ago in 01


Comments
There are no comments for this story
Be the first to respond and start the conversation.