
How to Assemble A Mobility Scooter
Learn how to assemble your mobility scooter

Car boot mobility scooters are lightweight and compact and designed to be lifted and fit into the boot of a car, van or truck perfect for getting outdoors again.
Our step-by-step guide of how to put your mobility scooter together is the perfect tool for adventuring into the great outdoors again. The instructions below are based on a Kymco Mini Comfort but can be used on many different models of car boot scooter.
Car Boot Scooter Benefits.
One of the biggest benefits of a boot scooter is being able to transport them with you. Unlike many other mobility scooters, boot scooters can be taken apart to be put into a car then can be put back together when you have arrived at your destination. Boot scooter are an incredibly popular choice for people who need to fit their scooter into their car as they are lightweight and their small frames make them easier to manoeuvre.
A mobility scooter can be broken down into 5 main parts which will then be able to easily fit into a car.
• Seat
• Basket
• Battery
• Front Section
• Back Section
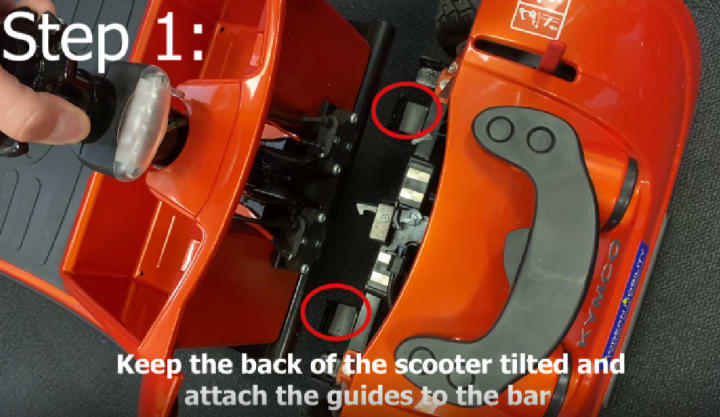
STEP 1:
Keep the back of the scooter tilted and attached the guides to the bar. Carefully let it click into place. Once they are connected let go of the back section, these parts will now stay together and not come apart.
STEP 2:
Loosen the handle bars and adjust to the position of your choosing, once in the correct place tighten to make sure they don’t move. You can do this by loosening the knob and gently bringing the handle bars up to the position which best suits you.

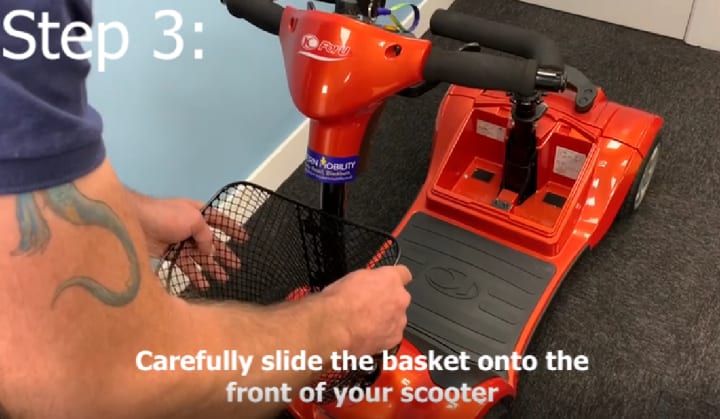
STEP 3:
Carefully slide the basket onto the front of your scooter. Line up the latches and slide the basket onto the front of the handle bars. If your scooter doesn’t have a basket then you can skip this step.
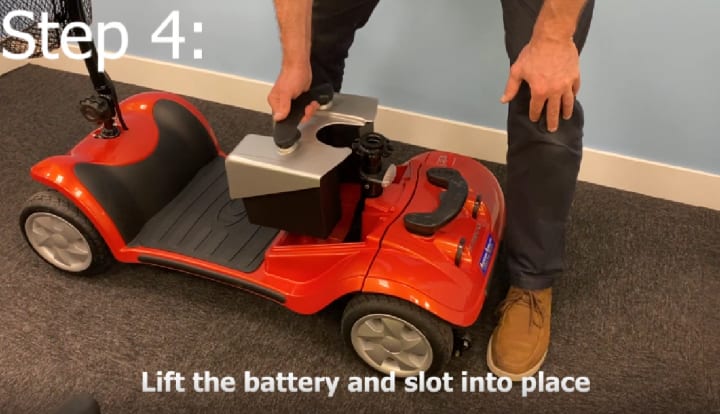
STEP 4:
Lift the battery and slot into place, the battery can be heavy to lift but it will slot into the hole at the back of the front section. The battery will not move about and should fit perfectly.
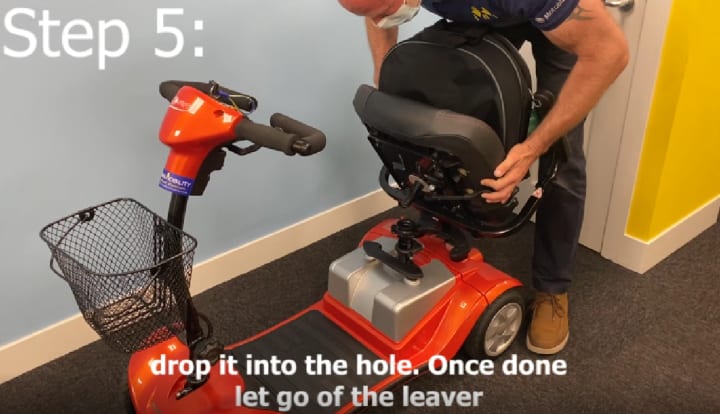
STEP 5:
Lift the Underneath leaver and pick the seat up. Line up the seat post and drop it into the hole. Once done let go of the leaver. The seat is now in pace and will not move unless you lift the leaver
STEP 6:
Unfold the back of the seat. You should just be able to pull this back up easily. You can add a bag to the back of the seat for extra storage options.
About the Creator
Keep reading
More stories from Modern Mobility and writers in 01 and other communities.
How To Make Your Home Wheelchair Accessible
If you are in a wheelchair, sometimes getting around your own home can be challenging, but it doesn’t have to be an impossible task. Making your house wheelchair accessible doesn’t mean you have to build a new house from scratch, you can simply adapt yours to make it less daunting. Updating your home can result in you being safer and ensuring comfort whilst making your house feel like home again.
By Modern Mobility3 years ago in Longevity


Comments
There are no comments for this story
Be the first to respond and start the conversation.