
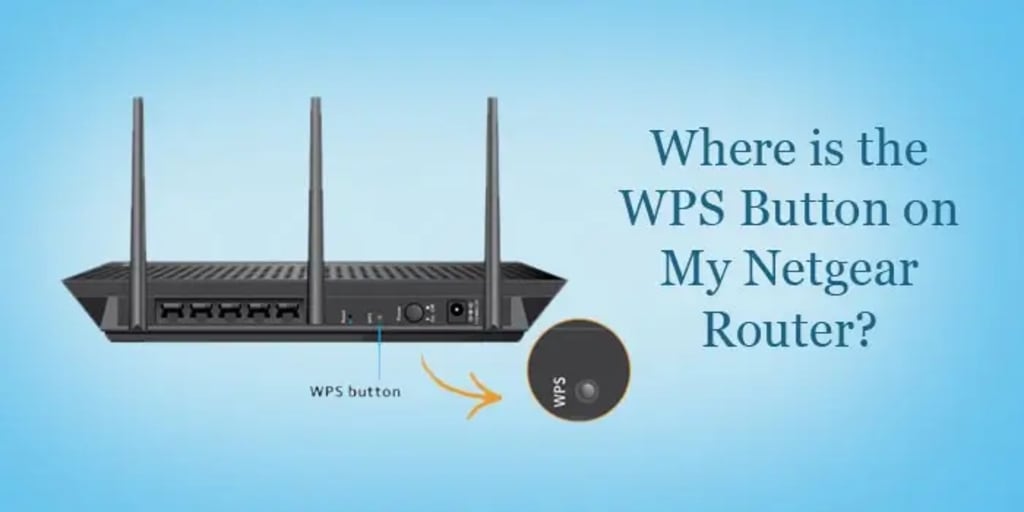
Where is the WPS Button on My Netgear Router?
WPS Button on my Netgear Router

Introduction
Setting up a wireless network can sometimes feel like a daunting task, but modern routers are designed to make the process as user-friendly as possible. One of the features that simplify this setup is the WPS (Wi-Fi Protected Setup) button, which allows you to connect devices to your Wi-Fi network with just a push of a button. If you own a Netgear router and are wondering where the WPS button is located, this article will guide you through the process.
What is WPS?
Wi-Fi Protected Setup (WPS) is a standardized method of securely connecting devices, such as smartphones, tablets, and laptops, to your wireless network. WPS uses a personal identification number (PIN) or a physical button press to establish a secure connection without the need to manually enter your Wi-Fi password. This makes it easier for users to connect their devices to the network quickly.
Locating the WPS Button on Your Netgear Router
The location of the WPS button on a Netgear router can vary depending on the router's model. Netgear typically designs its routers with user-friendliness in mind, making it relatively easy to locate the WPS button. Here are some common places to find the WPS button on Netgear routers:
On the Front Panel: Many Netgear routers feature a WPS button on the front panel. It is usually labeled "WPS" and may be a physical button that you can press.
On the Top or Side: In some cases, the WPS button may be located on the top or side of the router. Look for a button labeled "WPS" or with the WPS symbol.
Combined with Other Buttons: On some Netgear routers, the WPS button might be integrated with other buttons, such as the reset button. In this case, check your router's user manual or documentation to identify the specific button.
Through the Router's Web Interface: On certain Netgear models, you can enable WPS through the router's web interface. To do this, log in to your router's admin panel using a web browser, go to the WPS settings, and enable WPS from there.
It's important to note that not all Netgear routers have a physical WPS button. In some cases, you may need to use the web interface method mentioned above to enable WPS.
Using WPS to Connect Devices
Once you've located the WPS button on your Netgear router, here's how you can use it to connect your devices:
Turn on the device you want to connect to your Wi-Fi network.
Press and hold the WPS button on your Netgear router for a few seconds. The WPS LED on the router should start blinking.
Within a short period, typically around two minutes, go to your device's Wi-Fi settings and select the network name (SSID) associated with your router. The device should connect automatically without requiring a password.
Wait for the device to establish a connection to the router. Once connected, the WPS LED on the router should become steady, indicating a successful connection.
Conclusion
The WPS button on your Netgear router is a convenient feature that simplifies the process of connecting devices to your Wi-Fi network securely. Whether it's on the front panel, top, side, or through the router's web interface, locating the WPS button should be relatively straightforward. By following the steps outlined in this article, you can easily use the WPS button to connect your devices to your Netgear router without the hassle of manually entering a Wi-Fi password.
About the Creator
Tony Robbins
Hi,
Tony Robbins is a passionate technical content writer.
Visit- https://www.customerservice-directory.com/
how to delete sbcglobal email account
Keep reading
More stories from Tony Robbins and writers in Serve and other communities.
How can I resolve imap.comcast.net not responding on my iPhone?
When consumers become confused while implementing the instructions, they can contact Comcast customer service. Professionals are ready around the clock to answer clients' questions. Here's how to fix imap.comcast.net doesn't accept password authentication on iPhone:
By Tony Robbinsabout a year ago in 01
5 countries that have submarines
Submarines, those silent hunters of the deep, have captivated imaginations for over a century. These underwater vessels play a crucial role in modern warfare, offering strategic deterrence, intelligence gathering, and offensive capabilities. Today, we embark on a global voyage, exploring the submarine fleets of five prominent nations:
By Moharif Yuliantoabout 18 hours ago in Serve
CLARION CALL TO SERVICE.
In the ancient town of Tishbe, nestled amidst the rugged hills of Gilead, there lived a man whose name echoed through the corridors of time: Elijah. Born of humble origins, his parentage shrouded in mystery, Elijah's life would unfold as a testament to faith, courage, and unwavering conviction.
By oludotun oyedele5 days ago in Serve


Comments
There are no comments for this story
Be the first to respond and start the conversation.