
How to Professionally Photo-Shoot Your Jewelry at Home
In this guide, you'll find the simplest solutions to photo-shoot your jewelry at home, and in case you were wondering, the answer is yes! It's possible!

When it comes to photographing jewelry or other small objects, it's very important to control some basic aspects in the matter of photography: careful lighting that helps to enhance and make details stand out to the eye; taking care of the composition so that the object doesn't look deformed and putting some hard work on the focus to have the maximum sharpness.
In this guide you'll find the simplest solutions to photo-shoot your jewelry at home, and in case you were wondering, the answer is yes! It's possible! You can end up having awesome professional-looking photos and put a stop to all those times you've struggled with this.
When taking jewelry photographs, it's not necessary to have a professional studio; just get yourself a table and space to move around. Apart from the table, you'll need a surface that can work as a background. It can be a simple cardboard, a similar object, or anything with a texture that comes from your imagination, but preferably something flat (no texture); or maybe something like acrylic if you're looking to have reflection of the jewel.
As for the color, white is the most used for this given purpose because it makes it easier to later isolate the object, and so trimming or cropping becomes easy too. This being said, don't hesitate on trying out new things, other colors, or background materials; for example, a slate stone.
Lighting
The light source to be used has to be soft. The use of a studio flash and a large-sized diffuser window are suggested, in case your home provides these.
Believe it or not, the simplest configuration on your camera may do the work. A decent flash and an umbrella with absorbing fabric could act as a diffuser window too. To complete the lighting stage, you can use pieces of white feather cardboard that will act as white reflectors. Most of the time, foam core is what photographers opt for because of how resistant, how rigid, and easy to move around it is.
Reflection
The configuration of the "lighting set" to photograph your jewels should be as follows: the flash, with a window pointing towards the camera and giving it a decent angle on the working surface. Have the light in front, but at the same time take care not to have direct light on the lens. The white reflectors will go one on each side of the camera; this way the flash light bounces and illuminates the jewel.
Keep in mind that almost all jewels have shiny surfaces, like synthetic diamonds for example, and they reflect as if they were a mirror. So a great tip to make them look good in the photo is to make the jewel mirror the white reflectors that were placed before on each side of the camera.
In case you don't have a flash, the best alternative to it is the natural light from a window, which you can cover with tracing paper to blur the light a little. But remember that the use of a window brings with it less light intensity, of course; also, it's variable during the day, so you'll have to modify the measurements and make longer exposures. You'll have to try to adapt.
If you don't have a handheld photometer, the best option to measure lightness is to look at the camera's histogram and make the corresponding adjustments.
Composition
When composing a jewelry photograph, it's important to consider if the only thing to photograph is going to be a piece or a whole collection. Also, it's important to point out that it's not the same to take pictures for an ad as it is for an online store. But whatever the final destination is, the most important thing is that the shape of the jewel doesn't look deformed, so attention must be mainly focused there.
A good way to avoid deformation is to use the longest possible focal length. A macro of 105mm will allow a close focus; but at the same time, holding the camera at a distance that facilitates the manipulation of the jewel.
While getting deeper into the composition, it's important to monitor the lines, to give enough "air" to the jewel so that it has space and is not attached to the edge of the frame, and, finally, when placing the jewel, try to find a position where it seems as natural as possible.
When talking about necklaces and hanging jewels, place them in a frontal view by suspending them in the air to simulate the fall on the neck.
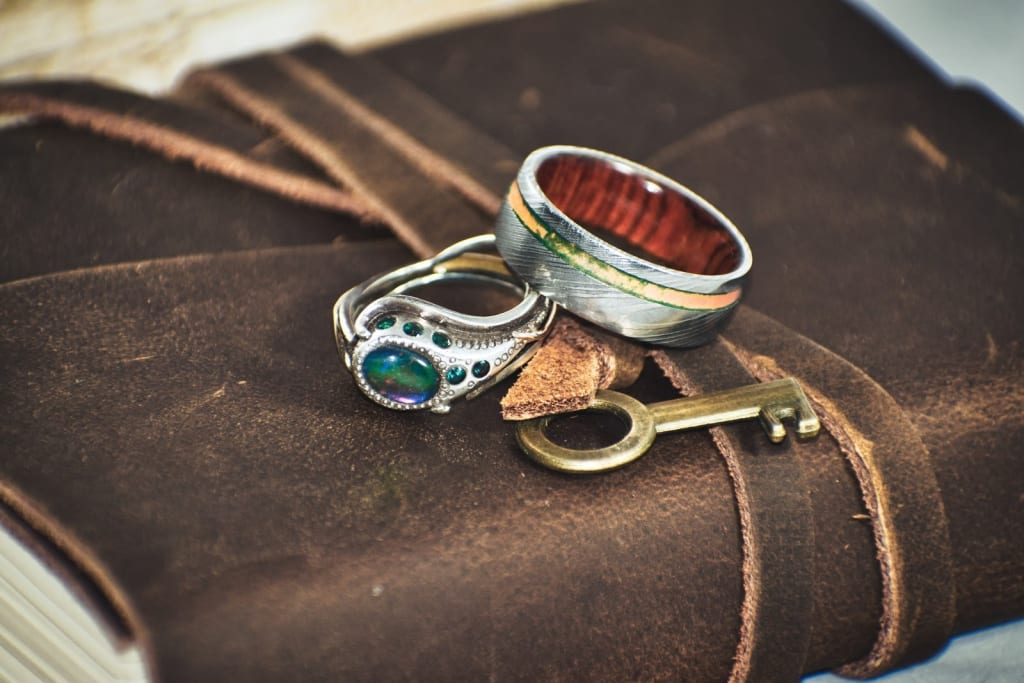
If it's rings, place them on the table with a little inclination towards the camera so that the view is almost frontal. Tilting the camera should provide depth as well. Rings can be also placed in a "stand up" position. To be able to keep them that way, a drop of wax will help.
Macro Focus
Once the jewel has been placed on the table and the camera's framing is ready, the most difficult thing will be to focus. Be very clear on knowing about the rules of depth in order to take advantage of the focus and to be able to obtain the best possible clear-cut of the jewel.
For depth optimization, use a very closed diaphragm, but keep in mind that this implies some loss of quality in reproduction, since the most closed diaphragms are the least clear. The solution could be to obtain focus by stacking or, to join different shots in later editing in Photoshop which will provide the same results. While doing this, use different focus points, to give the image an extended depth of field.
Using a Rail
Sometimes for these shots it's important to have a millimeter rail for macro photography. This will allow the movement of the camera without touching the focus. Once it's done and once all the shots are gathered, go to Photoshop to put them together.
Photomerge
The first step is to align the photos. For this, use the Photomerge function and uncheck where it says Merge Images. Once you have finished aligning the images, select all layers and, in the Edit Menu, click on Merge Layers Automatically. This command will select each of the focused parts of the image and create layer masks to show them all together.
As a final personal recommendation, don't forget to take care of the shine and cleanliness of the jewel, since when working in macro all these details are magnified and seen quickly.
Keep in mind that the process doesn't end in perfecting the focus only; so also work on editing the background for it to be as white as possible, as this is how the jewel looks best.
About the Creator
Betty Gibbs
Maria Vikse has been a director assistant, journalist, and screenwriter. Currently, she is writing for MadeStones. When not traveling, Maria enjoys practicing for marathons, going on hikes, and planning for the next adventure.
Keep reading
More stories from Betty Gibbs and writers in Photography and other communities.
Best Ideas for Eco-Friendly Presents for Your First Anniversary
The anniversary gift you give your partner embodies that hope, so putting some thought into that gift makes your future with them a more likely one. If you and your partner are ecologically conscious people, then choosing an eco-friendly gift is also a great way to show that you care about the future of the planet you will be living on.
By Betty Gibbs5 years ago in Humans
Capturing Magic
In the world of photography, timing is the key to everything. While skilled compositions and technical proficiency are undoubtedly crucial, the perfect lighting can create the perfect photo. Nowadays, we can determine any light ourselves and are no longer dependent on any natural light source, thanks to the developed technology. We can turn every day into a night by using the right filters. And we can illuminate every night to be seen as a day. A typical process, especially in the film industry.
By Krishan Mubashar8 days ago in Photography
Cristiano Ronaldo, often hailed as one of the greatest footballers of all time
Cristiano Ronaldo, often hailed as one of the greatest footballers of all time, has had a storied career marked by unparalleled success and remarkable achievements. From his humble beginnings in Madeira, Portugal, to becoming a global icon, Ronaldo's journey is nothing short of extraordinary.
By Mithun Gainabout 18 hours ago in Photography
The Fish Song
The room didn’t smell like disinfectants. Its fragrance seemed light and not overbearing. A soft mixture of lavender and mint permeated the space. No beeping machines or any tubes hooked up to four-year-old Kaleeka. Her cacao skin seemed to glow from the light over her head. The family, save for one and the doctors and nurses exited the room like a trail of saints showing their last vestiges of regard.
By Skyler Saunders7 days ago in Fiction


Comments
There are no comments for this story
Be the first to respond and start the conversation.