
How to Get Started with Food Photography
And get amazing food pictures

I know what you’re thinking. I’m already doing food photography. Every time I get something in a restaurant, I whip out my phone and snap a picture using the latest filter. I don’t need to get started.
And that’s fine if you are happy with that.
What I show you how to do is get professional-looking shots of food. Images that not only would you be proud to share on social media, but would be worthy of commercial use.
A good photographer, with decent equipment, and a working knowledge of lighting, can get a good shot of anything. But like everything else, there are many specialties in photography, and food photography is more specialized than most of them. You not only need to understand basic photography skills but also know what makes a food shot appetizing.
Light it up
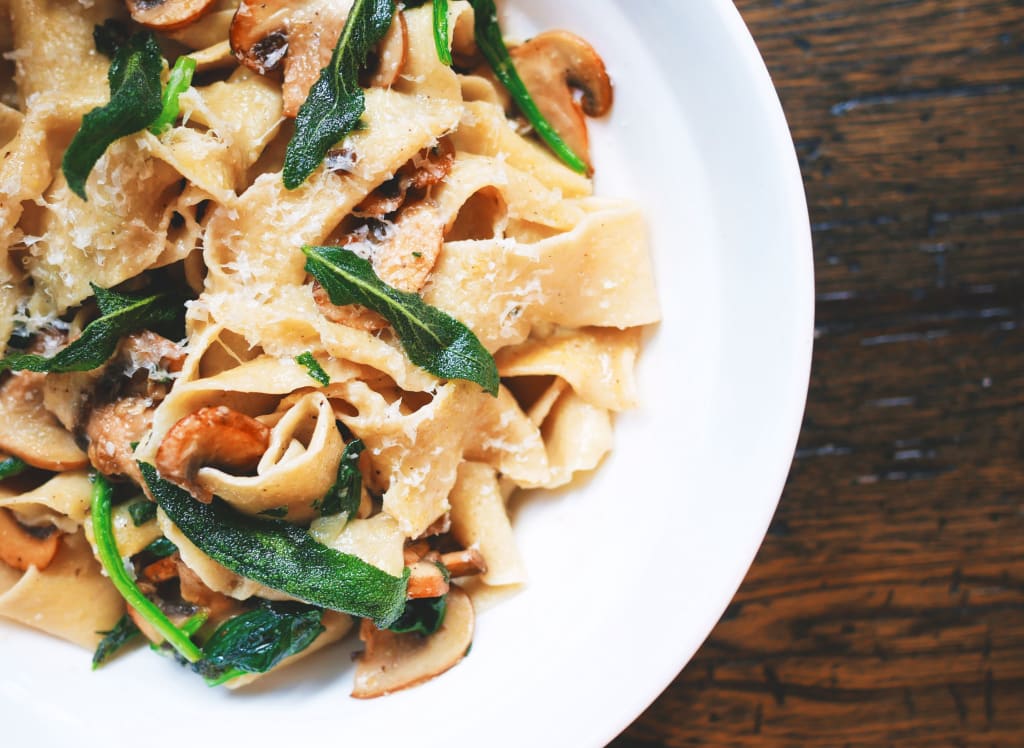
As with anything photography, lighting is everything. Bad lighting will make any food look horrible. And while lighting alone won’t make the food appetizing, good lighting will at least make it appear professionally photographed. The best light for food is natural window light. It adds directionality, texture, and a warm glow difficult to achieve with studio strobes and impossible to get with a cell phone flash. In a restaurant, get a table by the window. That one step more than anything else will improve your food photography.
If you shoot food at home, set up a small studio by a window. As long as the window isn’t getting direct sunlight, any window will do. If it is too bright, hang a thin, white sheet over the window while you are shooting. You don’t need much room, especially if you like the top-down shots that are in favor today. Allow the window to provide the key light and add a white piece of poster board for fill, and take a professionally lit food photo.
Dress it up
Composition and a few props can make or break your image. If you are shooting in a restaurant, make sure you consider the background before taking the shot. It is very easy to have distracting elements behind your main subject. Another good reason for shooting straight down. If you can get a low angle on the food, place a water glass and maybe the salt and pepper shakers behind the plate at 10 and 2 o’clock. Make sure the napkin and silverware are clean and neat.
At home, the sky’s the limit. But don’t limit yourself to your everyday plates and silver. Visit dollar stores and flea markets and pick up interesting props. I have a cabinet in my kitchen dedicated to dishes, containers and utensils just for my food photography. I also have a stack of backgrounds and textures next to my shooting table. Craft stores are perfect for this stuff.
Style it up
This doesn’t concern shooting in restaurants as the food comes styled and plated. But shooting at home requires a bit more effort than just throwing the food on the plate and taking a picture. Give some thought to the arrangement and placement of each element. Keep some colorful garnishes handy to dress up the final product.
In food photography, you must work quickly. Food can go from appetizing to dreadful quickly. Think through your shot and have the lights and camera ready in advance. Have a few props on hand you use in the serving dish and take test shots before the actual food comes out. A slice of bread on a plate or a wadded napkin in a bowl works fine. Once the food is ready, plated, and styled, you want to set it in place and get the shot within a minute or two.
One thing you need to consider is whether or not you will eat the food. Most professional photographers are creating a scene to shoot and dispose of. They don’t care if the food is edible. For that reason, there are a lot of tricks they can use to make the food appear more appetizing. I always eat what I shoot, and I will assume you are.
But you can still use some tricks to improve the food. Keep a spray bottle of water to spritz a little moisture on salads, fruits, and vegetables. Brush a touch of olive oil on most any food to give it a shine. Use a portable clothes steamer to add steam just before you click the shutter. Another trick food photographers use is to heat a moist cotton ball in the microwave for a few seconds and then hide them behind the food for the appearance of steam.
Food photography can be very rewarding. But it takes more than just pointing and shooting. The good news is, you get to eat your mistakes. Use these tips to help you get started with food photography and have fun doing it.
If you enjoyed this article, please click the Heart, and if you really liked it, consider dropping me a tip below. Thanks for reading.
About the Creator
Darryl Brooks
I am a writer with over 16 years of experience and hundreds of articles. I write about photography, productivity, life skills, money management and much more.
Keep reading
More stories from Darryl Brooks and writers in Photography and other communities.
10 Ways to Get Out of Your Photography Rut
Photographers get stuck in ruts like everyone else. Whether it’s food, landscapes, or portraiture, you shoot the same thing the same way every time you head out with the camera. If you want to refresh your photography style, this article gives you ten ways to get out of your photography rut.
By Darryl Brooks3 years ago in Photography
Capturing Magic
In the world of photography, timing is the key to everything. While skilled compositions and technical proficiency are undoubtedly crucial, the perfect lighting can create the perfect photo. Nowadays, we can determine any light ourselves and are no longer dependent on any natural light source, thanks to the developed technology. We can turn every day into a night by using the right filters. And we can illuminate every night to be seen as a day. A typical process, especially in the film industry.
By Krishan Mubashar9 days ago in Photography
Taobao, PandaBuy the Giant Marketplace of China: A Comprehensive Exploration
In the bustling landscape of e-commerce platforms, few names resonate as profoundly as Taobao, especially within the Chinese market. Launched in 2003 by Alibaba Group, Taobao has evolved from a modest online marketplace to a sprawling digital ecosystem that shapes the retail landscape of China.
By Abdul Haseeb Kamal2 days ago in Photography
Frankie's Song of the Week: Espresso - Sabrina Carpenter
A little something different from me while I deal with the strain of writers block. I thought I'd do a song of the week, because I have been surely annoying my neighbours and my friends with this absolute musical GEM. I am of course talking about Espresso by Sabrina Carpenter.
By Frankie Martinelli7 days ago in Beat


Comments
There are no comments for this story
Be the first to respond and start the conversation.