
Backyard Bugs
Stepping Into The Unknown During Lockdown.


March 29 2020, marks the date on which Australia, entered ‘Stage 4 lockdown’ in response to the rapid spread of the Covid-19 outbreak. With over one thousand cases daily in a span of a week, the government decided to take action in hopes of stopping the growing number.
Stage 4 lockdown rules, meant that citizens were unable to leave their house, with the exception of going to get essentials such as groceries and if your work was deemed essential. A 5km radius rules were also set and masks were mandatory or face heavy fines.
At the time my job as a retail assistant wasn’t essential, so I was stuck at home. When I was working on a rotating roster, I would use my day-offs for my hobby, photography. The photography I usually do involves street, fashion, portraits, basically anything that involved other people.
Being bored, unable to leave the house and flowing with creative juices, I decided it was time to get creative and broaden my photography skillset by taking photos of whatever was interesting in the house. It worked out alright, creative photoshoots of the trending ‘Dalgona' coffee I made and some clothes that I owned. But eventually, the subjects to shoot ran out.
Then one morning I noticed some flowers had grown in the back yard and some Bees and European Fire Bugs siphoning out its nectar. I had never done macro photography before, and since I had decided to take this lockdown as an opportunity to better my skillset, grabbed my camera and decided to try it out.
Now let’s get something straight, the DSLR I am currently using was given as a gift from my dad’s girlfriend along with a few lenses. It isn’t the latest and greatest but, for the stuff I usually photograph it gets the job done. One of the lenses that were given to me was a 180-300mm lens, with a macro option. Taking what I get, I started taking photos with the set-up.
As many photographers would know, shooting at such telephoto focal lengths without any optical stabilisation or tripod will tell you it’s a struggle to get crisp shots. The camera lacking in focus tracking made the effort to take photos harder especially when it comes to a bees erratic and unpredictable flight pattern.
But that didn’t stop me still, dialling in my settings to a really high shutter speed, to freeze the motion of the bee in flight or sitting on the flower petals. Thankfully the European firebugs were more still and didn’t really move. During the shoot there was another issue as well, due to the camera lacking modern creature comforts, it boasts a colossal 3 fps on continuous high drive mode. So not only was there a lack of image stabilisation to help frame my shots, a decent auto-focus tracking but there was no fast burst to capture more frames and moments on the bees flight. So I pressed on, (no pun intended) firing the shutter, trying to get as many exposures as possible. Hoping that the lack of gear could be countered with at least one or two banger photos. After taking over 100 or so frames, I checked the back of the camera to look at them and felt satisfied with the shots of the day.
Two days go past, and then I start to upload the photos into Adobe Lightroom. Now you might be thinking why didn’t get started with editing right after the shoot. Well for my workflow, no matter what the shoot is and who it’s for, I like to take at least a day away from the photos. By doing this it helps me see the photos from a fresh perspective. With the photos in my Lightroom library, I go throw each one individually and give a star rating of 1 for general selection and 2 for the best selection or none for throwaways. Photos that are rated with a 2-star rating are edited.
I have a particular colour scheme with my edits and personal aesthetic. This includes high contrast, punchy colours and crushed blacks - pretty much the ultimate recipe for a moody photo.
First off, with all my edits, I like to start in ‘Lens Corrections’ and ticking both boxes, to remove any chromatic aberration and fix lens distortion. After that, I adjust the perspectives if needs alignment and adjust the crop too.

Then going down to the ‘Color Calibration’ I tweak it accordingly. These aren’t always exact values as every photo is different. But this tool helps when you want to play around with colours.

With the small stuff out of the way, I start to adjust the ‘Tone’ or as most photographers refer to it as ‘Basic Adjustments’ this adjust exposure and contrast, as well as shadows and highlights. I tend to shoot very underexposed since I shoot in RAW format I can always bring up the details in the shadows. In this case, I had to slide it to the max. If need be I also adjust the white balance to help set the mode and tone even further.

Clarity slider I sometimes bring down, since modern cameras and glass are so sharp I always get this feeling that it’s too clinical in technicality. So to counter that I bring the clarity down a touch to give it some character.

Vibrance and Saturation I like to go opposites on these sliders. Bringing the vibrance up gives the colours extra punch while turning down the saturation gives a more muted and moody tone.
Tone curve I just like to put a basic ’S’ curve with a little fade on both the shadows and highlights.

HSL sliders were adjusted accordingly. This can vary from photo to photo as each photo is different. But for this image, I felt this was a good setup. Just to note I like to slide the hue of the greens more to blue rather than yellow, this hint of blue allows the greens to be richer and pop more. More often than not, I rarely ever have to mess with the Luminance sliders.

I added a slight teal blue tint to the shadows in ‘Color Grading’ to add blue to shadows. The reason for this is that the stem of the flower is in shadowy areas and I thought adding blue gave the greens in the stem more pop.
For these photos, I left ‘Details’ alone, as I felt happy with where it was at.
In the ‘Effects’ tab, I added a slight vignette as thankfully these photos had the subjects in the centre. By adding a vignette, naturally draws the viewers eye towards the subject. I also added grain and this I add to all my photos. Starting photography on film there was always some minor hints of grain that could be seen in high-res scans. Grain is also useful if you’re shooting portraits as it can help smooth out the skin.

With all that, set the final image and sync it to the other photos.
Final Results:
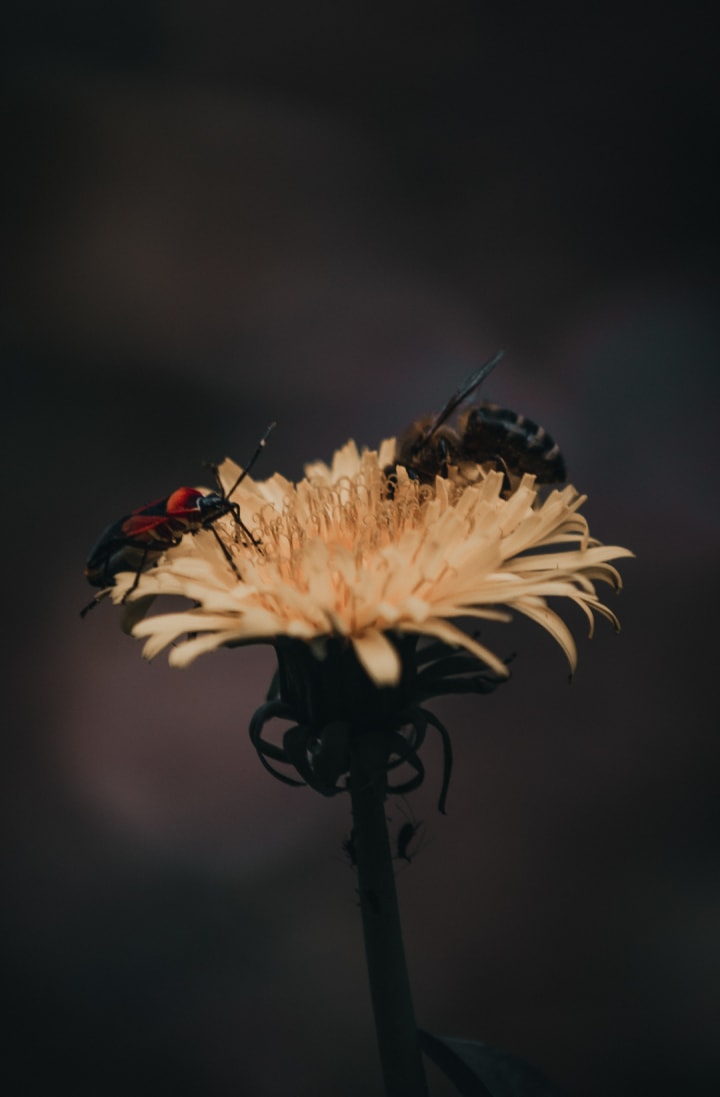


Despite me not shooting any more macro stuff after this shoot, I did genuinely find it fun and intriguing. Although it was a challenge, it is a challenge I would gladly take on again since it involves something I love doing and I feel the skills gained from this experience have helped me with close up compositions.
About the Creator
Einreb Ortega
New to this Vocal thing, but hopefully will get better with time. Interests include fashion, photography and music.
Keep reading
More stories from Einreb Ortega and writers in Photography and other communities.
Lady Luck
Thrifting is fun. Whether it be clothes, furniture and toys, the feeling of going treasure hunting and finding something that is almost as rare as a first edition Charizard Pokemon card is joyous. Stumbling upon something incredible by chance and knowing there will not be another person out there that has the same thing as you? What more could you ask for?
By Einreb Ortega3 years ago in Styled
Capturing Magic
In the world of photography, timing is the key to everything. While skilled compositions and technical proficiency are undoubtedly crucial, the perfect lighting can create the perfect photo. Nowadays, we can determine any light ourselves and are no longer dependent on any natural light source, thanks to the developed technology. We can turn every day into a night by using the right filters. And we can illuminate every night to be seen as a day. A typical process, especially in the film industry.
By Krishan Mubashar18 days ago in Photography
The Best Wedding Photographers In Toronto
Studio Arash has the best team of Persian wedding photographers in Toronto. It is a Persian wedding photography studio in Toronto, which isn't just a photography studio; it's a beacon of love in Toronto's bustling streets. Nestled in the heart of the city, our team of talented photographers possesses a rare gift for turning fleeting moments into eternal memories. With every click of the shutter, we capture images and fragments of your soul intertwined with love's essence. Our dedication to storytelling is unmatched as we weave each snapshot into a tapestry of emotions that speaks volumes without words. With Studio Arash, your wedding day isn't just an event—it's a symphony of love, and we are the maestros orchestrating every perfect note. Trust us to immortalize your love story with the magic of our lens, leaving you with images that will forever whisper tales of your romance.
By Arash Ekbatani5 days ago in Photography


Comments
There are no comments for this story
Be the first to respond and start the conversation.