
9 Steps to a Perfect Picture
Simple, satisfying, and absolutely free.


Welcome to the world of amateur photo enhancements. In this tutorial, I will show you how I transformed this lively boudoir forest image of myself with only an iPhone, a little bit of time, and a lot of inspiration.
The idea for my risqué photoshoot in the woods came to me after I received my monthly lingerie package in the mail last fall. I have always felt divinely feminine in lingerie, but I had never tried to capture the feeling in my art or through photography. So, when my best friend asked me to go camping (a pastime I typically abhor) my glamour instincts kicked in and I embraced the opportunity. Little did she know, I packed my black, lace teddy and white platform boots along with my sleeping bag and tent. Here are the complete steps I followed resulting in the photo you see above.
Step 1: Make a plan.
After inspiration struck, I knew I wanted a sexy-artsy-forest type shot of myself. I also knew that I would need the right kind of lighting, the right outfit, the right scenery, and the right fallen log to pose against. Obviously, I needed a plan. Actually taking the time to plan out the shoot removed a lot of the in-the-moment pressure. I wasn’t so worried about modeling or stumbling about the forest in my underwear after understanding my vision. When you’re well-prepared, the rest is easy.
Step 2: Take lots of photos.
Believe me, not every photo I took that day was this flattering. I probably left the camping trip with about 600 pictures on my camera roll, though not all of them were of me acting like a woodland fairy or straddling trees. Then, I laughed at about 80% of the shots for being either too ridiculous, out of focus, or just bad. It’s always better to have more.
Step 3: Select the best raw shots.
I ended up with a handful of photos that I knew I could work with. Choosing the best raw images was difficult, though. One photo had a weird glare, but everything else was perfect. One photo had a beautiful cascade of light shining through the trees, but my face was underwhelming. This photo had the most potential, so I went forward into the editing stage.
Step 4: The rule of thirds.
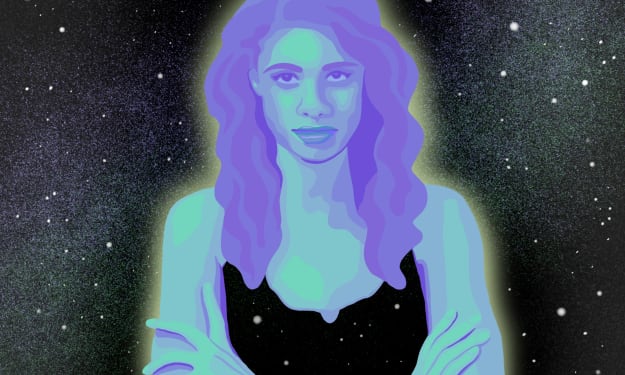
You may not be able to tell at first glance, but I did make a slight cropping adjustment to this photo. I live by the infamous rule of thirds, which, in art and photography, means placing your subject in one third of the frame. As you can see in my edited image, my body is off-center, more on the right side of the overall composition. It has something to do with science and attraction, but I generally just thought it looked better this way.
Step 5: Massage the imperfections.
In the original photo, there were some chubby bits poking out that I didn’t love, some distracting leaves on the log, and a few aesthetic issues with my face. I used Photoshop Fix (a free app) to warp and modify several elements of my body and the environment. Disclaimer: I’m not advocating that anyone warp or modify their body for any reason, either in reality or digitally. This was just my choice at the time, and I’m happy with the results.
Step 6: Make mini light adjustments.
Onto the fun stuff! Light settings are always a trial-and-error game for me. In this photo, I increased the exposure, contrast, and highlights by miniscule amounts. Because the natural light was already great, I didn’t feel the need to make big light changes during the editing phase. Light adjustments can be the fastest and most impactful edits you can make to a photo.
Step 7: Set the mood with color.
Another subtle but high-impact change I made in this photo was to the overall color. In order to create an inviting and cohesive mood, I increased the temperature and tinted the entire image slightly greener in tone. These color shifts helped to achieve the glowing vibe I was after.
Step 8: Direct the eye.
The obvious focal point all along was the human subject, but to further direct the eye I also added some minimal black vignette around the edges, blurred the background slightly, and highlighted the existing glow around my legs and head with a drawing tool. This can be a crucial step to make any subject matter pop for viewers.
Step 9: Play with effects.
Finally, I decided to play around with some special effects and artistic edits. I put some sparkles in the trees and a halo around my head with an art app, but as you can see, I decided to remove them. Regardless, it was fun to experiment with the artsy additions even if they didn’t make the final cut.
That is how I created my before and after! Nine fast and easy steps took my boudoir shot from bland to BAM. It’s important, lastly, to note that photo edits can often be exaggerated to the point of no return. For example, when adjusting light settings, you could wash out the details and color map from your photo if you’re not careful. Just be careful not to overdo it.
My final tip: have fun. What's the point if you're not having a good time? Whatever you decide to shoot, and however you choose to edit, enjoy the ride.
About the Creator
Alayna Cate
I'm... Alayna.
Keep reading
More stories from Alayna Cate and writers in Photography and other communities.
The V Card
You’re sitting in class, head down, and backpack zipped. You’re cleaning the break room, watching the clock tick closer and closer to 5:00. You’re walking home after a nice lunch with a friend. Then it happens. A classmate, a coworker, a neighbor, or whoever, asks without warning, “Hey, what’s your sign?”
By Alayna Cate3 years ago in Futurism
Capturing Magic
In the world of photography, timing is the key to everything. While skilled compositions and technical proficiency are undoubtedly crucial, the perfect lighting can create the perfect photo. Nowadays, we can determine any light ourselves and are no longer dependent on any natural light source, thanks to the developed technology. We can turn every day into a night by using the right filters. And we can illuminate every night to be seen as a day. A typical process, especially in the film industry.
By Krishan Mubashar17 days ago in Photography
Embracing Manageable Style: Moral Patterns and Brands Driving the Way
Lately, the style business has gone through a surprising change, with supportability turning into a point of convergence for the two buyers and brands the same. As worries about the climate and moral practices keep on rising, the interest for maintainable design has flooded, inciting a shift towards more eco-accommodating and socially mindful practices. In this article, we'll investigate the developing significance of supportable style, the key moral patterns driving this development, and a portion of the spearheading brands driving the charge towards a more maintainable future.
By Albert phashaabout 12 hours ago in Photography


Comments
There are no comments for this story
Be the first to respond and start the conversation.