


The inspiration for the idea of making my first candle stemmed from Pinterest, as most ideas used too, and still somewhat do to this day. I began searching for Christmas present ideas that were not only cost-efficient but somewhat simple to make as well. Finally stumbling upon a tutorial on DIY soy candles, figured why not? This is totally something that I could pull off. Started some basic research on what items would be needed. Set off to purchase these necessary items and got to creating. I do not exactly remember my first batch however; the rest is now history in the making.
Now here is the real test, time to gift these little beauties. To my dismay, the outcome was better than I would have ever expected. To see the overall joy of the gift I was giving for something I had created with my own two hands brought me pure joy. "Is this something I should keep doing?" This was the thought that crossed my mind after receiving such great feedback about the overall scent chosen and how long the candle lasted.
During my creative endeavors and many more holidays of candle giving, I discovered that I had a love for creating candles. Starting with ordering new scents to sample, especially the fall scents, these types of aromas have always been a favorite. Trying to achieve the longest and cleanest burns possible by testing out different wicks and jars in various diameters. Mastering the formula of what I would consider the ever-so-perfect fragrance oil to soy wax ratio. Lastly, this calls for the most creativity of all, designing the product labels. Being able to express my creativity throughout the entire process from start to finish just flat out makes me feel more fulfilled.
Now let us dive a little into the process without divulging all my trade secrets...
1. Melting the Wax
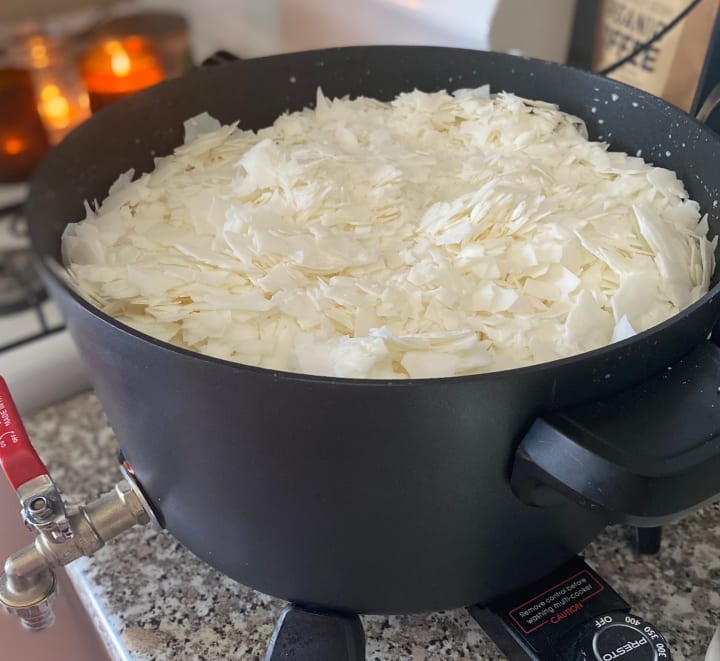
At the beginning stages, I started off with one pouring pot and a measuring cup. Which despite reading numerous articles stating they completely advised against this method due to inaccuracy, I continued to do so anyway. I consistently learned my lesson the hard way with either under pouring or over pouring on most batches being made. Happy to report I now am a proud owner of a scale and a presto pot. Anyways, now this presto pot has been a game-changer, what used to be only six candles per batch has now landed me in at about fifty candles per pot. Very easy to use might I add. Simply fill the pot up with wax flakes, plugin, allow the wax to melt, and heat up to the desired temperature. Usually, during this waiting period, I'm off doing some type of housework. Multi-tasking at its finest.
2. Setting the Stage
After the wax has heated up to the desired temperature, I sanitize each jar with alcohol removing any type of debris that may have been collected during shipping. At the same time, a thorough inspection of jars is completed to ensure no type of breakage has occurred. All clean and ready to go. Now it is time to secure and center the cotton wicks. Wick stickers have made this process a breeze, simply grab a sticker place it at the bottom of the wick, and adhere to the bottom of the jar. Making sure to be extremely careful to place it in the center. From here I secure wicks into place with a wooden clothespin. Again, making sure that the top of the wick will be centered within the jar once the wax has hardened. I do not know about you, but I do not want an off-centered wick. A nice full melt pool is where it is at.
3. Measure and Pour
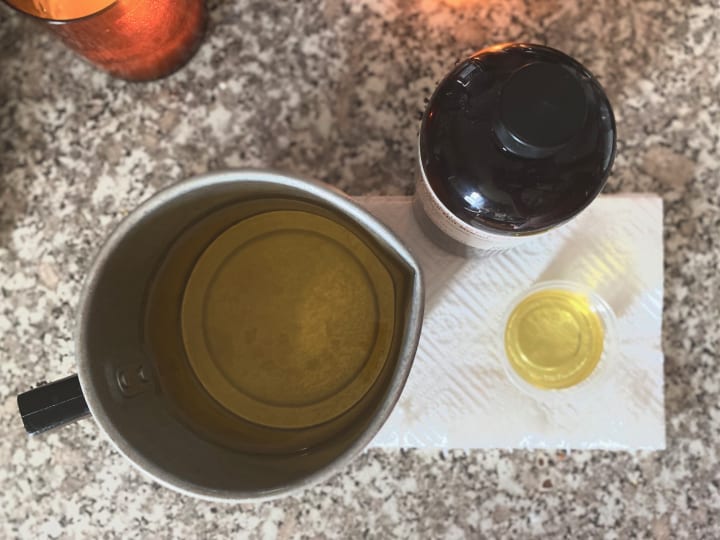
I place my pouring pot onto my scale and weigh out the wax in whatever quantity is necessary for the particular batch I'm making. Time to add the fragrance oil, but patience is required here. You do not want to add right away as there is a risk of burning off the oils before it has had a chance to mix in with the wax. Instead, wait for a little time to pass so the wax can cool down to the desired temperature.
Time to weigh up your fragrance oil of choice, and for today's purpose that is going to be my favorite, Lemon Pound Cake. This particular scent instantly makes me feel warm and sunny. Combine the two ingredients and stir until fully mixed. Now the toughest part, holding an ever-steady hand to pour the wax into this little space between the wick center and the outer edge of the glass jar. Full disclosure I always end up with spilled wax everywhere.
Then of course the part of cleaning up, but do not worry I will not bore you with those details.
4. Curing
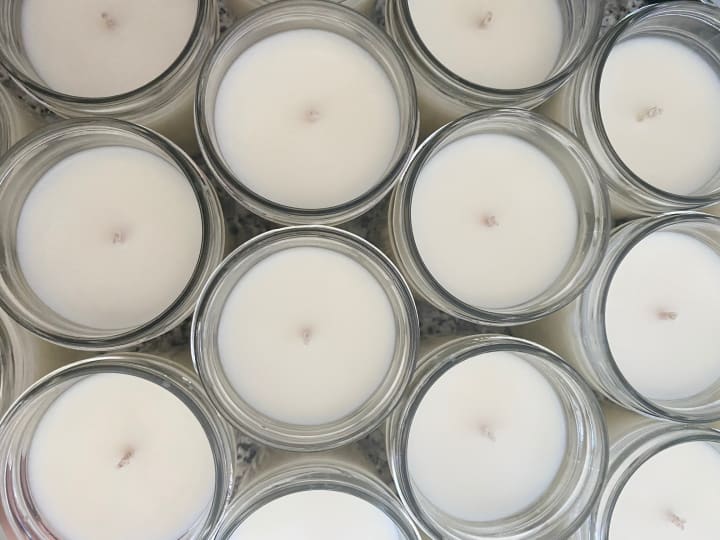
This is the phase that I would consider the absolute easiest as I literally do nothing. Nothing, but watch and stare as the wax hardens and begins the first stages of curing. For those who are unfamiliar with what this means - the process of fully hardening wax to evenly disperse fragrance throughout the entire mixture.
5. Packaging
First removing the clothespin to reveal a beautifully clean, soft white, soy wax candle. Smooth tops are a bonus, but this only happens if you are on your game that day. Soy wax is very finicky, anything can throw it off. Utilizing the heat gun to smooth out tops that are a little less than desirable. Once in the clear, scissors are used to snip off the excess wick only leaving 1/4" for safer burning. Finally wiping down the jar to remove any excess wax, and reveal a nice clean surface for placing the product label. Of course, being sure not to forget to place a warning label on each of the bottoms of the jars. Lastly, placing a lid over the top and allowing to sit for a set amount of days for the final stages of curing.
6. Enjoying the Goods
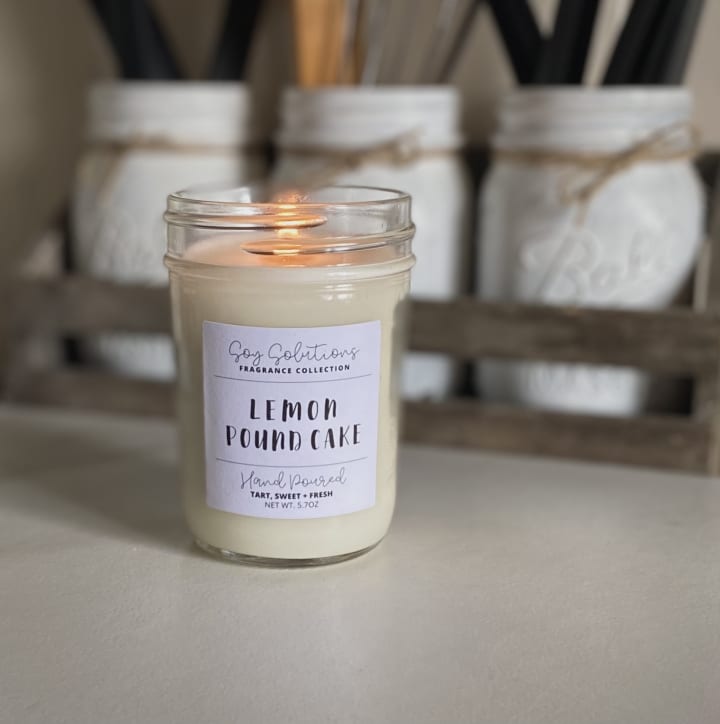
This right here is my absolute favorite. The ambiance a candle creates with the golden glow from the flame is just so comforting.
I'd like to consider myself lucky in a sense that there is basically a candle store within my home. Anytime I wish to enjoy this part of the process, I simply chose whatever scent is calling me, light up, and enjoy this unique item.
Before we part ways I am highly suggesting:
Somewhere in the near future, tidy up your area, light up a candle of your choosing and allow all the positive vibes in ✌
About the Creator
Brandy Goncalves
Just a free spirit with a lot of ambition 💕
Keep reading
More stories from Brandy Goncalves and writers in Lifehack and other communities.
Unlock Your Hidden Potential: Mastering Any Skill in Just 20 Hours
Have you ever felt like you'd never have time to learn something new? Between work, family, and a never-ending to-do list, the idea of picking up a new skill can seem daunting, if not impossible. But what if I told you that you could become reasonably good at anything – from playing the ukulele to juggling flaming chainsaws – in just 20 hours of focused practice?
By Sumit sharaf7 days ago in Lifehack
Mosquito-Free Zone
Have you ever killed a mosquito? Slapped? Or is it kill? Guess it's the same thing when it comes to them. But no matter the method, the problem is the same, mosquitos are very disturbing and annoying when you are just chilling in your garden or even inside your home.
By Theo Jonathan4 days ago in Lifehack
Mama’s Boy
I’ve been a fiancé for four years and three months. We’ve been together for six and a half years total, and we have a two-month-old son together. I can’t help but think that we’ll never get married. We haven’t even decided on a wedding date. When I bring it up, he tries to escape the room as if he’s late for something more important.
By Real Poetic4 days ago in Chapters


Comments
There are no comments for this story
Be the first to respond and start the conversation.