
Batch Mode: Import Windows Outlook PST to Mac Outlook
A Comprehensive Guide to Seamless Data Migration

Migrating from Windows Outlook to Mac Outlook can seem daunting, but with the right steps, you can seamlessly transfer all your important data, including emails, contacts, and calendar events. This guide will walk you through the manual process of importing a PST file from Windows Outlook to Mac Outlook, ensuring a smooth transition without data loss. Additionally, we’ll explore how AxBlaze PST to OLM Converter can simplify this process even further.
Manual Method:
STEP 1: Export PST File from Windows Outlook
Before you can import your data into Mac Outlook, you need to export it from Windows Outlook. Here’s how:
- Open Windows Outlook: Launch your Outlook application on your Windows computer.
- Navigate to File Menu: Click on the ‘File’ tab in the upper left corner.
- Choose Import and Export: Select ‘Open & Export’ and then click on ‘Import/Export’.
- Select Export to a File: Choose ‘Export to a file’ and click ‘Next’.
- Select Outlook Data File (.pst): In the Export Wizard, select ‘Outlook Data File (.pst)’ and click ‘Next’.
- Choose the Folder to Export: Select the folder you want to export. If you want to export the entire mailbox, select the email account name at the top.
- Choose the Destination: Browse and choose a location to save the PST file. Click ‘Finish’ to export.
STEP 2: Transfer PST File to Your Mac
Once you have the PST file, you need to transfer it to your Mac. You can use a USB drive, an external hard drive, or any cloud storage service like Google Drive or Dropbox.
STEP 3: Import PST File into Mac Outlook
With the PST file on your Mac, follow these steps to import it into Mac Outlook:
- Open Mac Outlook: Launch Outlook on your Mac.
- Go to File Menu: Click on ‘File’ in the menu bar and select ‘Import’.
- Select Import from a PST File: In the Import dialog box, choose ‘Outlook for Windows archive file (.pst)’ and click ‘Continue’.
- Locate the PST File: Browse to the location where you saved the PST file and select it. Click ‘Import’.
- Wait for the Import to Complete: The import process may take some time, depending on the size of the PST file. Outlook will notify you once the import is complete.
STEP 4: Verify Imported Data
After the import process is complete, verify that all your data has been transferred correctly:
- Check Emails: Ensure all your emails are present in their respective folders.
- Check Contacts: Go to the contacts section and verify that all contacts have been imported.
- Check Calendar Events: Review your calendar to make sure all events have been transferred.
Professional Method
Using AxBlaze PST to OLM Converter for a Simplified Process
While the manual method is effective, using AxBlaze PST to OLM Converter can make the process even easier and more efficient. This tool is designed to handle the intricacies of PST to Mac Outlook conversion, providing a more streamlined experience. Here’s why you might consider using the AxBlaze Converter:
- Ease of Use: The professional tools often come with user-friendly interfaces that guide you through the import process step by step, making it accessible even for those with limited technical knowledge.
- Time-Saving (Batch Mode): The Batch mode of this tool can significantly reduce the time required to transfer data, especially for large or multiple PST files.
- Data Integrity: Reliable professional tools ensure that all your data, including emails, attachments, contacts, and calendar events, are accurately transferred without any loss or corruption.
- Additional Features: AxBlaze tools offer additional features like filtering specific data to import, converting email formats, and more, providing greater flexibility.
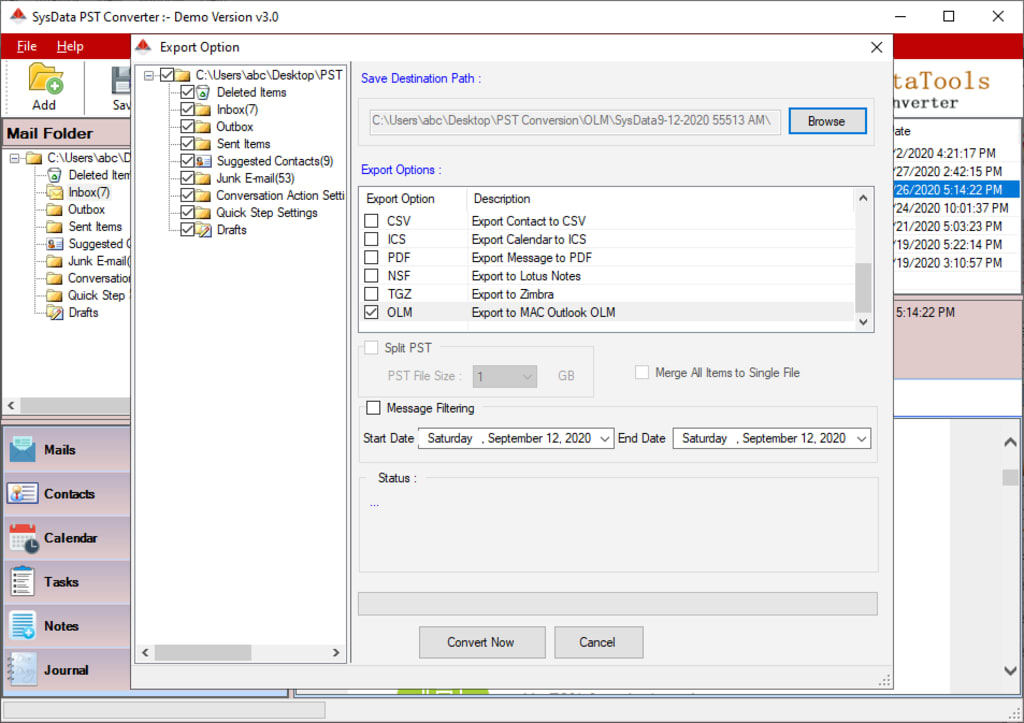
How to Use AxBlaze PST to OLM Converter
- Download and Install: Download the AxBlaze PST to OLM Converter (Download link: https://www.axblaze.com/products/dl/demo-pst-converter.exe) from the official website and install it on your Windows Machine.
- Launch the Tool: Open the tool and click the "Add" button from the menu.
- Select the PST File: Browse to the location of your PST file and select single or multiple PST file(s).
- Choose Destination Format: Select the format compatible with Mac Outlook (*.olm).
- Start the Conversion: Click the "Convert Now" to start the conversion process.
- Import into Mac Outlook: Once converted, you can import the OLM file into Mac Outlook using the import feature in Outlook.
Conclusion
Importing a PST file from Windows Outlook to Mac Outlook can be done manually or with the help of AxBlaze PST to OLM Converter. While the manual method works well, using a specialized tool can simplify the process, save time, and ensure data integrity. Choose the method that best suits your needs and technical comfort level to enjoy a smooth transition to Mac Outlook. Whether for work or personal use, these steps will help you migrate your data seamlessly.
Official Website: https://www.axblaze.com/pst/olm/
...
About the Creator
Franka Sommer
Franka Sommer, a tech researcher and content creator, excels in AI, cybersecurity, blockchain, and IoT. Franka's unique ability to simplify complex technical concepts makes her a trusted voice in the field.
Enjoyed the story? Support the Creator.
Subscribe for free to receive all their stories in your feed. You could also pledge your support or give them a one-off tip, letting them know you appreciate their work.
Keep reading
More stories from writers in Lifehack and other communities.


Comments
Franka Sommer is not accepting comments at the moment
Want to show your support? Send them a one-off tip.