

Questions About Online Invoicing With QuickBooks and How to Have Them Addressed
Receiving payment begins with an invoice. The tough element is how you generate, send, and collect on that invoice.
Numerous small firms utilise small business accounting software such as Intuit's QuickBooks Online (QBO) to automate and resolve these issues.
Nevertheless, if you're a QuickBooks user, you've undoubtedly discovered that some configuration is necessary prior to sending an invoice. To assist, we have compiled the definitive guide on QuickBooks Online invoicing.

In this QuickBooks Online invoicing guide you’ll learn:
- How to configure QuickBooks Online invoice settings
- How to create a QuickBooks Online invoice
- How to create a QuickBooks Online invoice from an estimate
- Anatomy of a QuickBooks Online Invoice
- How to edit a QuickBooks Online invoice template
- How to set up Quickbooks Online payments
- How to send QuickBooks Online invoice reminders
How to Configure QuickBooks Online Invoice Settings
Getting paid faster begins with establishing your QuickBooks Online invoice settings. Determine how much information you need to include on your invoices and sales forms as your first challenge.
See your Account and Settings by selecting the Gear Icon from the Quickbooks Dashboard. Here you will find all accessible fields and settings for invoicing and sales information.
Click Sales in Account and Settings to configure your invoice and sales form fields.
Available QuickBooks Online invoice fields include:
- Invoicing terms and conditions (Changes default conditions to "Net 30" or payment due 30 days after invoice creation by default.)
- Invoice delivery method (email or print hard copies)
- Shipping (Shipping fields are added to invoices and sales forms.)
- Custom fields (three fields are available for internal or public custom information)
- Custom transaction numbers (allows you to view and change transaction numbers)
- Service date (includes a service date field)
- Discount (Invoices and sales forms now have a discount field.)
- Deposit (Adds a deposit field to invoices and sales forms)
- Tips/Gratuity (Tipping and gratuity are added to invoices and sales forms.)
To change any or all of this information, click the pencil icon on the right. When you're finished, remember to click Save.
Additional QuickBooks Online Sales Settings
- Invoice payments (configure your credit card and ACH information)
- Products and services (show a product or service column, SKUs, price rules, quantity, price, rate, and inventory)
- Late fees (specify the default fee when an invoice is X days past late)
- Progress invoicing (create multiple partial invoices from a single statement)
- Messages (configure the default email sent with sales forms)
- Reminders (configure automatic and default email message for invoice reminders)
- Online delivery (email alternatives for all sales forms, such as an attachment in PDF format)
- Statements (shows aging table at bottom of the statement)
How to Create a QuickBooks Online Invoice
There are two ways to construct a QuickBooks Online invoice.
- Create a new invoice from scratch.
- Create and convert an estimate into an invoice.
Quick Start: How to Create a New QuickBooks Online Invoice
- Click + New and Invoice to create a new invoice.
- Select a customer.
- Enter customer email (if not already entered).
- Enter all necessary information for Product/Service, Description, QTY, Rate, Amount, and Tax.
- Enter an invoice message.
- Click Save and send.
- Quickbooks emails your invoice.
How to Create an Invoice from an Estimate
You are able to convert any estimate into an invoice. Also, you can opt to convert a portion or the complete estimate into an invoice. This is useful for billing progress on larger projects.
Quick Start: Convert an Estimate into an Invoice
- To find a current estimate, hover over Sales and click Customers.
- Choose a customer with an existing estimate by using the scroll bar.
- To open the estimate, click Estimate.
- To transform an estimate into an invoice, click Create invoice.
- Choose the portion of the estimate that will be billed.
- Choose Generate invoice from the menu.
How to Edit QuickBooks Online Invoice Templates
After configuring all the accessible fields for an invoice, you will need to modify its visual design. For invoices, estimates, and sales receipts, QuickBooks provides you with rather robust template-editing tools. But, you are restricted to a selection of template styles, fonts, and colours.
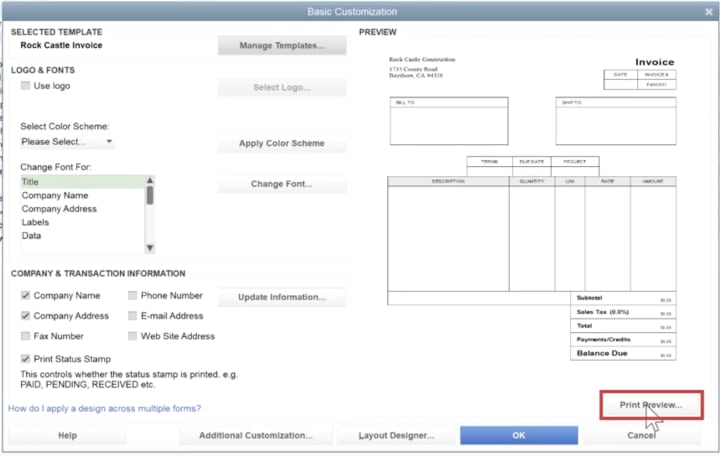
- Go to Custom Form Styles by clicking the Gear Icon.
- You will find a list of all Invoices, Estimates, and Sales Receipts on this page.
- Select an existing form to update it, or select New style to create a new form.
- Use the QuickBooks Online form builder to modify your invoice's layout.
- Use the Design tab to modify your logo, fonts, and colour scheme, as well as to apply templates.
- Use the Content tab to modify fields as they will appear to receivers of invoices.
- Use the Emails tab to modify the email sent to all invoice recipients.
How to Set Up Quickbooks Online Payments
Preparing and mailing your invoice constitutes the initial phase of the conflict. The second phase involves establishing a payment system. The good news is that QuickBooks can be configured to accept payments. This automatic process provides invoice recipients with a method of payment and cancels their invoices once the transaction is finalised.
- Click the Gear icon and select Account and Settings.
- Click Payments and then the Learn more button.
- Click Set up payments to get started.
- Enter your business information.
- Enter your business owner information.
- Select a bank account.
- Get paid straight from your invoice with a Pay Now button.
How To Send QuickBooks Online Invoice Reminders
You should send an overdue invoice reminder email when an invoice remains unpaid. You may send QuickBooks Online invoice reminders individually or in a batch.
- Select Invoices after clicking Sales.
- Select a single or multiple invoices.
- Click Actions in a batch.
- To send the bill, click Send.
- Click Send reminder to send a copy of the invoice with a payment reminder email.
- You'll see a message dialogue that lets you change your message before sending it to the customer by email.
Tips on how to work with QuickBooks invoices with ease
It’s possible to make your QuickBooks invoices recurring and receive payments on a recurring basis. Just hit the “Edit” button near the invoice, turn on the recurring option and select the frequency and date to start sending the invoice on a recurring basis. You can check our helpful guide on how to create and schedule recurring invoices.
Summary
By following the procedures outlined above, anyone may easily create and submit invoices in QuickBooks Online. Even with the conveniences of QuickBooks, sending and handling invoices can be tedious, especially if you have a large number of clients. There are other excellent alternatives to quickbooks, including online check writer, xero, etc.

About the Creator
Life Lessons: Wisdom from the Journey
Life is a journey, a winding path full of twists, turns, and unexpected detours. Along the way, we encounter joys, sorrows, triumphs, and setbacks. Through these experiences, we gain wisdom that shapes who we are and how we navigate the world. Here are some lessons I've learned along the way:
By Willow Peddy5 days ago in Journal


Comments
There are no comments for this story
Be the first to respond and start the conversation.