
How to Sign PowerShell Scripts Using a Code Signing Certificate?
Discover the Fundamentals and Easy-Step Process to Digitally Code Sign your PowerShell Scripts


PowerShell Code Signing is crucial and the best practice for business organisations using PowerShell scripts that helps to boost operational efficiency. Utilising code signing to sign your PowerShell scripts digitally allows enhanced security, verifying the script is from an authenticated, tamper-free source enabling user trust and they can safely download the signed script on their systems.
Businesses can effectively set up code signing by having their developers sign their scripts. This includes setting up a code signing certificate, installing the certificate authority on their devices, and ensuring their scripts are signed with the certificate’s private key. Additionally, they can integrate their code signing solution with their security protocols, such as anti-malware and antivirus programs.
Fundamentals and Process of Code Signing PowerShell Scripts
PowerShell code signing effectively keeps your scripts secure and prevents malicious actors from effectively mounting attacks. Organisations can ensure their scripts are securely signed and protected by following the best practices provided.
The process of code signing PowerShell Scripts begins with ensuring a checklist of some essential components which enables smooth signing process and safety of your scripts to be released or published.
1. Firstly, you need is a computer system based on the Windows 8.1 or greater version of Operation System(OS)
2. Download and Install Windows PowerShell of version 5.1 or greater on your system required for the signing process.
3. Finally, you require is the script for signing to be stored digitally in a folder.
Once you are ready with the above stated essential checklist, you can proceed with the actual PowerShell Code Signing Process as stated below through an easy-to-follow steps which makes the process time-saving and easy.
STEP 1: Obtain a Code Signing Certificate
The first step begins with obtaining the required code signing certificate from a reputed CA or authorised resellers available in the market.
Here, please make sure to select the appropriate code signing certificate like the PowerShell Script Code Signing Certificate which is highly suitable for digitally signing your PowerShell scripts.
Complete the purchase and validation process so that the PowerShell Code Signing Certificate will be issued to you from the respective Certificate Authority (CA).
STEP 2: Open and Start the Windows PowerShell
Approval from the administrator is required for PowerShell script signing. To launch PowerShell in administrative mode, follow the steps given below:
- Select Start to search for "PowerShell" in the search bar.
- You will find the “Windows PowerShell App” option there, click on it, and then select "Run as Administrator" as clearly highlighted in the below image.
STEP 3: Verification of your Code Signing Certificate
You may use the following methods using command to verify and view all your code signing certificates on your device.
1. The Changing Directory Method
cd Cert\CurrentUser\My
- Input “is,” then press Enter
2. The Single Command Method
- Enter the command as follows;
Get-ChildItem Cert:\CurrentUser\My
- Important Note: Make careful to substitute the example file path Cert:CurrentUser with your code signing certificate if it is located in a location other than "My."my on the right course.
For instance: Cert:\CurrentUser\-CodeSigningCert I have [0] such as Cert:LocalMachine-CodeSigningCert I have [2]
- All of your certificates will be listed on your PowerShell window as you press enter.
- Choose the certificate you want to make use of for the signing procedure right now. The certificate should be put into the $cert variable.
- The command that picks the certificate from the list (beginning at the top, which you will count as 0) might be used to do this. This command's output will resemble as per below;
$cert = (Get-ChildItem –Path Cert:\LocalMachine\My -CodeSigningCert)[4]
STEP 4: Digitally Code Signing Your PowerShell Scripts
After selecting a certificate, you can then begin signing your PowerShell scripts. Signing will involve an encryption technique to prove the authenticity of your code. This is a critical step, as malicious code could otherwise be run on a system.
Use the Set-Authenticode Signature command, which has the following syntax, to sign your PowerShell script;
Set-AuthenticodeSignature -FilePath SCRIPT_PATH -Certificate $cert
- Important Note: Use the path of your script in place of SCRIPT_PATH
- For instance, with a test script, here is how it appears;
Set-AuthenticodeSignature -FilePath C:\CodeSigningCertificate\example_powershell_script.ps1 -Certificate $cert
- Use the following command to sign your script and optionally include a timestamp to help your signature stay for longer time;
Set-AuthenticodeSignature -FilePath C:\CodeSigningCertificate\example_powershell_script.ps1 -Certificate $cert -TimeStampServer https://timestamp.certera.com
- Important Note: We have used “Certera” CA based time stamp server in the above command, but make sure to substitute your code signing certificate provider's time stamp server before executing the command. Usually, time stamp server data is available on the issuing CA's website
STEP 5: Verification and Authentication of PowerShell Script
Once you have signed your script, use the Certificate Validation Tool to verify its legitimacy. The quickest approach to determine if your script has been properly signed is determined by two alternative methods.
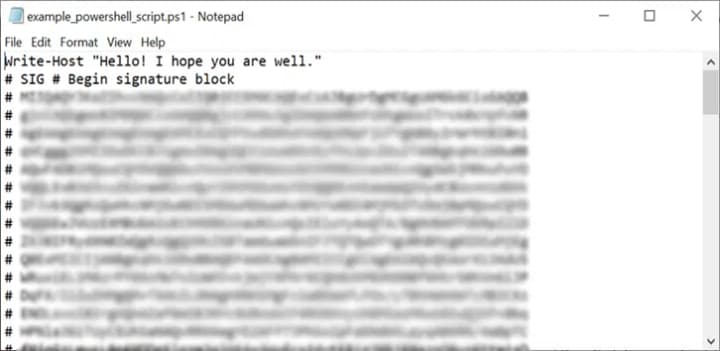
- Using Text Editor Option
- With a text editor open, access the script whereby the the signature block may be found at the end of the script and using # SIG # at the beginning and conclusion as per below image.
2. Using The Window Explorer Option
- Start your Window Explorer and go to the script's storage location.
- Choose the "Properties" option by right-clicking on the folder.
- Finally, select the tab for digital signatures.
- Thus, your digital signature verification is successful if you can see a signature with Name of the Signer, Algorithm Used and Time Stamping status from the list of digital signatures as highlighted in below image.
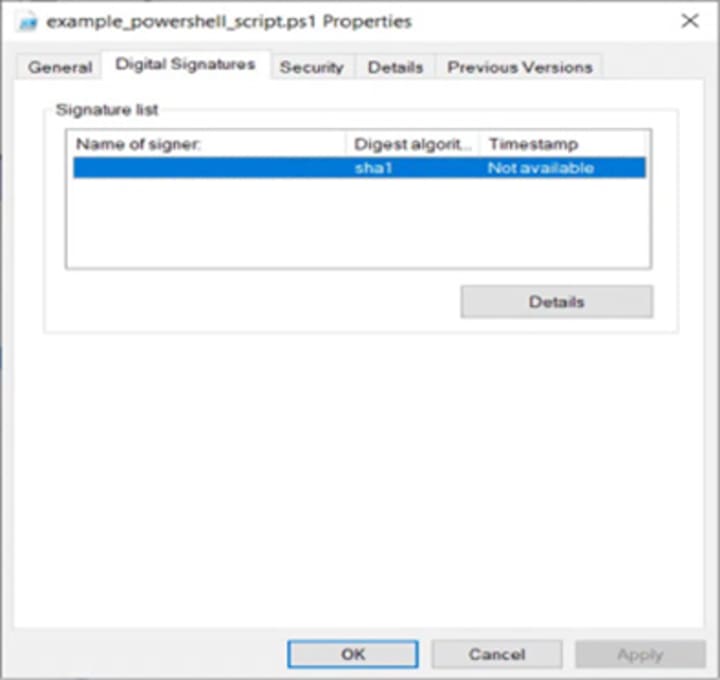
- Once you are able to see the digital signature of your signed script from the list, it means the digital signature is authenticated and verified and thus PowerShell scripts are appropriately code signed and your PowerShell Scripts are appropriately code signed.
Conclusion
To sum up, implementing practice to digitally sign your PowerShell scripts using a code signing certificate ensures their safety and security from cyber threats and also verifies their source to be legitimate, which helps boost user trust and increase brand reputation in the market.
About the Creator
Anna Shipman
Anna Shipman is a Cyber Security Consultant with a strong technical background and experience with a high analytical skillset. She has been involved in the information security industry for more than a decade.
Keep reading
More stories from Anna Shipman and writers in Geeks and other communities.
What Is Token Signing and Its Role in Code Signing Process
A token-signing certificate is a quick and straightforward approach to determining whether your private key has been compromised. Or tampered with and also helps to safeguard your online transactions and conversations. The procedures for issuing a token signing certificate from Certificate Authorities (CAs) are different as per the CA process.
By Anna Shipman9 months ago in Geeks
Spellbound (1945)
As part of my ongoing ambition to be a 1940s screenwriter, I have re-watched Hitchcock’s Spellbound. Of course, he is the master of suspense. During the 1940s and 1950s Hitchcock used his years of experience in the film industry to direct some of the most thrilling and frightening films of the era. They are full of heightened emotions, conflict and twisted plot-lines.
By Rachel Robbins3 days ago in Geeks


Comments
Anna Shipman is not accepting comments at the moment
Want to show your support? Send them a one-off tip.