
Optimum Email Settings For Desktop, iPhone or Android
Optimum Email 1(888)-715-9141 Settings For Desktop, iPhone or Android
OPTIMUM.NET is quite famous for its hassle-free email services. Nowadays, all the email service providers have gained a good amount of customer base, which results in more server issues, issues, and network slowdowns due to traffic. But OPTIMUM.NET email is free from all these problems. You will never encounter any server issues or network slowdowns with OPTIMUM.NET email. An OPTIMUM.NET email account can be set up on various email client platforms and devices. In order to use OPTIMUM.NET email services on any device or email client platform without any problems, you must configure your OPTIMUM.NET email account based on the correct OPTIMUM email settings. And this article is just about that.
Now, we need to go ahead and find below the table that highlights all the OPTIMUM email settings required for the successful setup of an OPTIMUM.NET email account. You simply have to follow all the steps and settings given below as described.
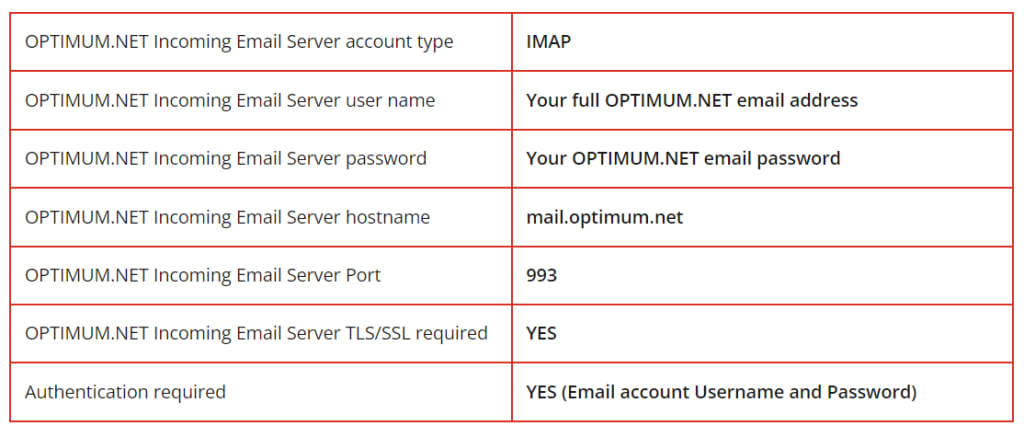
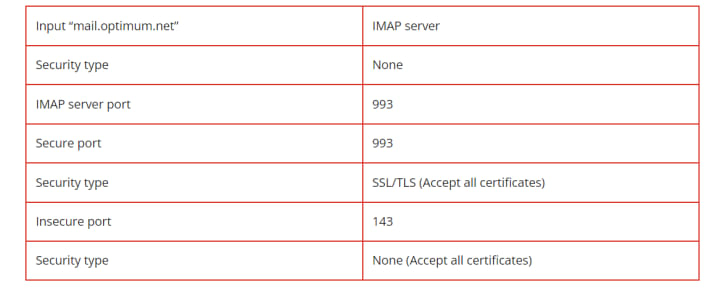
OPTIMUM.NET IMAP configuration (incoming mail server)
The IMAP server configuration is necessary in the process of activating the incoming mail services of your email account. The OPTIMUM.NET IMAP settings to be entered by the user are listed below and these server settings will allow activation of incoming mail services on any OPTIMUM.NET email account.
OPTIMUM.NET IMAP configurationYou should be able to receive emails without any problem in your OPTIMUM.NET email inbox after following the OPTIMUM.NET IMAP settings mentioned above.
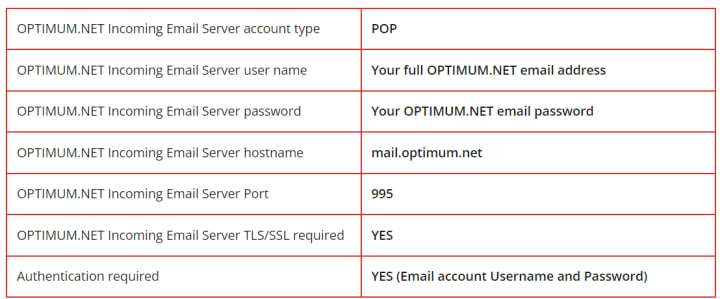
OPTIMUM.NET POP (incoming mail server) configuration
The user has the option to continue with the IMAP server or the POP server to be used for incoming OPTIMUM.NET mail services. You have to choose according to your needs and preferences. So, in the case of OPTIMUM.NET POP settings, enter and use the server settings as described in the table below.
OPTIMUM.NET POP (incoming mail server)The above mentioned
OPTIMUM.NET POP setup makes it easy to set up your email account as a POP account and now enjoy incoming OPTIMUM mail services without any hassle.
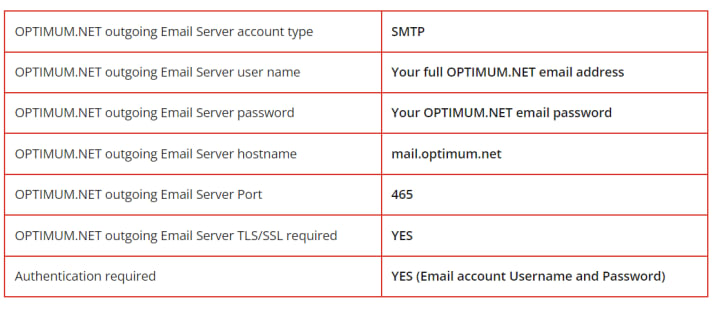
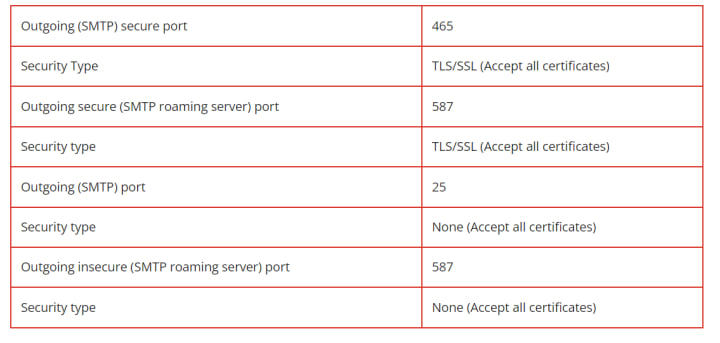
OPTIMUM.NET SMTP configuration (outgoing mail server)
The IMAP or POP server settings are used for the activation of incoming mail services, but you must use the correct OPTIMUM.NET SMTP settings as mentioned below in the table if you want to send email to your friends, family, colleagues, etc.
OPTIMUM.NET SMTP configurationIf you have applied all the OPTIMUM.NET SMTP settings mentioned above, then your account is already set up. You can send emails to anyone through your OPTIMUM.NET email account without any hassle or problem.
OPTIMUM Email Setup for Outlook (Auto Setup)
Are you looking for OPTIMUM email setup for Outlook to set up your OPTIMUM.NET email account? No problem, all the required OPTIMUM email settings for Outlook that will help you set up your OPTIMUM email account in Outlook are listed below step by step.
Step 1 - First of all, you need to open the Outlook program on your system.
Step 2- Now select the Tools option from the available menu items.
Step 3- Click on "Account Settings".
Step 4- On the Accounts setup page, go to the email tab and then click "New".
Step 5- Select the option of "Microsoft Exchange, IMAP, POP3 or HTTP".
Step 6 - You have to enter the necessary details/information such as your name, full email address and password in the respective fields and then click on the "Next" button.
Step 7- Now the Outlook program will configure your OPTIMUM.NET email account based on the automatic IMAP configuration.
Step 8- In the end, you just have to click on the "Finish" button and then on "Close".
In this way, you can easily set up an OPTIMUM email account in Outlook. When you follow all the above-mentioned steps in succession, the OPTIMUM email settings required for Outlook are automatically applied and you are ready to go ahead and use OPTIMUM.NET email services through your Outlook account.
OPTIMUM Email Setup for Outlook (Manual Setup)
Please find below the steps outlining all the important OPTIMUM email settings for Outlook, after which anyone can set up an OPTIMUM email account. Follow the simple steps below and enjoy OPTIMUM.NET email services in your Outlook account.
Step 1 - First of all, you need to open the Outlook program on your system.
Step 2- Now click on the "Tools" option which is available on the menu bar.
Step 3- Select the "Account Settings" option.
Step 4- Find and click on the email tab found on the Account Settings page and then click on the "New" option.
Step 5 - Select the option of "Microsoft Exchange, POP3, IMAP or HTTP" and then press the "Next" button.
Step 6 - You need to check the checkbox that says "Manually configured server settings or additional server types" and then simply click on the "Next" button.
Step 7- Choose the "Internet Email" option and then click the "Next" button.
Step 8- Now you have to fill all the necessary details in the respective field boxes as per your selection of IMAP or POP server and then click on "More settings" option.
Step 9 - Go to the outgoing server tab and make sure the checkboxes that say "My outgoing (SMTP) server requires authentication" and "Use the same settings as my incoming mail server" are checked.
Step 10 - Now go to the Advanced tab and make sure the server settings are as below according to your selection of IMAP or POP server.
OPTIMUM Email Setup for Outlook OPTIMUM.NET IMAP settings
OPTIMUM.NET IMAP settingsBe sure to check the "This service requires a secure connection (SSL)" checkbox for both incoming and outgoing mail if you want to enable secure SSL/TLS settings.
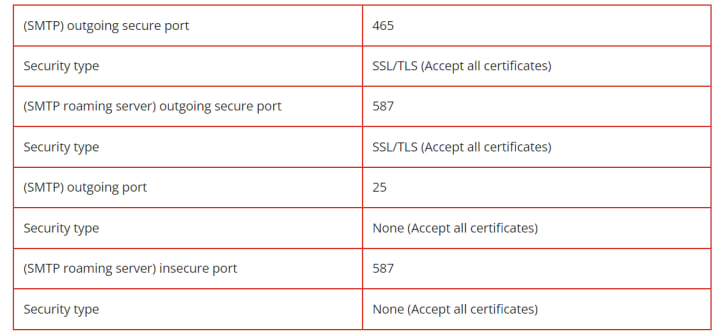
OPTIMUM.NET SMTP settings
Step 11- Now, you need to hit the "OK" button to save and apply the above-mentioned server settings.
Step 12- At the end, you need to click on the "Next" button and then click on "Finish" to finish the account setup process.
Magnificent! You have successfully set up your OPTIMUM.NET email account in Outlook based on the correct OPTIMUM email settings. Start sending emails through Outlook using your OPTIMUM email account. All versions of Outlook that you may use on your device will require the same server settings above for the successful setup of your OPTIMUM email account in Outlook.
OPTIMUM Email Setup for iPhone
Most of the users trying to set up their OPTIMUM.NET email account on their iOS devices get confused regarding the required OPTIMUM email setup for iPhone. But no need to worry, just check out the guide below and be informed of all the appropriate server settings that need to be applied to your email account. Also, find below the other essential steps along with the correct OPTIMUM email setup for iPhone to properly set up your OPTIMUM.NET email account on iPhon
Step 1- First of all, you need to go to the settings of your iPhone.
Step 2- Now, you need to click on the "Mail" option.
Step 3- Click on the "Accounts" option.
Step 4- Select the "Add Account" option.
Step 5- Now, you need to select the "Other" option from the available options in the menu.
Step 6- Click on the "Add email account" option.
Step 7 - Now you need to fill all the necessary information/details like your name, full email address and the password in the provided field boxes and then just hit the "Next" button.
Step 8- You must choose between the "POP" or "IMAP" server according to your preferences and requirements.
Step 9 - If you want to proceed with the POP server, please enter and apply the server settings as below in the section of incoming mail server and outgoing mail server and then press the "Next" button.
- Fill in the full email address in the place of Username. The username and password will remain the same for the incoming and outgoing mail servers.
- Enter "mail.optimum.net" instead of the hostname of the incoming mail server.
- Enter "mail.optimum.net" instead of the outgoing mail server hostname.
- You can also choose to continue with the IMAP server instead of the POP server and then enter the server settings as follows:
- Make sure your OPTIMUM.NET email address is filled in instead of username. The username and password will remain the same for the incoming and outgoing mail servers.
- Enter "mail.optimum.net" instead of the hostname of the incoming mail server.
- Enter "mail.optimum.net" in place of the outgoing mail server.
Step 10- You will now see a prompt message on your iPhone screen asking for verification of incoming and outgoing server details. You just need to click the "Continue" button for both incoming and outgoing servers or just click "Details" and then click "Trust".
Step 11- Now you need to click on the "Save" button to apply the above mentioned server settings.
Step 12- Select the newly created account.
Step 13- Choose the "SMTP Server" option.
Sep 14 - Make sure you have entered the SMTP server settings as mentioned below and then hit the "Done" button.
- The outgoing mail server host name should be set to "mail.optimum.net".
- Your full email address should be filled in instead of the username.
- The password of your email account must be filled in the place of the password.
You can enable or disable SSL and then enter the server port settings as below.
OPTIMUM Email Setup for iPhone At the end, you need to select the option of "Password" for authentication purpose.
Excellent! You are done with all the necessary steps to ensure that your OPTIMUM.NET email account has been set up correctly on your iPhone. Through the above-mentioned steps, all the correct OPTIMUM iPhone email settings will be applied automatically and you won't have any difficulties while sending or receiving emails.
OPTIMUM email setup for Android
If you want to set up your OPTIMUM email account on your Android device, you need to consider and proceed with the correct OPTIMUM email setup for Android. The steps below will help you through the required procedure to set up your OPTIMUM email account on Android device with ease.
Step 1 - First of all, you need to look for the Mail icon which is available in the app drawer menu of your Android device and simply click on it.
Step 2 - Now, you have to fill in all the necessary information/details like your full email address and password in the fields provided.
Step 3- Click on the "Manual Settings" option.
Step 4 - You can always go ahead with IMAP or POP server for incoming mail server based on your preferences and requirements.
Step 5 - Now, if you have thought about selecting the IMAP server for incoming mails, then you need to go in and apply the IMAP server settings as mentioned below:
- OPTIMUM email setup for AndroidYou can also select POP server instead of IMAP server for incoming mails and then enter POP server settings as below.
- OPTIMUM email setup for AndroidStep 6 - After you finish entering the server settings as above, based on your IMAP or POP server selection, just click the "Next" button.
Step 7- Now, you need to enter and apply the outgoing SMTP server settings as mentioned below and then click on the "Next" button.
- Enter "mail.optimum.net" instead of the SMTP server.
- You must set the security type to None.
- You need to set the SMTP server port to 465. Below are the general SMTP server settings.
Step 8- In the end, you need to click on the "Done" button to finish the account setup.
Congratulations! You are ready to go now. Experience OPTIMUM email services on your Android device without hassle. Smartphones have really made our lives easier, enjoy the ease of accessing and responding to emails on the go.
We hope you found the above information about OPTIMUM email setup for Outlook, iPhone and Android helpful and you were able to set up your OPTIMUM.NET email account without encountering any issues. Happy emailing!
Still not sure about OPTIMUM email setup or need more help? Don't worry, get all the necessary help and assistance in a few minutes. Our technical team will solve all your problems or queries related to email configuration. We are available 24/7 with the in-house team of technical experts just for you, all you need to do is raise your query/issue with our technical experts via a live chat service or give us a call.
We are here to eliminate confusion and queries for all users. So, we have covered a similar in-depth guide for users who are looking for Rocketmail.com email setup or SUREWEST.NET email server setup to set up their SUREWEST or Rocketmail.com email account on various email client devices and platforms. Just go through the detailed guide and set up your SUREWEST or Rocketmail.com email account correctly.
Source Url: https://medium.com/@jonismutuu/optimum-email-settings-for-desktop-iphone-or-android-50a27c528f2e
About the Creator
Keep reading
More stories from printerhelpline and writers in Gamers and other communities.
Sasktel.Net Email Settings IMAP & POP
Sasktel.Net Email Settings IMAP & POP Sasktel.Net is a renowned email service provider that has been in business since 1908. It has always been known for providing quality email services. You will encounter the fewest problems and server issues with Sasktel.Net email and is therefore the best option for many users around the world. Now, when you have decided to opt for Sasktel.Net email services, you need to set up your Sasktel email account based on the correct Sasktel.Net email settings. Sasktel.Net mail settings are of great importance as you will not be able to send/receive emails without applying them correctly.
By printerhelpline11 months ago in Education


Comments
There are no comments for this story
Be the first to respond and start the conversation.