
Building a Scalable WebRTC MCU Media Server with FreeSWITCH
Setting Up a WebRTC MCU Media Server with FreeSWITCH: A Complete Guide

The need for efficient media servers is growing because virtual meetings, video conferencing, and online collaboration are becoming more common. Businesses need real-time communication that works well, even with many people involved.
WebRTC is a great technology for making video conferencing possible directly in web browsers. You can use FreeSWITCH, an open-source platform for managing phone calls, to create a WebRTC Multipoint Control Unit (MCU) media server. This helps handle many virtual interactions efficiently.
Understanding a WebRTC MCU Media Server
A WebRTC MCU media server allows real-time communication in areas like remote work, healthcare provided remotely (telehealth), online education, and social networks. Instead of using a peer-to-peer (P2P) setup, an MCU server acts like a central point. It takes media streams from everyone involved, processes them, and sends a single combined stream back to each user. This uses less bandwidth for each user but requires more processing power from the server.
Why Choose FreeSWITCH for a WebRTC MCU?
FreeSWITCH is a flexible and adaptable open-source communication platform. Here’s why it’s a good choice for a WebRTC MCU server:
- Open-Source and Customizable — WebRTC Developers can change and improve FreeSWITCH to fit specific communication needs.
- Modular Design — You can choose only the necessary modules, which saves resources.
- Comprehensive Features — It has built-in features like secure communication methods, conferencing, and media processing.
- Cost-Effective — It’s a strong alternative to paid MCU solutions without needing to pay for licenses.
Prerequisites for Setting Up FreeSWITCH as a WebRTC MCU Server
Before setting up FreeSWITCH, make sure you have:
- A Linux-based server with enough hardware resources.
- FreeSWITCH is installed and running.
- SSL certificates for secure WebRTC connections.
- Basic knowledge of FreeSWITCH, SIP, and WebRTC.
Step-by-Step Configuration Guide
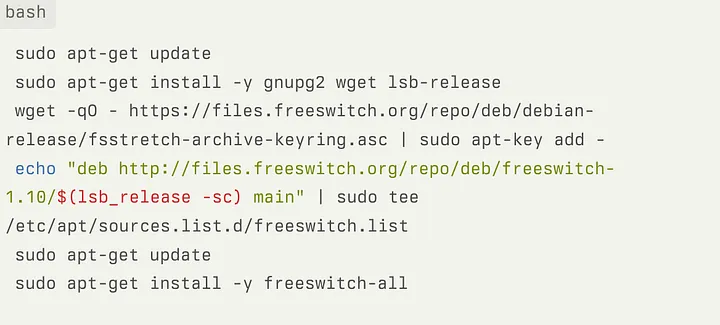
1. Install FreeSWITCH
Make sure your server meets the requirements and install FreeSWITCH with the following commands:
2. Configure SIP Profiles for WebRTC
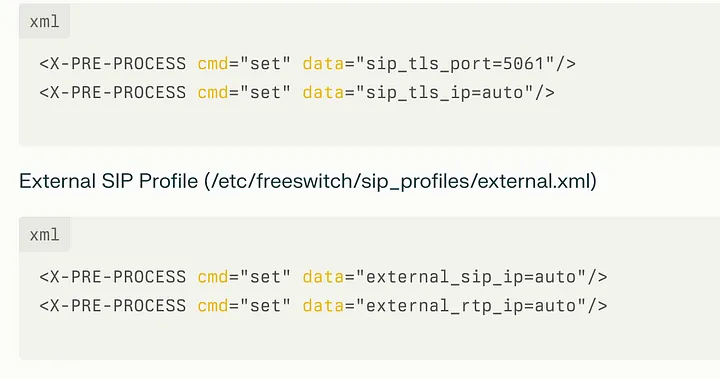
Modify SIP profiles to support WebRTC.
Internal SIP Profile (/etc/freeswitch/sip_profiles/internal.xml)
3. Enable WebRTC Support
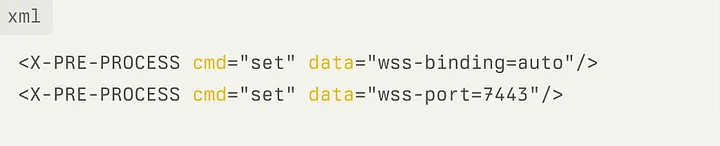
Modify vars.xml to enable WebSocket Secure (WSS):
4. Set Up SSL for Secure WebRTC Connections
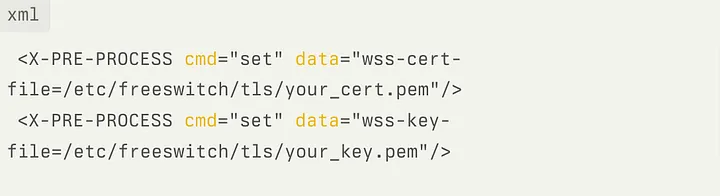
Obtain SSL certificates from a trusted CA.
Store them in /etc/freeswitch/tls/.
Update vars.xml to reference the certificates:
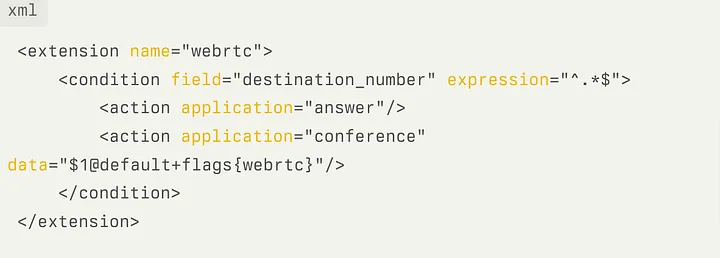
5. Define a Dial Plan for WebRTC Calls
Modify default.xml to support WebRTC conferencing:
6. Configure Conference Profiles
Edit conference.conf.xml to optimize WebRTC settings:

7. Restart FreeSWITCH and Test
Restart FreeSWITCH to apply the changes:
Use a WebRTC client to test your setup, ensuring clear audio and stable connections.
Advanced Enhancements
Once your WebRTC MCU is operational, consider these optimizations:
- Load Balancing — Spread media processing across multiple servers.
- Custom Dial Plans — Set up routing for specific situations.
- Enhanced Security — Use SRTP, authentication, and rate limiting.
- Scalability Improvements — Improve codecs (Opus, VP8) and use hardware accelatieron.
By following this guide, you can create a WebRTC MCU media server using FreeSWITCH that can handle a lot of users. This improves your real-time communication setup, ensuring efficient and high-quality virtual interactions.
To know more visit: https://www.hirevoipdeveloper.com/blog/configure-freeswitch-as-webrtc-mcu-server/
About the Creator
Enjoyed the story? Support the Creator.
Subscribe for free to receive all their stories in your feed.
Comments
There are no comments for this story
Be the first to respond and start the conversation.