


The novice cultivator would do best to work with Stropharia cubensis Earle, sometimes rendered Psilocybe cubensis (Earle) Singer. Not only because spores of this species are so easy to obtain, but many strains of it will consistently produce mushrooms on a wide range of substrates, especially the agars, rye grain, and various composts.
The tools include:
- Pressure cooker or use of an autoclave for sterilizing substrates (grains and composts) in their containers
- Scalpel or a similar cutting and impaling device—with an alcohol lamp to flame sterilize it
- Electric scale
- Disinfectant gloves
- Sterile place such as an inoculating hood in which one may perform the operations
- Compost
Wide mouth mason jars are used in this procedure as mini-environmental chambers, for which they are ideally suited. They and their contents are easy to sterilize—they seldom crack and never melt. The lids can be quickly removed for sterile inoculation, and also permit air to pass through without introducing contaminants. Because they are made from transparent glass, observation of mycelial growth is unimpaired.
Experience has shown that widemouthed mason jars are the best. As far as size is concerned, most growers prefer the widemouthed quart or the “tapered” pint.
When purchasing rye, or any grain used in this procedure, one should be sure to obtain only an organic produce suitable for human consumption. Much of grain obtained at animal feed stores contain fungicides. When used in this procedure, rye grain is mixed with water at a two to three ratio.
Milo, rye grass seed, and birdseed are feasible substitutes. Triticale, wheat, and barley do not produce as well. Both brown (long & short grain) and white rice have been used with some success.
Other psilocybin species, and even some strains may grow more vigorously on these other grains than on rye.
Preparing Jars for Sterilization
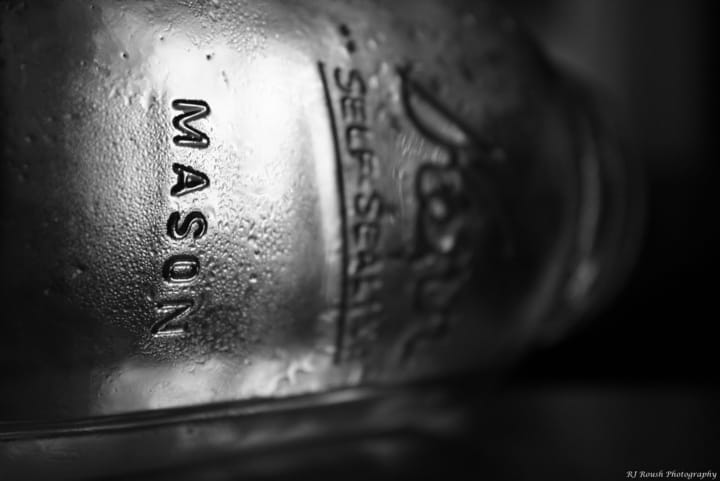
RJ Roush Photography
Remove the lid of a clean quart mason jar and note that it is made up of two parts: the dome, and the screw on ring that secures it. Weigh out and pour into the jar 100 gm (a little under 3 oz or a half a cup) of grain. To this add 150 milliliters (5 fluid oz) of water (preferably distilled). Place the dome lid INVERTED on top of the rim of the jar so that the seal faces upward (and will not adhere to the glass). Then, screw on the ring so that it is about a third of a turn shy of being tight. When using tapered pint mason jars, the amount of both the rye and water should be cut in half. Some like to use a little more substrate in these smaller jars, i.e. 60 gm of rye to 90 gm of water. The reasons for not using a greater volume of grain will be discussed later.
Following these directions, make up only as many jars as will fit into your pressure cooker. Rye grain will sprout if left in contact with water. When sterilized, these sprouts degenerate into a mushy substance which is unsuitable for our purposes.
Before loading the pressure cooker, make sure that there is at least a half-inch of water between the bottom of the cooker and the grid. Furthermore, no part of a jar should be in contact with the bottom of the cooker, or a regrettable mess will occur during sterilization. The jars should be upright, or almost so. Otherwise, they may lose water through the unsealed lids.
Attach the lid to the cooker, making certain both that the seal is complete, and that the lid is well fastened down. Place the heat source on, and open the stopcock. When a steady stream of steam billows forth, close the stopcock and watch the pressure gauge carefully while the pressure increases. Taper off the heat as the pressure gauge needle approaches the 16 pounds per square inch mark. By adjusting the heat source, maintain a constant pressure between 15 and 19 pounds per square inch for 45 minutes. After that, turn off the heat source and allow the cooker to depressurize and cool down. This may take from 30 minutes to one hour. When the pressure is reduced to between zero and one pounds per square inch, open the stopcock to allow exhalation of steam and remove the lid. You will note that the grain has greatly expanded. Using a hot-pad or asbestos gloves, remove the jars one at a time, checking them for cracks. You will find that the grain forms lumps at the bottom of the jar. These can be broken down and the moisture more evenly distributed by shaking.
Now place the steaming, hissing jars in a reasonably sterile place such as an inoculating hood (literally a large plastic storage, like you might store clothing in for the winter), so that they can cool off without becoming covered with spores. When the cooling jars have reached a little above room temperature (not more than 80°F), they become ready to inoculate.
The reader might wonder at this point why the jars are not filled to capacity. The answer is that ambient air space is needed, to allow both an intake and an exhaust flow of air during the growth period. Otherwise, anaerobic bacterial contamination will set in and wreak havoc among the jars. Remember that mycelium is a living thing, and that beside a food source, it needs both fresh air and a way to dispose of exhaust gases.
Many manuals have recommended the use of this buffer in conjunction with grains—especially rye. I have used it in both the finely crushed oyster shell form and the gypsum. I obtained better yields, however, without the addition of these substances.
All inoculations must be performed in an area made as sterile as possible. A disinfectant-sprayed “inoculating hood” would be ideal but a closed-off draftless room (presprayed with a disinfectant to knock the spores out of the air) would be sufficient. When working without an inoculating hood, all operations should be performed wearing a surgeon’s mask or a bandana covering both the nose and the mouth. In both cases, the inoculator would do best to wear thin latex gloves sprayed with a disinfectant. Caution should be exercised when using pressurized sprays because they are flammable for a few minutes after spraying. Water soluble disinfectants sprayed from a normal pump-type plastic spray gun do not have this explosive drawback.
In the sterile environment, arrange the cooling jars so that they are within easy reach. In front of these jars, place an alcohol lamp, a petri dish containing mycelium, and a scalpel. Light the lamp and flame-sterilize the scalpel, including the part of the handle that is close to the blade. Then heat the blade until it is red hot. At an angle, open the cover of the petri dish, with the now sterile scalpel, incise, spear, and withdraw a “plug” of mycelium covered agar. Deftly replace the petri dish cover, and with the now free hand unscrew the mason jar lid only enough to allow the impaled plug entry into the jar. Shake the plug off the end of the scalpel blade, remove it and replace the lid—again screwed on to a quarter shy of tight, to allow air exchange. Make sure that the plug is in contact with the grain, and not stuck on the lid or the glass above the grain. This procedure should be repeated for the rest of the jars, which should then be stored at room temperature.
An inoculating procedure similar to the syringe technique for germinating spores in petri dishes may be substituted for the one described above. The syringe should be able to contain at least 5cc of water. The needle should be at least an inch long, and large enough to allow pieces of mycelium to flow through. Sterilize the needle, syringe and some distilled water. After the water and the syringe have cooled down, draw up about 5cc of water into the syringe. Crack open a petri dish and inject water over the whole mycelial mat. Break up the mycelium with the needle, and then draw it up with the water back into the syringe. This water-borne mycelium is then used to inoculate both dishes or jars, by simply introducing a few drops onto the substrates within them. Under sterile conditions, the parent dish can be used many times.
In order to better distribute both mycelium and water throughout the grain, jars should be vigorously shaken directly after inoculation or within a few days. Jars should be shaken every three days, up to the ninth or twelfth day after inoculation. Too much shaking will cause the grain to dry out, drastically hindering mycelial growth. Often the complete permeation of the grain is hindered by wet wads of grain, lacking mycelial coverage, wedged at the bottom of the jar. These may be removed by tapping the jar with the heel of one’s hand or with a rubber hammer. At least one intrepid cultivator uses a paint shaker to perform this task.
Many of the same contaminants that show up in petri dishes become a nuisance at this stage. The most common are the “bread” moulds, and the “slimy” anaerobic bacteria that has a distinct aroma, resembling rotten apples. When such contamination occurs, IMMEDIATELY either re-sterilize the jar and discard the contents, or throw out the whole jar. Not only can contaminants spread very quickly from one jar to another, but there is also evidence that some of these contaminants may be producing carcinogens. This should not discourage the prospective cultivator, but should encourage him to be ever so vigilant.
To Case or Not to Case
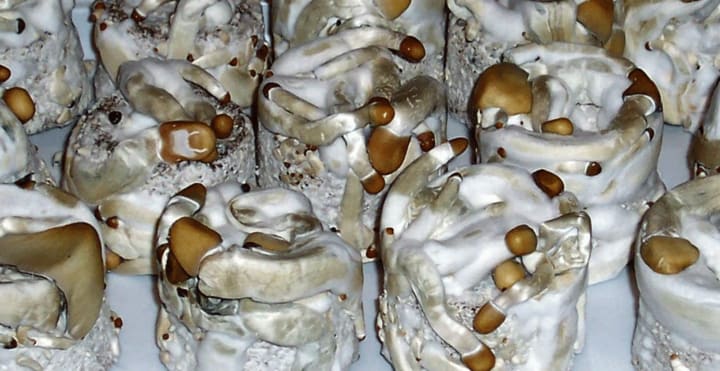
Within ten to fifteen days, the grain will be totally permeated by the mycelium. If the production of mushrooms within the jar is desired, there are two ways to go: either to leave the jar alone at room temperature, or to “case” it with a soil.
Jars left uncased usually form mushrooms within a month. There are usually only a few flushes, because the grain dries out unless kept in a very humid environment. If spraying uncased jars or keeping them in a highly humidified place, be certain to drain the water that often forms around the base of the substrate at the bottom of the jar. If water displaces the air, the mycelium will literally “drown,” causing contaminants to set in.
Although this method continually produces small yields, it does have its adherents, particularly when rice is substituted for rye. But long and short grain brown rice should be used in the ratio of 5 parts rice to 8 parts water, sterilized and inoculated. (The author has found rice particularly hard to work with. It is lumpy and often takes months for complete mycelial coverage, and to make matters worse it produces piddling yields when it finally fruits.)
“Casing,” then, is the way to go. “Casing” involves placing a layer of soil over the fluffy-white mycelium covered grain. A good casing soil will have many functions. It will be nutrient-poor, and thus attracts no contaminants. It keeps in needed humidity but is not so heavy as to deprive the culture of oxygen. Furthermore, it acts as a buffer zone where mushrooms can develop and be picked without damaging the grain.
An effective casing soil recipe is:
- 4 parts peat moss
- 2 parts fine sand
- 2 parts perlite or vermiculite
- 1 part ground chalk or ground oyster shell powder
Potting soil will work in a pinch, but in general the above mixture produces better yields.
There is some difference of opinion over whether or not the casing soil should be sterilized before casing. Try it without sterilization first, and if that contaminates by all means sterilize.
To case, simply remove the lid of the mason jar and spoon in some of the well-mixed ingredients. When using S. cubensis, case from a third to two-thirds of an inch thick.
Casing soil can also be applied “wet” (or more descriptively, “damp”). The rule of thumb is that when it is applied, it should not be so wet as to cause water to run down the insides of the jar between the glass and the culture.
When the soil has been applied to all of the jars, they should be placed in some kind of container, which should be kept at room temperature or a little above and which will both allow replacement of fresh air and keep in much-needed humidity. Light is important, too. Unlike commercial mushrooms, these are heliotropic and will not grow well without it. A good environmental chamber is absolutely essential. Jars may be kept with their lids on (to keep in humidity) for a few days only, for they tend to contaminate quickly without adequate air circulation.
Oss and Oeric in Psilocybin: Magic Mushroom Grower’s Guide (the authoritative text on the subject) recommend making such chambers out of styrofoam boxes, with the lid cut out and replaced with plastic. A commercial ice chest will work admirably, and aquariums, although expensive, are excellent.
Keeping Moist

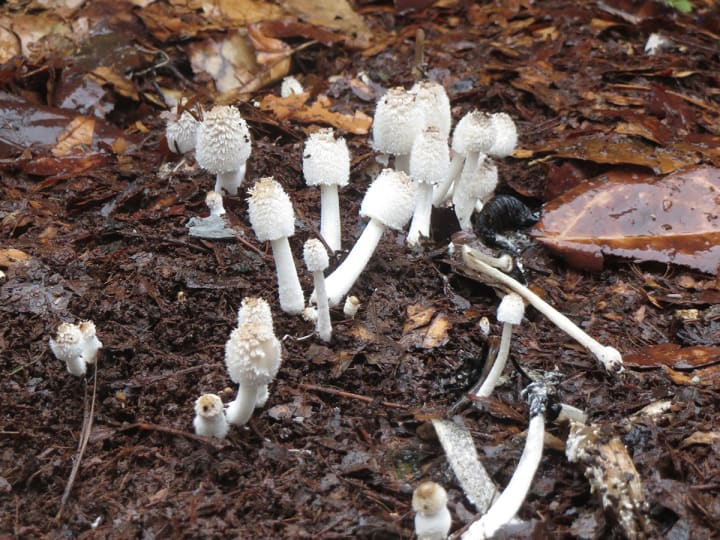
Once inside the environmental chamber, the jars should be sprayed daily to make the casing soil moist but not wet to the touch. Within a period of from two to three weeks, the mycelium pushes its way through the casing soil, forming primordia or “pinheads.” (Remember, we saw these before on the agar dishes.) They are the initial stages of mushrooms. Within a few days some will mature, their caps opening up, stretching and breaking the veils, which turn purple-black with the thousands of spores dropped upon them. Most experienced growers prefer to harvest their mushrooms just as the veil breaks, thus avoiding the heavy black spore deposits that smudge the ivory-colored stems. Dried mushrooms are easier to handle when the cap is still conical. because they break less.
The first flush usually consists of from twenty to fifty wet grams (two to five dry grams after drying). The second flush should appear within a week of the first. Usually, it is the largest flush. The third and subsequent flushes appear at weekly intervals for one to two months, tapering off in amount with each successive flush. A mason jar under optimum conditions that contains a 100 gm rye substrate should produce at least 200 Wet grams.
Even with daily spraying, the mycelium may not be getting enough moisture and may lose humidity rapidly from the surface of the substrate that pulls away from the sides of the jar as it shrinks. There are two remedies for this: recasing or flushing with water. Recasing involves casing not only the top again, but the shrunken sides as well. It has two disadvantages: 1) the mycelium expended in growing through the soil could be better used as actual mushroom mycelium; 2) sometimes casing gets compacted and cuts off air from the lower part of the culture which causes contamination.
Immersing in lukewarm water should be done only once or twice, because both psilocybin and psilocin are water soluble and some of it would secrete out of the mycelium. To immerse, simply fill the jar with lukewarm water. The substrate will probably float to the top of the jar, engorging itself with water. This should not be left more than a couple of hours, then turned over and completely drained. As much as 80 gram flushes have followed from this.
Mushrooms will often form at the bottom of a quart jar, where they mature and rot. Because of their position, they cannot be picked without destroying the jar and/or the substrate. However, these often can be swilled or washed out, using the water immersion technique. Because of their conical shape, tapered pint jars can be cured of “subcasing fruiting” by simply inverting and removing the jar from the culture, removing the mushrooms, and replacing the culture back in the jar.
There are many variations on the grain theme. Many large mushrooms can be obtained by placing substrates, whole or crumbled, into larger containers and then casing. Pyrex dishes work quite well because of their transparency. Before placing in the mycelium, the dish is washed and then covered with a layer of vermiculite or perlite. Then the mycelium-covered substrates are placed in the dish, either in mounds or crumbled, to form one solid mass.
Whether to crumble or not depends on what kind of mason jar the culture is contained within. The substrates from tapered pint jars shake out easily in one solid piece. In case of quarts, however, the circumference of the opening is smaller than that of the grain and it must be at least partially crumbled before removing. Grain should be well-covered with mycelium before removing it from the mason jars. It is wise to wait at least a week after the time one would normally case.
After the dish has been filled with grain, it should be covered with Saran Wrap to keep in humidity until the mycelium looks vigorous and able to be cased. This may take up to a week. This should be cased to the same thickness as the regular jars, sprayed daily, and placed in an “environmental chamber.” Using this technique, I have found that although slightly less weight of mushrooms was produced, the mushrooms were generally larger.
Compost
There are many composts that can be used for cultivation. In order to fruit many species other than S. cubensis, composts are absolutely essential. Most strains of S. cubensis fruit excellently on composts.
The preparation of the various composts is beyond the scope of this article, and no attempt will be made to explain it. Furthermore, composting requires much space, making it a high visibility project.
However, already composted cow, horse, or synthetic dung of uncertain quality can be obtained at ridiculous prices from mountebanks advertising in various magazines. Unfortunately, many of the composts offered have been sitting around in Baggies waiting to be sold. Often they become contaminated or dry out before they are sold.
Such compost is best used in mason jars. If the compost is water-saturated and relatively fresh, it can be sterilized as is. Otherwise it can be dried out completely and about three parts water added to one part compost (by weight). Jars prepared either way may be inoculated and cased the same way as with grain.
When using this technique with S. cubensis and two “commercial” composts as substrates, I found, to my dismay, that I got less than a fifth of the yield obtained with the same amount of rye substrate. Such “commercial” composts should only be used as a last resort, but this composting technique is useful for growing up species such as Panaeolus (Copelandia) cyanescens in a limited space.
When larger amounts of good compost are available, sterilization is no longer necessary. In fact, a compost that is resistant to contaminants will lose this resistance once sterilized. To use it, simply place it in a tray with a layer of vermiculite. From a jar that is ready to case, break up and evenly distribute the grain throughout the compost. Then cover the container with Saran Wrap, but remove this for a few minutes daily. Within a few days the mycelium will start growing through the compost. Within a couple of weeks it can be cased if desired, or left uncased in a humid environment. The cased product should be sprayed daily, and it may be necessary to spray the uncased one more often. Mycelium-containing compost may be used to inoculate other composts by simply pulling out a piece and embedding this peace in some fresh compost.
Without doubt, compost-grown mushrooms can be larger than those grown on rye. However, this is not true of potency. Two recent analyses have shown that when using the same strain of mushroom, rye produced stronger mushrooms than compost did.
Species of mushrooms that normally grow on wood or wood shavings, i.e. “beauty bark,” such as Ps. cyanescens or Ps. baeocystis, may be capable of being cultivated on a mixture of manure and Sawdust. The author has been unsuccessful at this endeavor, but others claim to have succeeded.
If you live in a warm place, you may best use your old substrates, both rye and compost, by placing them in the soil outdoors. The soil covering should be no more than an inch thick.
Home cultivators soon recognize that psilocybian mushrooms can elicit powerful effects and should be used with both caution and respect. When experimenting with a new strain, ingest only half of a dried gram and increase the dose in half gram increments until the desired effect is experienced. The initial effective dose is the psychedelic dose. For instance, a widely cultivated strain from the western Amazon elicits noticeable effects at the half gram dose, but the true psychedelic effects lie in the three to five dried-gram range.
Hallucinogens, even at low doses, are not very good social drugs. Mushrooms should not be substituted for Cannabis or alcohol. There are those who should not ingest hallucinogens, and there are others who may experience a negative idiosyncratic reaction to either the mushroom or the drug within. Furthermore, there are times of stress and emotional disturbance when even the most experienced user should not partake. Keep children away from fruiting jars, not just because they may experience something they were not ready for, but because their metabolisms are different from those of adults.
Psilocybian mushrooms are best used in private, safe, serene environments, free from external interruption. Feelings of great and profound insight, of universal oneness colored by kaleidoscopic visions often characterize positive experiences. It is this author’s opinion that their fullest potential has not yet been realized by contemporary western use. Hallucinogenically-induced trance states have been induced the world over by shamen not only to elicit the cosmic experience but also to divine the future.
For any of you shroom lovers, the fun doesn't have to stop there! You've got magic mushrooms for the spiritual, but what about the physical? There are tons of organic mushroom blends to strengthen your immune system promote healthy digestion. Check out my personal favorite below!
About the Creator
Ed Green
Gynecologist. Amateur Farmer and weed whacker. Loves figure skating and Liza Minnelli. Bakes amazing brownies.
4/20 one of 365 days per year that I smoke weed
I smoke pot constantly. And it’s a good thing that I do. The plant helps keep my mood stable. I am diagnosed with schizoaffective disorder bipolar one type. I am prone to terrible mood swings, but not when I'm smoking marijuana. My psychiatrist was so pleased with the results she observed from me smoking weed that she took me to get my medical cannabis card.
By David Heitz4 days ago in Potent
Reaching Out
I promise her. I'd do anything for her. She's my mom. Even as Lanie and Deanna are flying home, Mom is scrappy fighting dying. She lays too still in that too-big bed with all the toasty white hospital blankets, in the south tower, at the broad end of a long slow-turning corner that delivers me again to her private room with the view she can't see through, with the beeping that tells us nothing new, and all these ice chips she can't swallow, and a flood of well-intentioned nurses who cannot do a damned thing all the same.
By Christy Munson2 days ago in Fiction


Comments
There are no comments for this story
Be the first to respond and start the conversation.