

There are two ways to grow cannabis sativa indoors. You guessed it—a right way and a wrong way. The wrong way is to throw a handful of seeds into a garbage can full of local dirt in a foil-lined closet with a desk lamp over it for twenty-four hours a day. The probable result will be plants that look like mutant bean sprouts, taste like the stuff between your toes, and give you a head like the morning after the night before. At least they're already in the garbage can.
The right way is to spend a little money and follow a planned scientific approach. With quality seeds, proper materials, and sufficient light, the result will be a constant supply of lush connoisseur-quality cannabis as potent as any Thai stick. After a year of production, the cost of this surprising herb comes to under $7.00 an ounce, all inclusive. The yield is at least one and three-fourths ounces per square foot of growing area.
Be warned, this process is no cake walk and not for the faint of heart. For the impatient among you, various tinctures are available for order online, and will expedite the process of you getting buzzed.
Cultivation Technique
Cannabis can be cultivated with equal success in any region, providing its needs for nutrition, water, heat, and light are met. In nature, these forces combine in different proportions in different parts of the world. This accounts for the numerous varieties of pot on the market. The best pot comes from areas of the world which provide a superior balance of these forces. Still, there are natural drawbacks in every region, although they are minimized in certain areas of Southeast Asia, Central America, and Africa. And as long as they do, the best pot has yet to be grown. You can grow that pot at home by following the procedures outlined in this article.
Before you begin, you’ll have to forget all that hocus-pocus about “perfect Mother Nature.” We think she's more arbitrary than perfect. Processes governing plant life are determined by very predictable electrochemical reactions that take place within the plant's tissues. Such reactions are not only predictable, but controllable. Man, not nature, has deliberately developed superior strains of tomatoes. Man can deliberately grow better pot—especially indoors in a highly controlled environment. The following is the most sophisticated, yet foolproof method ever developed for growing marijuana indoors.
Environmental Conditions
- Temperature. The ideal room temperatures are 70°–80°F during light periods, and 60°–70° during dark periods. Assume that fluorescent lights alone will raise the temperature of your growing area about 5° when they’re turned on.
- Humidity. Cannabis tolerates a wide range of humidity. Moderately dry rooms are just fine; unlike with popular varieties of tropical houseplants, misting will be neither necessary nor desirable unless the humidity is near zero. High humidity is fine, too, provided there is plenty of ventilation and a decent amount of space between plants. The higher the humidity, the greater the need for ventilation and spacing. In general 40-60 percent humidity is ideal.
- Location. Come out of the closets, folks! Closets are wonderful places for storing shoes, hats, garments, dirty laundry, alter egos, and general brica-brac. They’re lousy places to grow pot. Healthy cannabis plants are exceptionally beautiful and merit prominent placement in the living room, bedroom, pool area, etc.
Aside from aesthetic considerations, cannabis needs more ventilation than it can get in the closet. Stagnant air frequently induces fungus problems. More important, in a tightly enclosed space, the plants are likely to deplete the supply of carbon dioxide (CO2) normally present in the atmosphere.
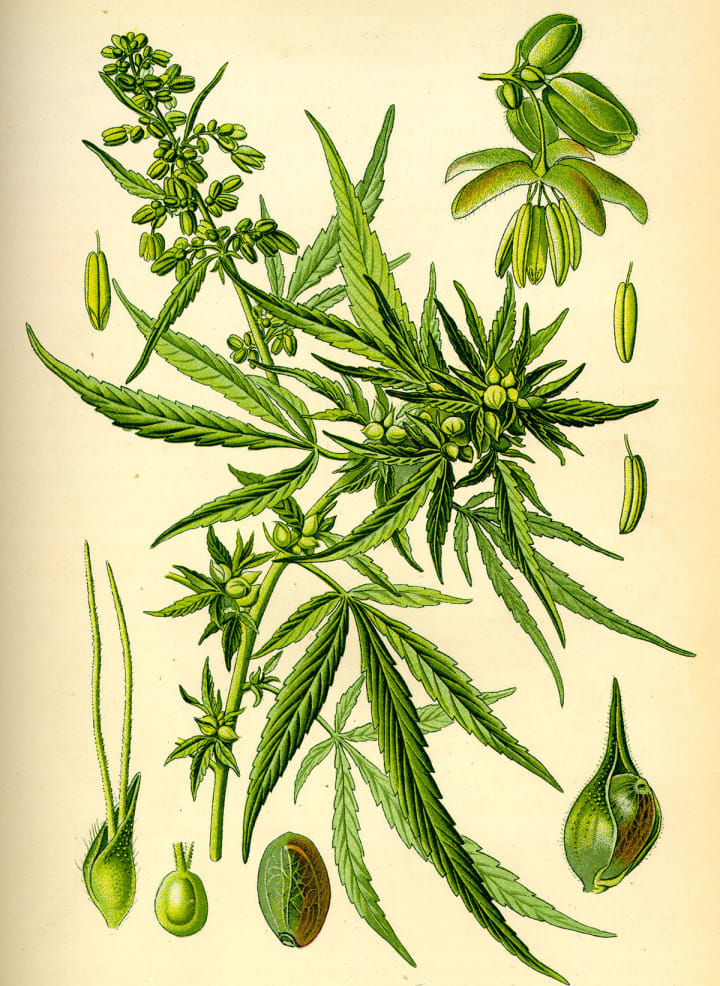
Image via Daily Public
All the Right Lighting
Cannabis needs loads of high quality light. Remember, it's a plant that grows best in nature where full sun is beating directly down on it all day long Don't confuse cannabis with your “houseplants,” as they’re worlds apart in their light requirements. Insufficient and poor quality lighting has been the number one destroyer of otherwise intelligently-grown indoor crops. By following the guidelines suggested here, you can easily avoid this pitfall.
If you're starting plants indoors anytime after June, you might as well grow them under artificial light from the beginning. They'll grow faster and stronger, and won't have to undergo any transition from sunlight to fluorescent light in the fall.
If artificial light is to be used, it should be fluorescent lighting only. Fluorescent lighting costs a bit more initially, but is much cheaper in the long run. Fluorescents last much longer, and will reduce your electric bill nearly 70 percent. Since their heat output is minimal, they can be placed very close to plants without burning them.
Results will be as good with a combination of “daylight” and “natural white” or with a combination of “cool white” and "warm white." The important thing is to place the tubes alternately in a one-to-one ratio.
If standard output equipment is used, parallel tubes should be spaced six inches apart, and about six inches above plant tops. This will supply the plants with eighteen to 22 watts per square foot of growing area, or a minimum of 450 one-foot candles. Any less light will be insufficient.
The spacing of tubes is important. If tubes are farther apart, or farther above plant tops, the result is totally inadequate light. If tubes are placed closer together, a good deal of light energy is transferred into heat energy. The result is excess heat, reduced light output per tube, and a non-uniformity of both light intensity and spectral quality.
Light should remain on constantly from the day seeds are initially planted to the first few days after germination. After that, lights should be kept on sixteen to seventeen hours a day. It is important to be consistent, and the easiest way is to spend a few dollars on an electric timer. Female cannabis is photoperiodic–it goes into flower in response to a reduction in the hours of light received a day (photoperiod). They will begin to flower six to eight weeks after reducing the photoperiod to twelve or thirteen hours a day. Male plants are not photoperiodic. They will flower twelve to fifteen weeks after germination, regardless of the photoperiod.
During dark periods, the room should be pitch dark. This is especially imperative once the photoperiod is reduced in order to induce female flowering. At this stage, even a small amount of light from a distant street light can adversely interfere with the plants' photoperiodic processes. By controlling the photoperiod, you can decide when females will flower. You can reduce the lights as early as three months after germination, or as late as a year after. In general, the older a plant grows, the more potent the plant becomes. However, plants over nine or ten months old tend to become disease-prone and may die of natural causes. We suggest planning to harvest crops between five and seven months old. Keep all tubes in use spotlessly clean at all times, as dirt severely reduces light output.
A single square foot of lit area will hold nine well-spaced plants two weeks old. Five months later, each plant will require at least two square feet of growing area. So plan accordingly. Most people start out with one or two tubes, and add more tubes gradually as the plants demand more space. Plants should not be crowded together to fit under a limited light area. The leaves of one plant should never touch the leaves of another plant. If you find your plants cramped for space, either harvest a couple of plants, add more lights, or give a plant to a friend.
Don't Soil Your Plants
Do not use any soil whatsoever. Instead, use a prepackaged “soil-less mix.” Three good brands commonly available are Pro-Mix B, Metro-Mix, and Jiffy-Mix, along with many other good brands sold in different parts of the country. The package should say “soil-less mix,” “peat-lite mix,” or “Cornell-Mix.” The package should not say “potting soil,” “top soil,” “humus,” etcetera.
What’s the difference? Soil contains humus, whereas soil-less mediums do not. Humus is great in the outdoor garden, but unnecessary in the indoor pot. Humus releases essential nutrients to plants at a rate which is highly unpredictable, and even less controllable. We can easily bypass this anarchic factor by combining a soilless medium with a controlled nutrient feeding program using the fertilizers discussed later. In doing so, the plants are assured of receiving the optimum level of nutrients at every stage of development.
As it comes from the bag, most soil-less mediums don't drain quite well enough for cannabis, and are slightly more acid than cannabis prefers. Consequently, the following ingredients should be mixed in thoroughly before using the soilless mix:
- 1 1/2 teaspoons dolomitic lime per quart soil-less mix.
- 1 quart perlite or coarse sand per 4 quarts soil-less mix.
These ingredients will probably be available from the same outlet which stocks the soil-less mix. We suggest regular grade agricultural perlite for plants under two months old, and sand or some combination of sand and perlite for older plants. Any coarse (e.g., construction) sand will do, as long as it isn't beach sand Never use fine sand. The label on the lime package should give its neutralizing value in terms of its total calcium carbonate (CaCO) equivalent. The figure is typically about 100 percent. If the listed figure is higher, use proportionately less lime; if the figure is lower, use proportionately more lime. Make sure to get dolomitic lime, which is sometimes called simply dolomite.
In the rest of this article, we will use the word "soil" solely for the sake of convenience. We will actually be referring to the soil-less growing medium described above.
Germination Expectations
Forget all those charts and drawings you may have seen describing elaborate germination chambers. They're not only unnecessary, but they require later transplanting, which is fairly tricky in the case of very young cannabis seedlings. Choose good seeds. keep them moist, allow for four inches of root depth, and supply loads of constant light. That's all it really takes.
Don't choose solid pale green or creamy white seeds; and don't choose the dark crusty-looking ones. The large, slightly spotty-looking seeds have the best chances of germinating. Before planting any seeds, soak them in a small amount of distilled water for about twenty-four hours. The water should be room temperature, or slightly warmer.
We strongly recommend Jiffy-7 pellets as the best possible germinating medium. These pellets are available at most nurseries and garden centers for less than ten cents each. Before planting any seeds in these pellets, the pellets should first be soaked in water mixed with plenty of dolomitic lime. Otherwise, the salesman will explain how to use these pellets for seed germination.
If you don't use the Jiffy-7 pellets, the best alternative is simply to fill plastic pots four inches in depth and diameter with the soil-less mix discussed earlier. Insert several seeds one-quarter inch deep in each pot. Gently add water, until the soil is thoroughly moistened, but not wringing wet. Cover the tops of the pots tightly with clear plastic. There should be a space of about one-half inch between the soil line and the plastic Place any type of fluorescent tube two inches above the pots (or Jiffy 7 pellets). The plastic will prevent the medium from drying out from the light. Keep the light on twentyfour hours a day for the next two weeks. As seeds begin to germinate, remove the plastic. Once the seedlings have several leaves per plant, the lights should be raised to six inches above the plant tops, and a sixteen to seventeen hour photoperiod should be started.
Whenever more than one plant per pot (or pellet) germinates, allow only the healthiest-looking plant to grow. Extra plants should be destroyed by cutting their stems with a scissors at the soil line. Never allow two or more plants to grow in the same container. If no seeds germinate within two weeks after planting, use seeds from a different source.
Contain Your Excitement, and Your Bud
Use plastic pots only. Yes, clay pots do “breathe" better, but the suggested growing medium will breathe more than adequately on its own in plastic. The medium will dry out too quickly in clay pots.
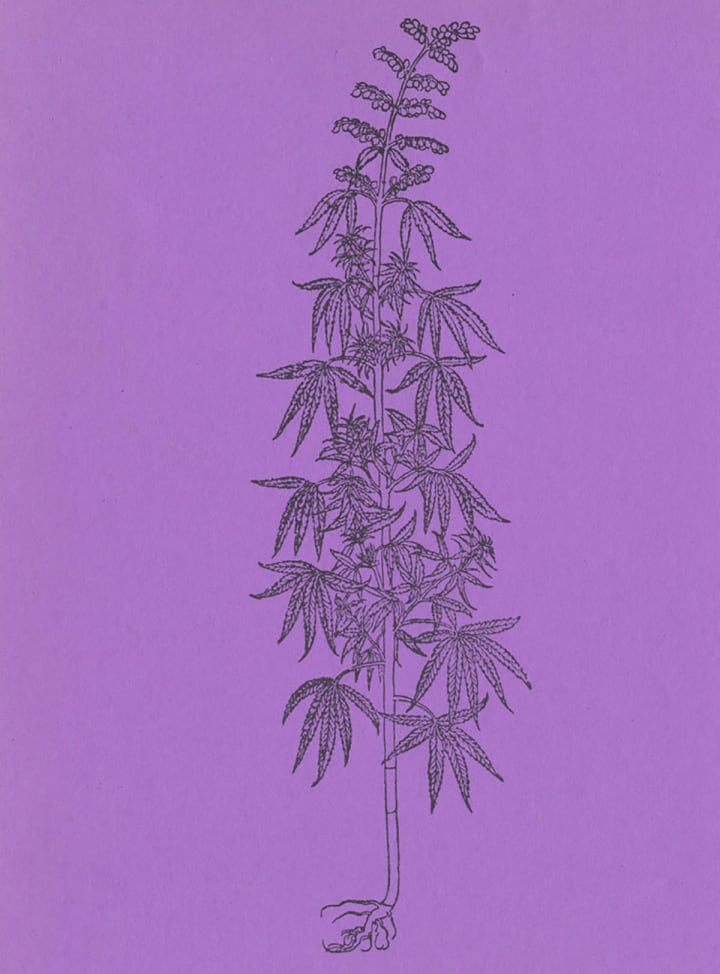
Start out with the plants in pots four inches in depth and diameter. When they’re five or six weeks old, they should be re-potted into pots six to seven inches in depth and diameter. When they’re three to four months old, re-pot them into containers eight to ten inches in depth and diameter. If you plan to keep them growing for more than six months before harvesting, re-pot them into containers ten to fourteen inches in depth and diameter when they reach about six months. You won't need anything larger.
Always re-pot in dim light, as roots exposed to bright light may suffer damage. Before re-potting, thoroughly moisten the fresh soil in the larger pot, as well as the old soil in the smaller pot. Hold the plant upside down, supporting the main stem at the base with one hand. Squeeze and tap on the upside-down pot until the soil just falls out of the pot with roots and all in one big clump. Put this clump in the larger pot, with as much of the old soil as possible still clinging to the roots. Fill in around the edges with the new soil. Then water the plant thoroughly.
Make It Rain
Let the plants tell you when to water. If you think a plant may need water, stick your finger a third of the way down from the top of the soil. If you feel any moisture, don’t water the plant. If it's all dry, then water the plant. Water thoroughly. You haven't finished watering the plant until some water drips out of the drainage holes at the bottom of the pot. If there are no holes at the bottom of your container, either switch to a container that has holes, or punch some out in the existing container.
The frequency of watering will vary between every day to once every ten days, depending on root development in relation to the pot size. Newly re-potted plants will normally take a week or more before they need water. Plants sitting in the same pot for a couple of months may beg you for water every day. If any plants are drying out every day or two, then it's time to re-pot them into a slightly larger container, even if it doesn't fit in with the schedule described above.
Water should always be room temperature.
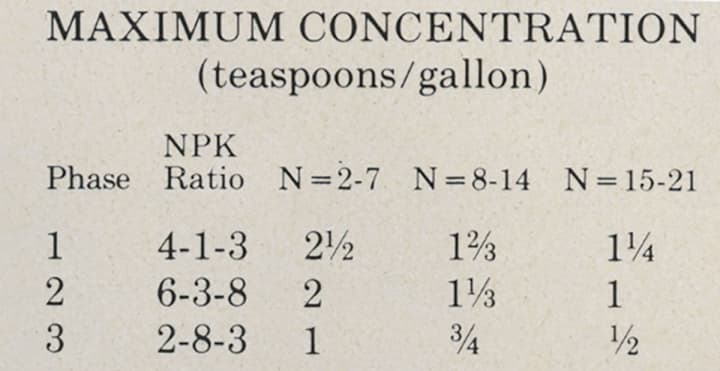
Chart via Head Magazine
Fertilizer Formulas
How much fertilizer to use depends on the makeup and quality of the fertilizer being used, and the stage of growth of the plant. Choose your fertilizers carefully according to the criteria below:
N-P-K Ratios: By law, every fertilizer must list three digits specifying each of the percentages contained of nitrogen, phosphorous and potassium, always in that order. A 4-1-3 fertilizer, for example, contains 4 percent nitrogen, 1 percent phosphorous, and 3 percent potassium, or a total of 8 percent active fertilizer and 92 percent inert material. Quadruple each figure to 16-4-12, and you have the identical N-P-K ratio, but in a form four times as concentrated. Identical results would be obtained using the 4-1-3 formula at four times the dosage of the 16-4-12 formula. Two fertilizers with N-P-K ratios of 4-13 and 2-4-2 would both contain 8 percent active fertilizer, but would have radically different effects on plant growth if used in identical concentrations.
Your cannabis plants will go through three distinct phases. Phase one begins about ten days after germination. Phase two begins when you reduce the photoperiod six to eight weeks before flowering. Phase three begins with first flowering. Different concentrations of fertilizer with different N-P-K ratios should be administered at each stage. The above chart suggests maximum dosages (in teaspoons per gallon of water) of the proper fertilizer for each phase. “N” in this chart stands for nitrogen, and refers to the first digit of the N-P-K ratio of the fertilizer you are using.
You will probably have some difficulty finding the fertilizers with N-P-K ratios corresponding precisely to the three in the chart above. If ratios you do find are fairly close, then they should work well enough.
The maximum dosages shown in this chart should only be used if your growing area meets the environmental conditions already discussed, and if your fertilizers meet the following additional criteria.
Chemical Fertilizers: Use chemical fertilizers only. These are sold at most nurseries and garden centers in the form of water soluble powders. They are much better suited for use with soil-less mediums than are “organic” fertilizers. Despite ill-informed myths to the contrary, "organic” fertilizers are not healthier, either for you or for the plants.
Quick Release: The principal advantage of chemical fertilizers over "organic” fertilizers is one of greater control. Nutrients from chemical fertilizers are immediately available to plants, whereas nutrients from organic fertilizers become available over an unpredictable period of time. Choose fertilizers that state “0.00 percent water insoluble nitrogen” on the label. Definitely do not use any fertilizers which claim to be effective over an extended time span.
Low Acidity: Fertilizers used in the first two phases should have a potential acidity of no greater than 5 percent or 100 pounds calcium carbonate per ton equivalent. This information should be on the label. If the label says anything about potential basicity, then it's just fine. The high phosphorous formula used in phase three will necessarily have a much higher potential acidity. Don't worry about this, although here again, the less acid the better.
High Solubility: The best chemical fertilizers usually come in the form of water-soluble powders. The more highly soluble, the better and safer. You can test a fertilizer's solubility by mixing the fertilizer with water at twenty-five times the concentration recommended on the label. This should be done in a clear jar. After mixing thoroughly, let the mixture sit undisturbed for a few days. Then check to see if any particles have settled to the bottom. If any settlement is visible, it is not a highly-soluble fertilizer, and may cause serious difficulties.
If your growing environment is in balance, and your fertilizers meet all specifications, you can safely ignore the dosages recommended on the label, and follow our chart alone. If any element of the environment or of the fertilizers is substandard, then the safest bet is to use no more fertilizer than is suggested on its label.
For maximum effectiveness and safety, plants should be fertilized every time they are watered, with the following exceptions:
Never fertilize plants less than ten days old.
Never fertilize plants within ten days after re-potting.
Never fertilize a completely dry growing medium.
Never fertilize where new leaves emerge with brown or distorted tips.
If you should accidentally allow the soil to dry out completely, first water thoroughly with clear water. Then fertilize about twenty minutes later.
If new leaf tips emerge with brown or distorted tips, water with ten or twelve times the normal amount of water in order to leach out excess fertilizer salts which may have built up. Then wait a couple of weeks before adding any additional fertilizer, and reduce the fertilizer concentration by about 25 percent. Occasional brown tips on older leaves will appear from time to time, and should not be a cause for alarm.
Harvesting
For three months you've been paying careful attention to the plants' needs. Probably you've clipped back the main stems in places a few times, in order to encourage branching. The leaves are dense, large, and deep green. Stems are strong, but not especially thick. The plants have been growing like males begin to flower. Should you harvest them?
Definitely not. They're potent all right, but not nearly as potent as they will become in the next few weeks. You keep the photoperiod at around twelve or thirteen hours, and you switch to the high-phosphorous fertilizer. Then you break nearly every rule you've been following.
You raise the temperature to between 90° and 110°. You do everything possible to lower the humidity to near zero. You let the soil get nearly bone dry between waterings. And you bombard the plants with light . . . more fluorescent light especially "warm white tubes, incandescent lights scattered about, (especially around the sides of plants), even sunlamps a couple of feet from the plants for a couple of hours a day.
The plants are awed by this bombardment of energy. They must flower profusely, and they must protect the flowers against all this. Resin is manufactured and sent up to protect leaves and flowers from the heat, light, and dryness. The resin is loaded with THC. The flowers await pollination from male flowers, Instead, vou pick the flowers for your harvest. The plants keep trying... flowers and more flowers appear; resin and more resin is produced. The potency keeps going up. You make sure that no flowers receive any male pollen. You watch the flowers carefully, making sure that none of the plants begins to produce some male flowers. If it happens, you harvest that entire plant at once.
More resin, greater potency. You're watching very carefully for signs of spider mites. You know that in this dry heat, mites could ravage the crop in a few days, and you don't want to spray. If you see signs of mites, you harvest the whole crop immediately. If not. you let the plants flower unpollinated for about a month before they begin to weaken, getting more potent all the time. Meanwhile, you've been trimming off a few leaves and flowers here and there, getting more and more stoned. About a month after they've begun to flower, you harvest the entire crop. It's sinsemilla, but much better than the commercial stuff. In fact, it's probably the world's best grass.
About the Creator
Ed Green
Gynecologist. Amateur Farmer and weed whacker. Loves figure skating and Liza Minnelli. Bakes amazing brownies.
4/20 one of 365 days per year that I smoke weed
I smoke pot constantly. And it’s a good thing that I do. The plant helps keep my mood stable. I am diagnosed with schizoaffective disorder bipolar one type. I am prone to terrible mood swings, but not when I'm smoking marijuana. My psychiatrist was so pleased with the results she observed from me smoking weed that she took me to get my medical cannabis card.
By David Heitz4 days ago in Potent
Vocal Bonus Leaderboard: 04/24/2024
Welcome to the weekly update of the Leaderboard! We're thrilled to showcase Vocal's most discussed stories, popular picks, and rising stars. Let's dive into this past week's standout contributors and their remarkable achievements.
By Vocal Teama day ago in Resources
The Dangling Bead
My life is splashing before my eyes, as I precariously suspend and prepare for the end, the consumption of my Self and identity. I know that gravity will be the victor in this struggle. Like a pendant, slipping from the chain, the tension has caught me in this moment, bestowing one last gift of reflection. I cling desperately, questioning my purpose. Searching for comfort. And I remember…
By Leslie Staven4 days ago in Fiction


Comments
There are no comments for this story
Be the first to respond and start the conversation.