


In most, if not all, parts of the country, that is. If you followed proper advice, which is based upon many years of experience and experimentation in both city roof and country farm gardening, you should have a couple dozen very healthy 6-8" seedlings within a three to six month period. Depending on your gardening skills and degree of marijuana usage, growing your own private garden can save between $150-600 a month. As always, the best yield comes from the caring and informed grower.
Proper Lighting
Whether you started your seeds under fluorescent lights as I prefer, or in a sunny window or spot in the garden, it is now time for the seedlings to be transplanted to a permanent growing site in the garden or to large pots or tubs for window, roof or fire escape growing. Pick the sunniest location available; There is nothing like a full day of sun for growing great dope.
Don't crowd your plants. Keep in mind that planting in the new year, by the end of August can be a nearly full grown cannabis plant and is likely to be ten or eleven feet tall with lower branches that extend to three or four feet in length. So give them room; they should be at least four feet apart. If space is at a premium, grow fewer plants. Quality is better than quantity anytime. Seven or eight good-sized plants will provide you with a more than adequate personal supply.
A word of caution about selecting a site. If you plant your cannabis like a cornfield, in neat rows, the plants will be extremely obvious and are likely to attract a great deal of unwanted attention. This is definitely something you don't need—if for no other reason than that you are likely to get ripped-off.
In my city roof garden, I grow several evergreens in wooden tubs, pots of flowers, a small weeping birch and even manage a few pieces of outdoor furniture to give the illusion of a natural garden. Then I carefully fit my cannabis plants into the overall scheme. Obviously, with this "garden" disguise I have less space for cannabis, yet I still manage to fit in seven or eight plants that do well—and I worry a lot less.
In the Berkshires, I have found a sunny clearing in the woods that is naturally surrounded by good-sized evergreens which offer excellent visual protection. Lacking such an ideal site, group your plants in twos or threes in different parts of the garden or surround them with sunflowers or other striking plants to help create a casual illusion. And should you still feel a little paranoid as the plants get larger (as did I the first two years), buy some cheap plastic flowers and carefully wire them to your plants, rather like decorating a Christmas tree. The more natural the setting, the less attention your plants will attract. Keep it cool and don't throw garden parties.

Illustration by Debby Young
Let Them Spread Their Wings and Fly
Wherever you decide to plant, remember the second basic rule: Give the roots plenty of room. In the garden this means digging a good-sized hole, preferably two feet wide and two feet deep, removing loose stones and adding and mixing with the loosened soil and couple of handfuls each of rotted cow manure, humus, and peat moss. You cannot grow dynamite grass in dense, hard-packed soil.
If you are using pots or wooden tubs, as I do in my city roof garden, the larger the better. My containers average about sixteen inches across and sixteen inches deep; a little on the small side, but a compromise with available space. Whatever kind of pots or tubs you use (plastic waste baskets or garbage cans also make excellent and economical containers), make sure you have good drainage holes in the bottom. Such holes should be at least the size of a nickel, three to a container. You should then use an inch or two of stones or gravel on the bottom to prevent the soil from seeping through or plugging up the holes.
Satisfactory Soil
The soil should be light and absorbent, as I have stressed many times. Use potting soil mixed with several handfuls of peat moss for lightening, rotted cow manure for fertilizer, and humus for organic matter.
When you have your holes dug or containers filled, it is time to transplant the seedlings from their yogurt cups to their permanent homes. With a thin knife blade, gently loosen the soil around the edges. Do this carefully so as not to damage the roots. The idea is to remove the seedlings with all the soil in tact from the cups. If the seedling soil is too wet, it will be too heavy and sag like mud; if it is too light, it will flake away, exposing roots. I usually water my seedlings lightly about 24 hours before I transplant them. That way, the soil has time to dry out a bit, but not too much.
After you have loosened the edges, place your left hand over the top of the container, loosely fitting the stalk of the plant between your fingers. Invert quickly and gently tap the bottom (now the top) of the container; The seedling should slip free, soil intact. (This process is rather like removing a cake from a baking tin.) Immediately place the seedling in its permanent home.
I find it advisable to set the seedling fairly deep into the soil so that it sits as low as possible without the lower leaves actually touching the earth. The reason for this is to keep the plant as compact as possible and avoid too long a stalk, which might prove weak, in the early stages of growth. Fill in loose soil and press it firmly around the seedling so that it is held securely in place. Give it a good, healthy watering immediately. Any excess water will drain through the drainage holes or seep deep into the earth.
At this point, I also stake my plants. Since they are exposed to a good deal of wind from time to time, staking and tying the main stalk for additional support is important. Cannabis is extremely hardy once it reaches three or four feet and will withstand all kinds of adverse conditions and storms rather remarkably. But why take chances? If you will stake your plant now (use a thin, six foot stake), you can place the stake very close to the plant without disturbing the roots. If you wait until later, you will have to drive the stake through the roots, destroying some of them. When, in a few weeks, you are ready to tie the stalks to the stakes, do it loosely since the stalk will continue to expand as it grows. A too-tightly-tied plant will choke.

Illustration by Debby Young
Transplant with Care
When transplanting, keep in mind that even a careful and gentle approach causes a certain amount of shock and will set the plant back slightly. It is best to transplant in the late afternoon or early evening so that the seedling will have a little time to adjust to its new home before the sun starts pumping it full of energy. If you transplant in the midst of a particularly brutal hot-spell, make some newspaper sun-shades to cover the plant for the first day or two.
After your initial watering, don't water the plants again until the soil feels quite dry. A slight lack of water at this time actually encourages the roots to spread out and develop quickly. For several days the plants will appear dormant while they adjust, but by the end of a week they will begin to show signs of healthy new growth. This would be a good point to give them a feeding with a chemical fertilizer such as MiracleGro, remembering to follow the manufacturer's instructions. Over-feeding is just as much of a killer as over-watering.
From this point on, it's full speed ahead. Within a week or two your plants will grow as much as an inch or two a day, like weeds. The rest is simple; you need only watch and water. If you are growing your plants in pots or tubs, they will need watering more frequently. In the heat of July and August, when the plants are large, it's not unusual to have to water them every evening. Soil in containers has a tendency to bake and dry out quickly. Plants that show signs of drooping from lack of water will snap right back, provided the drought has been brief.
Mature Marijuana
Growing cannabis to full maturity completely under artificial light is not impossible, but it requires a good deal of planning, ingenuity, and a rather substantial initial investment in lights. One friend grows an astonishingly good crop in a very large closet by using a bank of twelve forty-eight inch fluorescent gro-lites. The chief problem with artificial light develops as the plants grow larger. The candlepower of light decreases by the square of the distance from the source. Therefore, the top of a three foot plant will receive nine times as much candle power as the bottom. Obviously, the top of the plant grows much more fully than the bottom unless you use a large number of lights, as my friend does, and bank them properly. On the other hand, since the sun is so many thousands of miles away, the difference in candle power between the top and the bottom of the plant is miniscule. Also the sun is considerably more powerful than the best artificial light. For a demanding plant like cannabis, the sun, therefore, is both the natural and best source.
As your plants grow to four or five feet, a little pruning can be helpful. The prunings, after drying, although not up to full strength, will give you a sample of the quality of your maturing dope. The tops of the plants are the best and most powerful for smoking. Therefore, NEVER disturb the top of the plant until it is ready for harvest. If you cut off, pinch back or prune the top of the main stalk at any time, the plant will cease further vertical growth. But in early August, you can cut off six to eight inches from the ends of the lower branches to good advantage. This not only encourages fuller and bushier growth, but sends increased energy to the top of the plant where you want it. In fact, I often completely remove three or four of the lowest branches at this time, especially on my city plants whose containers don't permit the same heavy root expansion as garden plants. Removal of lower branches helps keep the tops lush.
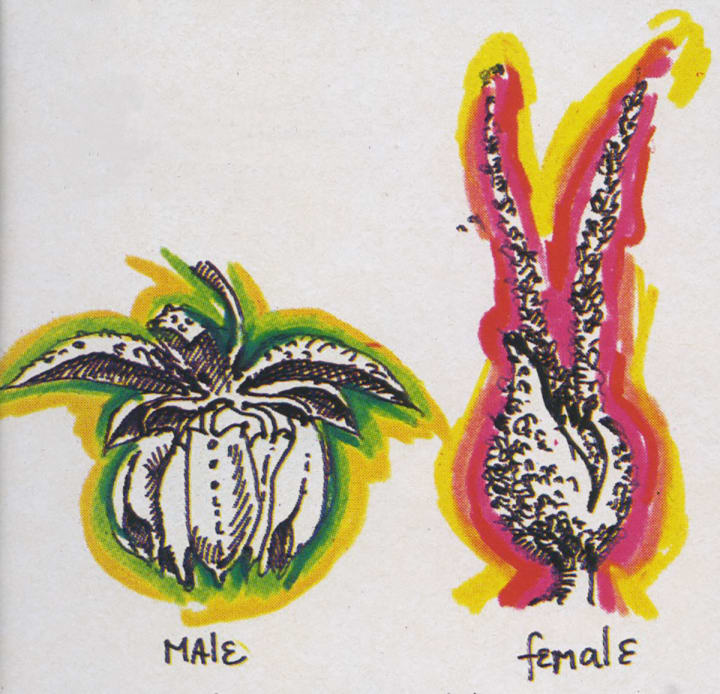
Illustration by Debby Young
Battle of the Sexes
Now, a few words about sex. The female cannabis is considerably more potent than the male, at least for smoking purposes. Reportedly, the ratio of female to male plants is about nine to one, and my experience bears this out. I find myself with one or two male plants every season. In the early stages of growth, it is difficult to tell which plants are male and which are female. Only a practiced eye, past experience and instinct can help you out at this point. If a young plant appears to be particularly erect and skinny, it usually turns out to be male. If it seems fatter and bushier, it will probably be female. By mid-August, however, the difference becomes more readily apparent. The male develops clusters of tiny, cream-colored flowers on the outer ends of its branches, while the female flower appears only as a tight cluster of tiny green leaves.
In parts of the world where cannabis is abundant, the male plant is often destroyed as a useless waste of space. I personally don't destroy the male plant for two reasons. One, it does have some potency and certainly provides a pleasurable smoke. Two, there are other attractive uses for it. I often press the leaves and frame them for friends.
Harvest Time
When is the best time to harvest? The answer is very similar to the recipe for bread which says rather vaguely, “bake until done.” There is no set time period or number of weeks, although from eighteen to twenty-two weeks from germination is a sort of general guide. There are many variables including location, length of growing season, weather conditions, soil quality, etc. In an intense, ideal growing season plants may well reach full maturity in as few as sixteen weeks. On the other hand, during the long, rather mild, late summer of last year, my plants weren't ready for harvesting until the end of September—more like twenty-four weeks.
So how do you tell? When a plant has finished its cycle, it turns to reproduction and begins to make seeds within its flowers. At this time, the energy of the plant (reproduction is hard work!) goes into developing seeds, indicating that the growth cycle is nearly complete. However, don't start harvesting the moment you discover the first seed; a few seeds will naturally begin to form a little early. Wait abOUt ten days after discovering the first seeds; that's the ideal time to harvest In parts of the country where there can be an unusually early "killing" frost, always harvest immediately after such a frost regardless of whether or not the plant has completed its cycle.
Drying and Curing
Drying and curing is the final stage; your work is nearly done and the magic is about to begin. There are many ways of drying and curing, but let's take the standard method first warm-air drying.
First of all, chop (and I mean chop, because cannabis is part of the hemp family and it is from hemp that rope is made) the plants at the base of the stalk keeping in mind that the tops are more potent, chop off the upper third of the plant to dry separately. Bundle the bottoms together in groups of three or four, using strong cord or florist's wire. Do the same with the tops. Then, keeping them separate, hang them all upside down in a warm, dry place where they can remain safe and undisturbed for about two weeks. The idea is to allow warm air to evaporate the water slowly from the plants while the plant is hanging upside down. The resins, which get you high, need time to flow out of the stems and into the leaves. You slowly get rid of the water in the plant while keeping the resins intact. Too much heat will destroy some of the resins and weaken the grass. That is why I personally never use the oven method of drying, although many do. However, in an emergency or for quick need, dry- ing in the oven works fairly well if you keep the temperature very low (120°) over a couple of days. Light the oven, set it warm up for about two minutes and then turn it off. Repeat every six or eight hours.
After ten to fourteen days of war air drying, in spite of the fact that it tempting to leave the plants hanging decoratively (the smell alone is heady for the first few days), I clean a little for immediate use and then wrap the remaining bundles in heavy-duty foil and seal them in plastic garbage bags for air-tight storage. The grass stays fresher and more potent this way, retaining I just enough natural moisture to sustain space, clean all the grass at once and store it in the freezer.
Last year I experimented on about a third of my crop with a newer and entirely different technique. The results the resins. If you are short on storage were superb. There is no doubt in my mind—or anyone else's who has compared the two methods-that the following method at least doubles the potency of grass. But there are two minor drawbacks. First, it takes a little more time, effort and watchfulness. Second, you have to be prepared to withstand several days of a very foul and raunchy smell.
Chop, bundle and hang upside down as in the standard method. But after two or three days, giving the resins some chance to descend into the leaves, clean all the leaves with their stems off all the branches. Compact them together as much as you can. Then separate into bunches and put the bunches into air-tight containers such as Ziploc plastic bags, jars, or coffee cans, filling them about half full before sealing. Put the containers in a warm, dark place and let nature go to work. This moist, stagnant environment is a magic breeding ground for decay and fungi. Every couple of days, shake up the containers so that the decaying process takes place evenly and equally. In two weeks, when you open the containers, the cannabis will appear black and raunchy and the stench will just about knock you out. Select one container for immediate drying and freeze the others to stop the process.

Illustration by Debby Young
To dry, spread the raunch on a piece of foil and find a place (preferably an unused area, because the stench is going to be overwhelming) and let warm air dry it naturally for about a week. It can then be put through a strainer and cleaned like ordinary grass, although it will still be a bit tacky even after it has dried, and then rolled and smoked. However, I prefer to smoke these black chunks in a hash pipe. Although not as sweet as hash, it is a dazzling high.
You can, by the way, get almost as good results with grass that has already been dried once by using a version of this method. Fill an air-tight container about one half full. Then dampen the grass by spraying it as evenly as possible with three or four tablespoons of water. The idea is to dampen, not soak. Seal the container and proceed. But in this case it is a good idea to shake the container every day for the first few days until the moisture is evenly absorbed. After two weeks, air-dry. Once any grass has been dried, it is best stored in the freezer.
Your work is now done, so celebrate with a party and amaze your friends. Turn them on to the advantages of growing their own at home. One final suggestion: choose a name for your grass, for a good name heartens and encourages both you and the crop. I have already picked one for this year, Millennial Social, its a nice smooth crop that offers a bit too much confidence and often inspires random thoughts with no real purpose but to enjoy life. But hey, that's what we all love about weed.
About the Creator
Ed Green
Gynecologist. Amateur Farmer and weed whacker. Loves figure skating and Liza Minnelli. Bakes amazing brownies.
4/20 one of 365 days per year that I smoke weed
I smoke pot constantly. And it’s a good thing that I do. The plant helps keep my mood stable. I am diagnosed with schizoaffective disorder bipolar one type. I am prone to terrible mood swings, but not when I'm smoking marijuana. My psychiatrist was so pleased with the results she observed from me smoking weed that she took me to get my medical cannabis card.
By David Heitz4 days ago in Potent
The Fish Song
The room didn’t smell like disinfectants. Its fragrance seemed light and not overbearing. A soft mixture of lavender and mint permeated the space. No beeping machines or any tubes hooked up to four-year-old Kaleeka. Her cacao skin seemed to glow from the light over her head. The family, save for one and the doctors and nurses exited the room like a trail of saints showing their last vestiges of regard.
By Skyler Saunders6 days ago in Fiction
In The Blink of Her Eye
Time itself bent and morphed, allowing Shannon the precious seconds needed to see and adjust to the disaster unfolding in front of her. Each frame showed minute details she would have missed had the clock not slowed down until she heard every click of the hands as they swept toward the end of everything. If only she was being melodramatic...
By Lisa VanGalen2 days ago in Fiction


Comments
There are no comments for this story
Be the first to respond and start the conversation.