
Understanding Manual Mode
Balancing your Camera Exposures

When you first get your DSLR you’ll probably put it on Auto, point, shoot, done; you have an image. Yes, this dose give you a photo, but you have almost no control over how the camera takes it. Putting your camera in Auto means that you’re giving all controls over for the camera to assess what the camera sees and trust it put the right combination of settings together to expose your image well. Sure, this can be used for the sake of take a family photo while using the timer, or if you’re just starting out or have no interest in the mechanics behind what makes a great image.
Let’s get started learning how to understand manual mode!
First, you must understand what all needs to happen in order to achieve the results you want. There are four things you'll need to understand:
Once you grab hold of how these feature work, you'll be able to see how they work together to compose amazing photographs. Let's start with aperture.
Aperture
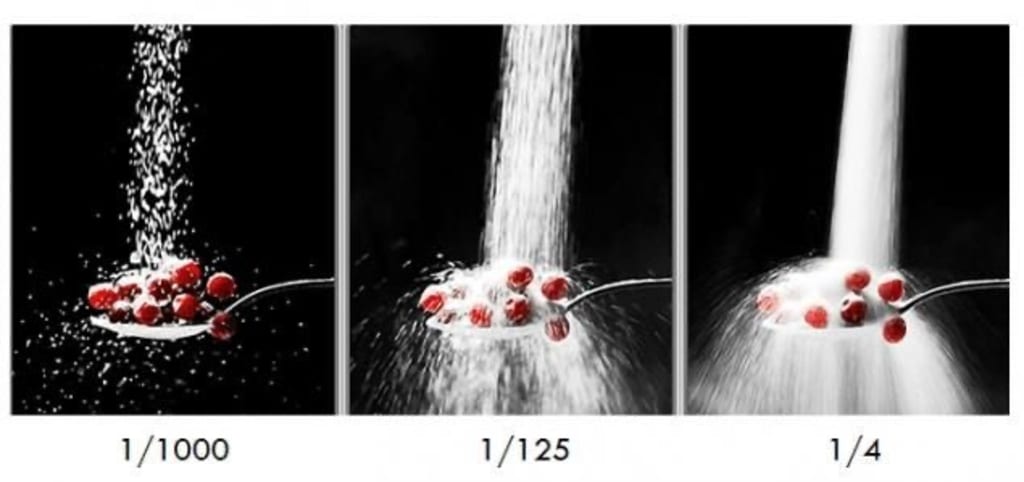
Aperture, or f-stop, controls how much light is let into the camera. This setting can be confusing because the smaller the number, the more light it lets in because the opening is biggest. Here's an example:

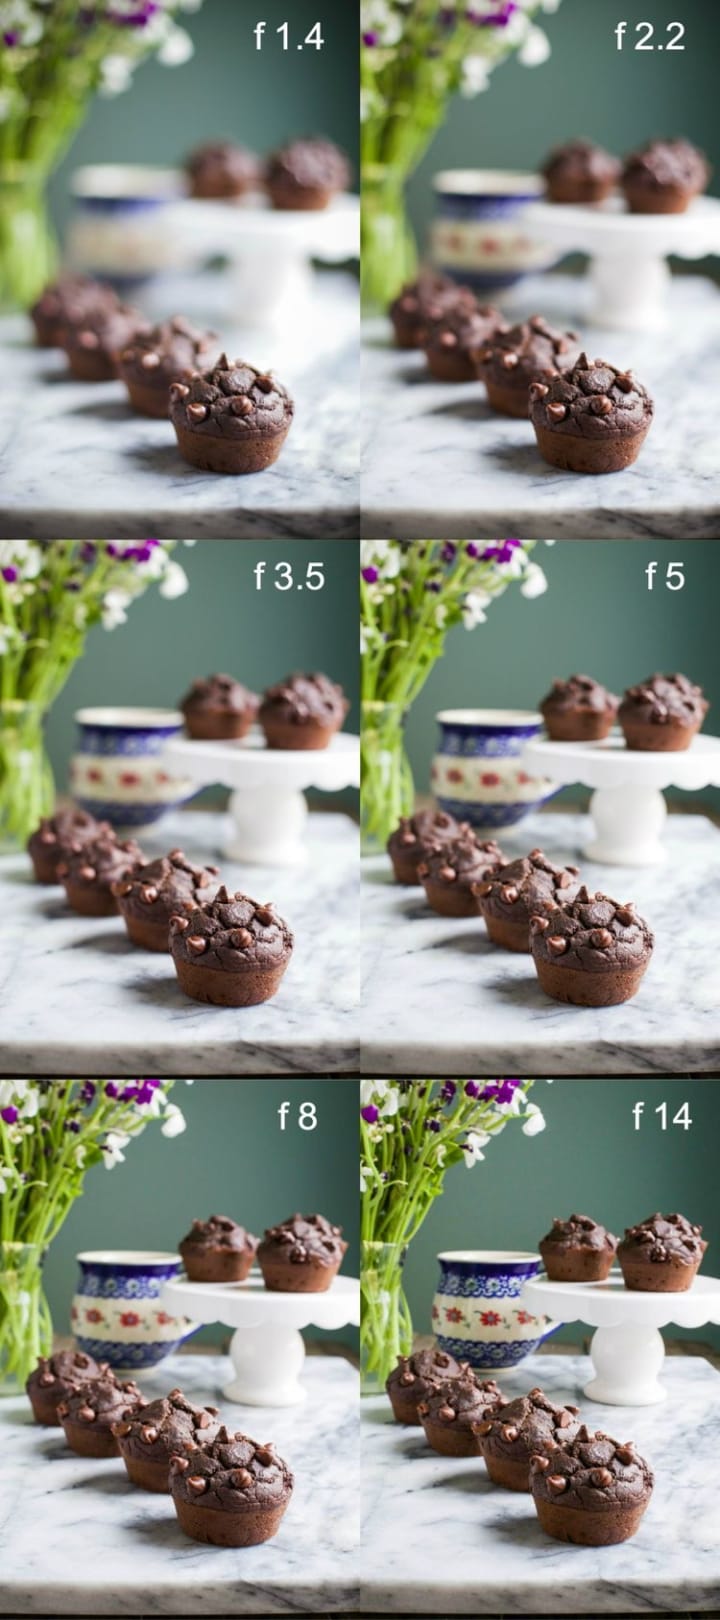
This also controls how much of your photograph is in focus. This is call the depth of field. The depth of an image can say a lot about how the audience views it. If everything is in focus then you can lose your focal point. If not enough is in focus then again, loss of focal point. Depth of field let’s you either isolate or widen your focal point by blurring the background, foreground, or middle ground depending on what you want in focus. It can be hard to tell what should be in focus and what will bring the viewers eye toward what you want them to see, but I will tell you there is almost no wrong way to use a shallow depth of field (blurred background) when you have single items or a small cluster of items with little to nothing in the background. For example:

See how the background is blurred enough that it doesn’t draw attention away from the subject? This is an example of a shallow depth of field. This was taken with a wide aperture; a f2.8. This means the lens is open about as wide as it could go. Some lenses can open as far as f1.2. When you take the number as small as you can make it then the number will be high. Typically, the smallest aperture you can do is f22, but there are some lenses that will allow f32, f45, or even f64. This lets in very little light, but your depth of field is a lot deeper. For example:

Off the top of my head, this one was taken at either f11 or f16; I rarely take photos at f22. Here are some more examples I found on Pinterest that give you side by side photographs of the same image, but taken with different aperture settings.

Some of you might ask why some cameras only have a certain range of aperture, and my answer for you is: it's not all about the camera. It mostly has to do with your lens. Your lens is what does most of the work. Depending on the brand of camera you're using, and if you're using the same brand lenses or an off brand/compatible brand, you'll be able to find the widest aperture on the lens itself. Unfortunately it only show the widest it can go and not the smallest; that would need to be researched. These numbers can be found on either the rim of the lens near the glass, or on the outside near the grip.

Shutter Speed
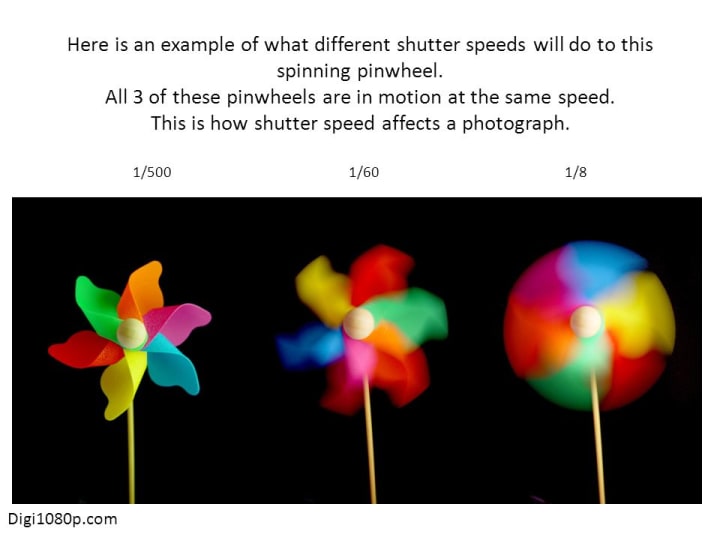
Next in line is shutter speed. This controls how long the light, which is being let in by the aperture, touches the sensor. Your shutter speed is measured by fractions of a second. Yea, I know, sorry... math... The higher the denominator, the faster the shutters will close and open again. The lower the number, the slower is takes to close and open.
Knowing what shutter speed to use is like trying to pick what outfit to wear for the day; you need to know what you're walking into. You wouldn't wear winter clothes if you're going to the beach, just like you wouldn't set up your shutter to shoot for a portrait when you're shooting race cars on a track. I'm not saying you're not going to get good results, you just might not get the result you want.
Shutter speed also helps control the motion in your photos. It can capture motion or it can freeze motion. This is called motion blur. Our eyes catch a certain aspect of motion blur. When filmmakers are filming a movie, they have to have the right shutter speed in order for our eyes to register the right amount of motion blur, otherwise it won't look real, or at least as real as they're hoping it will.
Balancing your aperture and your shutter speed is key to having a well exposed photo. Under and over exposed are what make all the difference between good and great images. When you have a wide aperture, do you think you’ll need a fast or a slow shutter...?
You’ll want a fast shutter. Remember, wide aperture is letting in a lot of light so having a quick action of the shutter gives just the right amount to hit the sensor. If your shutter is too slow it will result in an over exposed photograph. Why? Because too much light was allowed to hit the sensor.
and vise versa.
If the shutter is too fast it will result in an under exposed photo meaning not enough light was let in, darkening the details in the image.
Over exposed means that the whites of the image are brighter than they should and washes out the detail in the light colored and highlighted sections where under exposed is the complete opposite. It will darken the dark and hide details in the shadows. This is easier to fix is post, but I always say it's best to get the best shot in camera first so post production editing is minimal.
As I stated before, the shutter speed can be used to capturing and freezing motion. When you use a fast shutter speed it freezes the objects in motion. Using a slow shutter speed you capture the blur of the moving object; it won't be crisp and clear because the shutter was open just long enough to see it move from point A to point B. Whereas a fast shutter speed is so fast it doesn't have time to see it get to point B.
ISO
Now that we know about the "how much" and the "how long" now it's time to learn about the "how sensitive". This is the ISO (International Standards Organization), it's used for rating the sensitivity of the light being shown into the lens. As the number of the ISO increases the more sensitive to the light the sensor will be. This process is all done mechanically, so when you bump your ISO up numerically it adds grain to the photo to balance the light on the sensor.
So think of it like the aperture: the brighter the light source, the lower the number will be. (Just like with aperture, the more light the lower the f stop).
When you're shooting in direct sunlight, which is be the brightest light you can humanly possible shoot in, you'll want your ISO to be at 100 (or lower) if your camera can go lower than that. The reason the ISO is so important is because this has to be right in order for your shutter speed and aperture to have the effect you want. If your light is too dim, then it will force you to change your shutter speed to a slower setting (remember, slower shutter speed lets in more light) risking the possibility of capturing motion blur or camera shake. Shooting in dim light isn't the greatest because like I said above, you'd have to raise your ISO to a higher number which inevitably adds grain to your image. This also depends on your camera. Full frame sensors tend to have higher ISO ranges which means the grain isn't as bad until you get really high up there. Crop sensors however have smaller ranges which means you'll start seeing grain at the 800 to 3200 range. These are usually found in the lower/entry level end cameras.


Okay, the hard part is over. Think you can balance an exposure now? Practice these steps before throwing in the next steps.
White Balance
This is used to make sure your whites are real white in your image. Different lights have their own temperatures, measured in Kelvin.

Your camera should already provide the options for you to chose from so you don't have to chose the Kelvin manually. What the most important is knowing the light in your environment when you walk in. Selecting the right white balance ensures your whites are pure and blacks are blacks. You will see drastic color differences if you select the wrong one. When I first started out I almost always forget about the white balance until after I took a photo. I would be shooting in daylight and my white balance would be on Tungsten (Domestic Lighting; according to the list above) and boy was that color was off big time. When starting out, I would recommend practicing the first three steps outside in the daylight and leave your white balance on Daylight. Practice that for a few weeks to a couple months, then do only photos inside with a warm colored lamp or light of some sort, then again with the fluorescent light or LED. Then if you're feeling adventurous, take a few trips to some different spot and guess the White Balance.
Practice Makes Perfect
Thank you all so much for reading through this. I hope this article helps you with your photography techniques and skills.
Tips are appreciated - and thank everyone in advance who leaves one.
Follow me on Instagram to check out my photography: @sara_aulds_photography
Check out the rest of my photography tips and tricks here on Vocal; more content on the way!
About the Creator
Sara Aulds
I am a photographer and videographer from Cincinnati, Ohio. I write as a hobby and capture reality as a profession.
Keep reading
More stories from Sara Aulds and writers in Photography and other communities.
Mistakes Beginner Filmmakers (and Photographers) Make #7...Video Composition
So some of you might be wondering if there really is a difference between composing a photo and composting for video. In short, yes there is. There’s slightly different rules when it comes to composing your frame while filming. Since the camera and your subject or subjects would be moving you’re not always going to have them perfectly in frame, and some cinematographers choose to be creative with how they want to portrait their characters.
By Sara Aulds3 years ago in Photography
Capturing Magic
In the world of photography, timing is the key to everything. While skilled compositions and technical proficiency are undoubtedly crucial, the perfect lighting can create the perfect photo. Nowadays, we can determine any light ourselves and are no longer dependent on any natural light source, thanks to the developed technology. We can turn every day into a night by using the right filters. And we can illuminate every night to be seen as a day. A typical process, especially in the film industry.
By Krishan Mubashar8 days ago in Photography
The Secret of Lighting
“Light is not just an element, but the essence that breathes life into images.” Whether it is capturing the delicate contours of a portrait, the vibrant hues of a landscape or the intricate details of still life, lighting plays a tremendous role in shaping the mood and visual impact of a photo. Understanding the nuances of lighting is crucial for us to elevate our craft from snapshots to interesting works of art. It is not just about having the right equipment, it is about harnessing the light creatively to transport emotions, tell stories and evoke reactions from our viewers.
By Krishan Mubashar5 days ago in Photography


Comments
There are no comments for this story
Be the first to respond and start the conversation.