
Are you an Amazon seller looking to boost your sales and stand out from the competition? Look no further! In the fast-paced world of e-commerce, captivating product photos are the key to attracting customers and increasing conversions.
In this comprehensive guide, we will dive deep into the art and science of creating irresistible visuals that will make your products shine on the Amazon marketplace. From understanding the importance of high-quality images to mastering the technical aspects of product photography, we will equip you with the knowledge and skills needed to capture the attention of potential buyers.
With step-by-step instructions, expert tips, and real-life examples, you will discover how to showcase your products in the best light, create compelling lifestyle images, and optimize your photos for maximum visibility. Get ready to take your Amazon business to new heights with visually stunning product photos that will leave customers clicking that "Add to Cart" button!
The Importance of High-Quality Product Photos on Amazon
When it comes to selling products on Amazon, high-quality product photos are a game-changer. In an online marketplace where customers cannot physically touch or see the products, images play a crucial role in influencing purchasing decisions. Studies have shown that customers are more likely to engage with listings that have clear, attractive, and professional-looking photos.
High-quality product photos not only convey the details and features of your products but also build trust and credibility with potential buyers. In a highly competitive marketplace like Amazon, where multiple sellers offer similar products, visually appealing photos can be the differentiating factor that sets your listings apart from the rest. So, investing time and effort into creating high-quality product photos is essential for maximizing your chances of success on Amazon.
To ensure your product photos meet Amazon's guidelines and stand out from the competition, it's crucial to understand the specific requirements and best practices for Amazon product photography. Let's explore the key aspects you need to consider when creating stunning product photos for Amazon.
Understanding Amazon's Image Guidelines
Amazon has specific guidelines for product images to ensure consistency and a positive shopping experience for customers. These guidelines cover various aspects such as image size, file format, background, and product representation. Familiarizing yourself with these guidelines is essential to avoid potential issues with your listings and to ensure your photos meet Amazon's standards. Here are some key points to keep in mind:
- Image size: Amazon recommends using images that are at least 1000 pixels or larger in either height or width to enable zoom functionality and provide a clear view of your products.
- File format: Save your images in JPEG format to maintain image quality while keeping file sizes manageable.
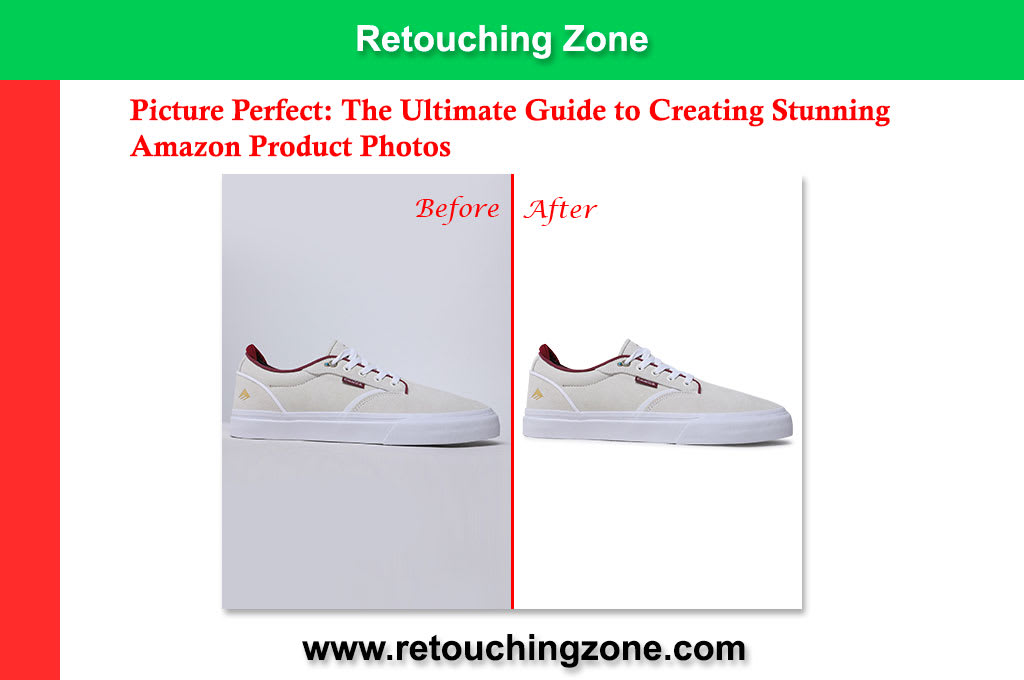
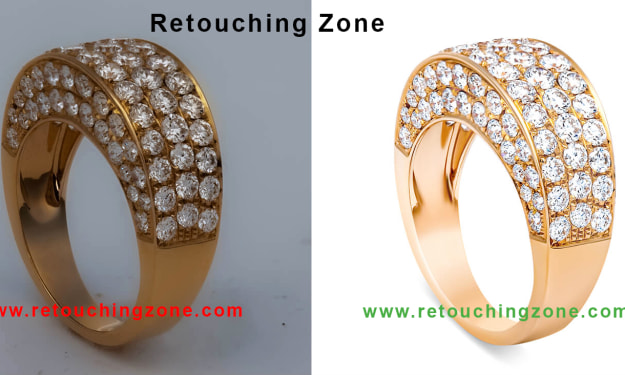
- Background: Use a pure white background for your product images to create a clean and professional look. Avoid using any additional props or distractions that may take the focus away from your product.
- Product representation: Your product photos should accurately represent the item being sold. Avoid using misleading images or including any additional items that are not part of the product listing.
Get the best Amazon Photo Editing Services form professional services provider. By adhering to these guidelines, you can ensure that your product photos meet Amazon's requirements and provide a seamless shopping experience for your customers. Now that we have a solid understanding of the importance of high-quality product photos and Amazon's image guidelines, let's move on to setting up a DIY product photography studio.
Setting Up a DIY Product Photography Studio
Setting up a dedicated space for product photography is essential for achieving consistent and high-quality results. While professional photography studios can be expensive, you can create a DIY setup without breaking the bank. Here's what you need to get started:
1. Choose the right location: Look for a well-lit area in your home or office where you can set up your photography studio. Natural light is ideal, but if that's not available, you can use artificial lighting.
2. Create a backdrop: A plain white backdrop is the most popular choice for product photography as it provides a clean and professional look. You can use a large white sheet, a roll of white paper, or a white photography backdrop.
3. Set up a table or platform: Use a sturdy table or platform to place your products. Ensure it's clean and large enough to accommodate your items comfortably.
4. Gather essential equipment: While you don't need expensive gear, having a few key pieces of equipment can significantly improve the quality of your product photos. These include a camera (a DSLR or a high-quality smartphone camera), a tripod to keep your camera stable, and lighting equipment (if you're not relying solely on natural light).
5. Arrange additional props: Depending on your product and the desired look, you may need to add props to enhance the visual appeal. For example, if you're selling kitchen gadgets, you can include fresh ingredients or cookware in the frame.
By setting up a dedicated space and gathering the essential equipment, you can create a DIY product photography studio that allows you to capture stunning images of your products. Now, let's delve into the technical aspects of product photography, starting with mastering lighting techniques.
Essential Equipment for Product Photography
To capture stunning product photos, it's important to have the right equipment at your disposal. While professional photographers may invest in high-end gear, you can achieve impressive results with a few essential pieces of equipment. Here's what you'll need:
1. Camera: While a DSLR camera is the gold standard for professional product photography, many smartphones offer exceptional camera quality that can produce fantastic results. Choose a camera that allows you to manually adjust settings like exposure, focus, and white balance.
2. Tripod: A tripod is essential for keeping your camera steady during the photoshoot, reducing the risk of blurry images. It also frees up your hands to adjust props and lighting.
3. Lighting equipment: Good lighting is crucial for capturing clear, well-lit product photos. If you're shooting indoors, you can use natural light from a window or invest in affordable studio lighting kits. These kits typically include softboxes, light stands, and bulbs that mimic natural daylight.
4. Reflectors and diffusers: Reflectors help bounce light onto the product, reducing shadows and creating a more even lighting setup. Diffusers are used to soften harsh light sources, producing a more flattering and natural-looking result.
5. Props and backgrounds: Depending on the style and context you want to create, having a collection of props and different backgrounds can add depth and interest to your product photos.
By investing in these essential pieces of equipment, you'll be well-equipped to capture professional-looking product photos that grab the attention of potential buyers. Now that we have our equipment ready, let's dive into lighting techniques that will take your product photos to the next level.br/>
Mastering Lighting Techniques for Product Photos
Lighting is one of the most critical aspects of photography, and product photography is no exception. The right lighting setup can make your products appear more appealing, highlight their features, and create a mood that resonates with your target audience. Here are some lighting techniques to consider:
1. Natural light: If you have access to a well-lit area near a window, natural light can be an excellent option for product photography. Place your product near the window, making sure there are no harsh shadows. You can use reflectors to bounce light onto the shadowed areas and create a more balanced look.
2. Artificial light: If natural light is not available or consistent, artificial lighting can be a reliable alternative. Studio lighting kits, with softboxes or umbrella lights, can help create a controlled and even lighting setup. Experiment with different angles and intensities to find the best lighting for your products.
3. Light tents: Light tents, also known as lightboxes, are portable enclosures lined with a diffusing material that helps create soft and diffused lighting. They are particularly useful for small products and can help eliminate harsh shadows.
4. Light painting: For products with intricate details or textures, light painting can be a creative technique to highlight specific areas. This technique involves using a small, handheld light source to selectively illuminate parts of the product while keeping the rest in shadow.
5. Backlighting: Backlighting is a technique where the main light source is positioned behind the product, creating a halo effect around the edges. This technique can add depth and a sense of drama to your product photos.
Experimenting with different lighting techniques and finding what works best for your products is key to capturing stunning product photos. Once you have your lighting setup perfected, it's time to consider styling and props to enhance the visual appeal of your photos.
Styling and Props for Product Photography
Styling and props can take your product photos to a whole new level by creating a context that resonates with your target audience. Depending on your product and brand, you can choose to create a minimalistic look, a lifestyle setting, or a visually stunning composition. Here are some tips for effective styling and prop selection:
1. Keep it simple: In product photography, less is often more. Avoid cluttering the frame with too many props or distractions that may take the focus away from your product.
2. Tell a story: Consider the lifestyle and emotions associated with your product. Create a setting that tells a story and connects with your target audience on an emotional level. For example, if you're selling outdoor gear, you can showcase your product in a natural setting, surrounded by trees and mountains.
3. Use relevant props: Props can help create context and add interest to your product photos. Choose props that are relevant to your product and enhance its features. For example, if you're selling skincare products, you can include fresh flowers or beauty tools in the frame.
4. Consider color and texture: Choose props that complement your product and add visual interest. Consider the colors and textures that will work well together to create a cohesive and visually appealing composition.
5. Pay attention to composition: The way you arrange your product and props within the frame can significantly impact the overall visual appeal. Experiment with different compositions, angles, and perspectives to find the most captivating arrangement.
By carefully selecting props and styling your product photos, you can create visuals that not only showcase your product but also tell a story and resonate with your target audience. Now that we have covered the technical aspects of product photography, let's move on to composition and framing tips to capture captivating product photos.
Composition and Framing Tips for Captivating Product Photos
Composition and framing play a vital role in creating captivating product photos that grab the attention of potential buyers. By following these tips, you can create visually appealing images that highlight your product's features and make a lasting impression:
1. Rule of thirds: The rule of thirds is a fundamental principle in photography. Imagine dividing your frame into nine equal sections with two vertical and two horizontal lines. Place your subject along these lines or at the points where they intersect to create a visually pleasing composition.
2. Leading lines: Leading lines are lines within the frame that guide the viewer's eye towards the subject. Use props or elements in your composition to create leading lines that draw attention to your product.
3. Symmetry and balance: Symmetry and balance can create a sense of harmony and visual appeal. Experiment with symmetrical compositions or use props to create a balanced look.
4. Negative space: Negative space refers to the empty areas in your frame. Leaving some negative space around your product can create a sense of simplicity and elegance, allowing your product to stand out.
5. Depth and perspective: Play with different angles and perspectives to add depth and visual interest to your product photos. Experiment with shooting from above, below, or at eye level to find the most captivating perspective.
By applying these composition and framing techniques, you can create visually stunning product photos that capture the attention and imagination of potential buyers. Now that we have captured the perfect shot, let's move on to the editing and retouching process to give our product photos a polished and professional look.
Editing and Retouching Product Photos for a Polished Look
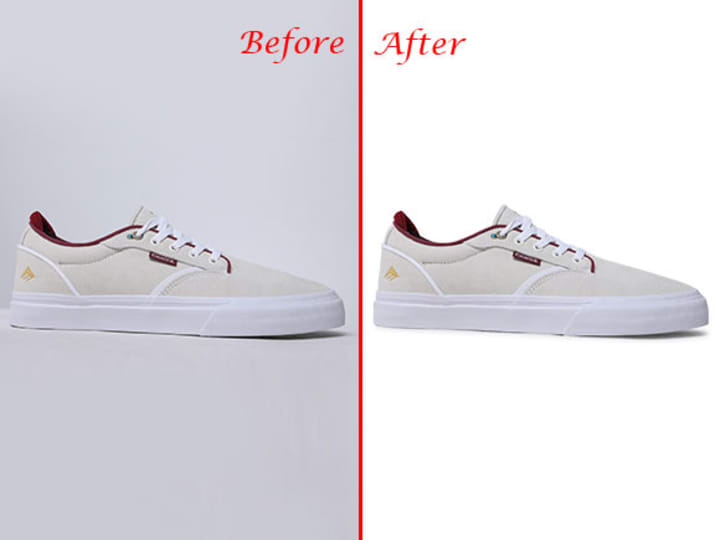
E-commerce Image Editing and Retouching are crucial steps in the product photography process that help enhance your images and give them a polished and professional look. Here are some key editing and retouching techniques to consider:
1. Adjust exposure and white balance: Correct any issues with exposure and white balance to ensure that your product colors appear accurate and true to life.
2. Crop and straighten: Use cropping and straightening tools to remove any distractions or unwanted elements from the frame. Ensure that your product is the main focus of the image.
3. Enhance sharpness and clarity: Apply sharpening and clarity adjustments to enhance the details and textures of your product. Be careful not to overdo it, as excessive sharpening can create an unnatural look.
4. Photo Retouching: Use the spot healing or clone stamp tool to remove any dust, scratches, or blemishes from your product. Ensure that your product looks flawless and ready for sale.
5. Resize and optimize for web: Resize your images to the appropriate dimensions for Amazon listings and optimize them for web use. Compress the file size without compromising image quality to ensure fast loading times.
Editing and retouching your product photos can make a significant difference in their overall appearance and quality. By following these techniques, you can transform your raw images into visually stunning visuals that will make your products shine on Amazon. Now that we have our polished product photos ready, it's time to optimize them for maximum visibility on the Amazon marketplace.
Optimizing Product Photos for Amazon's Search Algorithm
Creating visually stunning product photos is one thing, but optimizing them for maximum visibility on Amazon is another. To increase your chances of ranking higher in search results and attracting more customers, it's important to optimize your product photos using relevant keywords and best practices. Here's how you can optimize your product photos for Amazon's search algorithm:
1. Use descriptive filenames: Rename your image files with relevant keywords that describe your product. For example, if you're selling a blue ceramic mug, use a filename like "blue-ceramic-mug.jpg" instead of a generic filename like "IMG_1234.jpg."
2. Include alt text: Alt text is a brief description of your image that helps search engines understand its content. Write descriptive alt text that includes relevant keywords and accurately represents your product.
About the Creator
Keep reading
More stories from Alex M and writers in Photography and other communities.
Jewelry Photography Editing Services: How to Get Your Jewelry Looking Its Best
Jewelry is a popular product category in the e-commerce sector. However, it can be difficult to sell jewelry online because it is a tactile product that people want to see and touch before they buy it. This is where jewelry photo retouching comes in.
By Alex M11 months ago in Photography
Capturing Magic
In the world of photography, timing is the key to everything. While skilled compositions and technical proficiency are undoubtedly crucial, the perfect lighting can create the perfect photo. Nowadays, we can determine any light ourselves and are no longer dependent on any natural light source, thanks to the developed technology. We can turn every day into a night by using the right filters. And we can illuminate every night to be seen as a day. A typical process, especially in the film industry.
By Krishan Mubashar15 days ago in Photography
Exploring the Best AI-Based Video Creation Tools
Artificial Intelligence (AI) has revolutionized many industries, and video creation is no exception. With the advancements in AI technology, creating high-quality videos has become more accessible and efficient. In this blog post, we will explore the best AI-based video creation tools available in the market today and how they can benefit content creators.
By Arnar Dadi4 days ago in Photography
We'z Walking on a Path Ruled By Numbers
This road has felt endless, yet limited; every step tracked. Inching away along this path, I feel trapped. Confined. Left to this narrow passage that may one day amount to something greater. Time is not a concept. Only distance. From start to finish, I laugh and cry and attempt to convince myself that this is worth it. I cannot stray. I must keep going. Every step etched, is a step taken, is measured as more than before. I cannot even recall how I got here. Maybe I don’t even really exist. Just another tick marking off a perceived presence. Of what though? I am just another line drawn. Nothing more, nothing less.
By Oneg In The Arctica day ago in Fiction


Comments
There are no comments for this story
Be the first to respond and start the conversation.